Models
About Models
In Models, you can find all language models deployed in DIAL and also add new model deployments.
DIAL allows you to access models from all major LLM providers, language models from the open-source community, alternative vendors, and fine-tuned micro models, as well as self-hosted models or models listed on HuggingFace or DeepSeek.
DIAL can function as an agentic platform, where language models can be used as building blocks in your apps to create multi-modal and multi-agentic solutions.
You can use the DIAL SDK to create custom model adapters. Applications and model adapters implemented using this framework will be compatible with the DIAL API that was designed based on the Azure OpenAI API.
Refer to the Supported Models page for a list of all supported models and model adapters.
Models List
On the Models page, you can find all language models (LLMs) deployed on your DIAL instance. Here you can view, filter, and add new model definitions.
TIP: Click Columns to open the columns selector to define what columns to display.
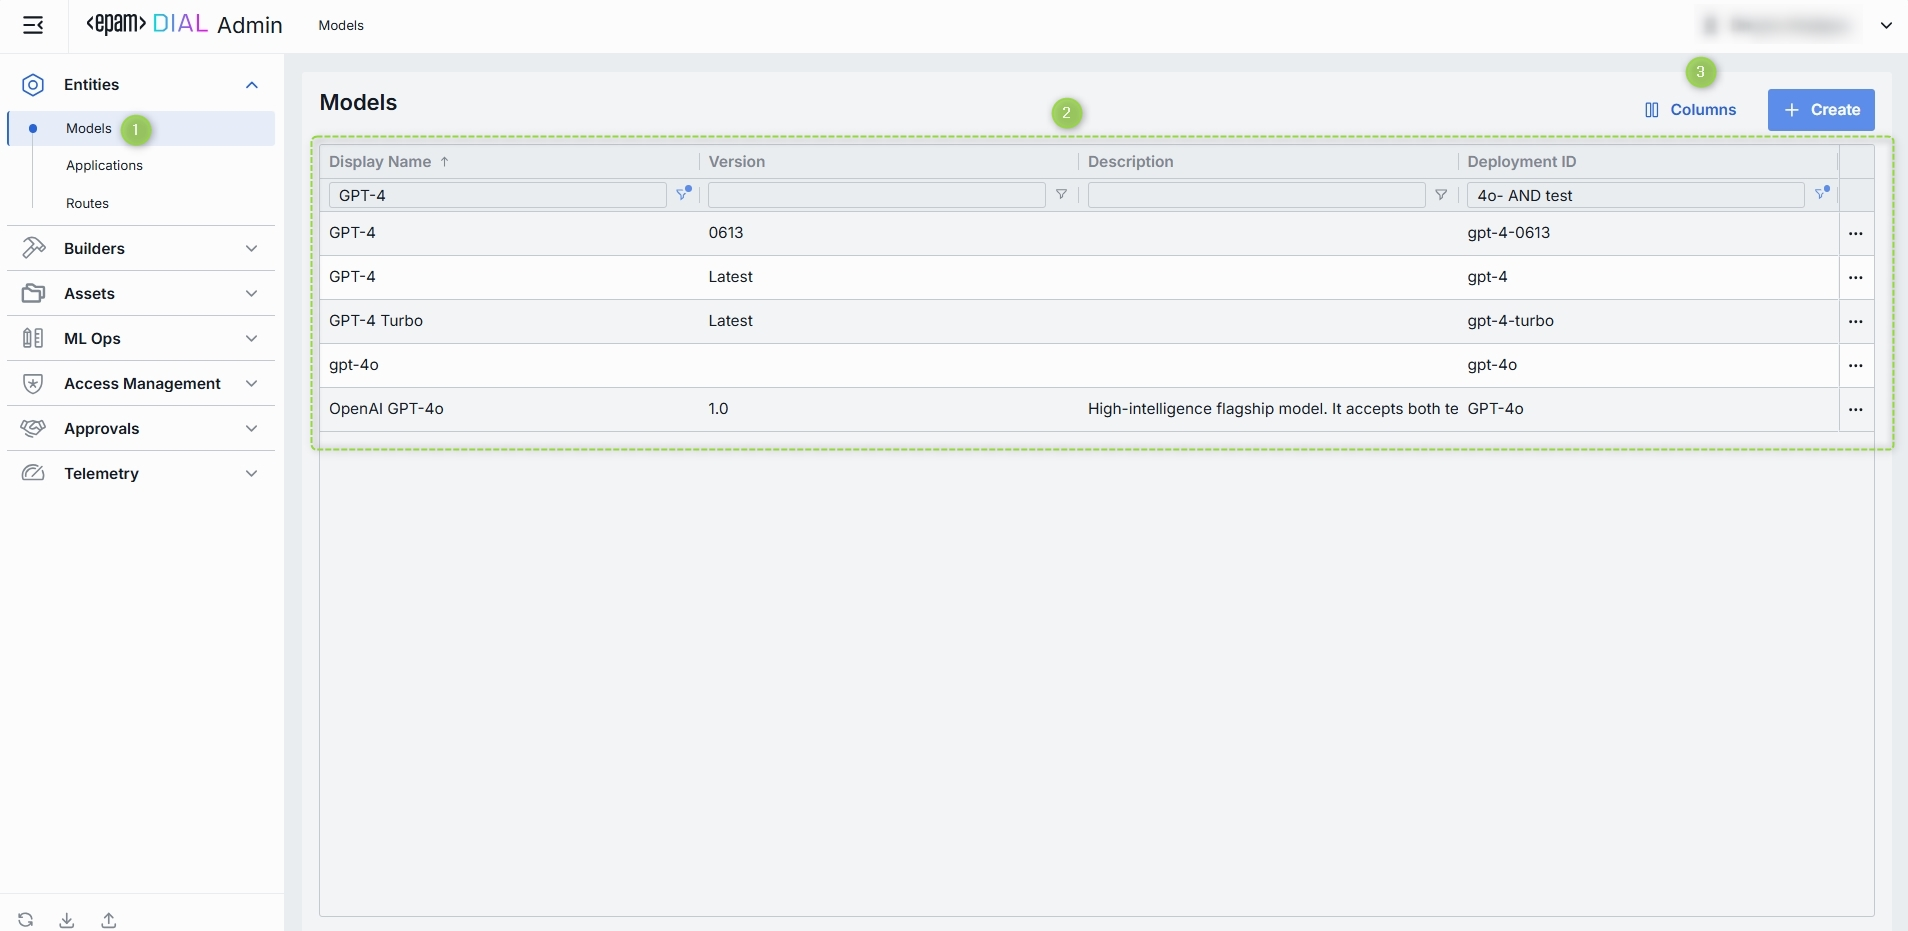
Models grid
| Field | Definition |
|---|---|
| Display Name | A user-friendly label for a model (e.g. "GPT-4 Turbo"). Display name is shown in all DIAL client UI dropdowns, tables, and logs so operators can quickly identify the model. |
| Version | An optional tag or a label for this model deployment (e.g. 0613, v1). Use it to distinguish between "latest," "beta," or date-stamped builds. |
| Description | Free-text notes about this model’s purpose, training data, cost tier, or any other relevant details. |
| Deployment ID | This is a unique key under the models section of DIAL Core’s config. Must match the upstream service’s model or deployment name (e.g. gpt-4-0613). |
| Adapter | The identifier of the connector that handles requests for a model (OpenAI or DIAL). The adapter provides authentication, request formatting, and response parsing for the underlying LLM API. Refer to LLM Adapters to learn more. |
| Type | Defines Chat (conversational completions) and Embedding models (vector generation). DIAL Core uses this to choose the correct API endpoint and a payload schema. |
| Override Name | An optional, context-specific display label that supersedes Display Name in dropdowns or tables for certain routes or applications. Use it to give a model different aliases in different workflows without redefining the model. |
| Topics | Tags or categories (e.g. "finance," "support," "image-capable") you can assign for discovery, filtering, or grouping in large deployments. Helps end users and admins find the right model by the use case. Topics are also used to filter models in DIAL Marketplace. |
| Attachment types | Controls which types of attachments this model can accept. |
| Max attachment number | Maximum number of attachments allowed per single request. Leave blank for an unlimited number. Prevents requests with an excessive number of files. |
| Tokenizer model | Identifies the specific model with a tokenization algorithm identical to the referenced model's. This is typically the name of the earliest released model in a series of models sharing an identical tokenization algorithm. This parameter is essential for DIAL clients that reimplement tokenization algorithms on their side, instead of utilizing the tokenize Endpoint provided by the model. |
| Forward auth token | Optionally, configure the system to forward the Auth Token from the caller's session to the upstream API call. This enables multi-tenant scenarios or pass-through authentication for downstream services. |
| Interaction limit | The interaction limit parameter in models refers to the maximum number of tokens that can be transmitted in a completion request and response combined. This parameter ensures that the model does not exceed a specified token limit during interactions. |
| Prompt price | Cost per unit (according to Cost unit, typically "token" or "request") applied to the input portion of each call. Used by the Dashboard and Usage Logs to estimate spending in real time. |
| Completion price | The cost per unit is charged for the output portion of each call. Combined with the prompt price, it determines your per-model cost calculations. |
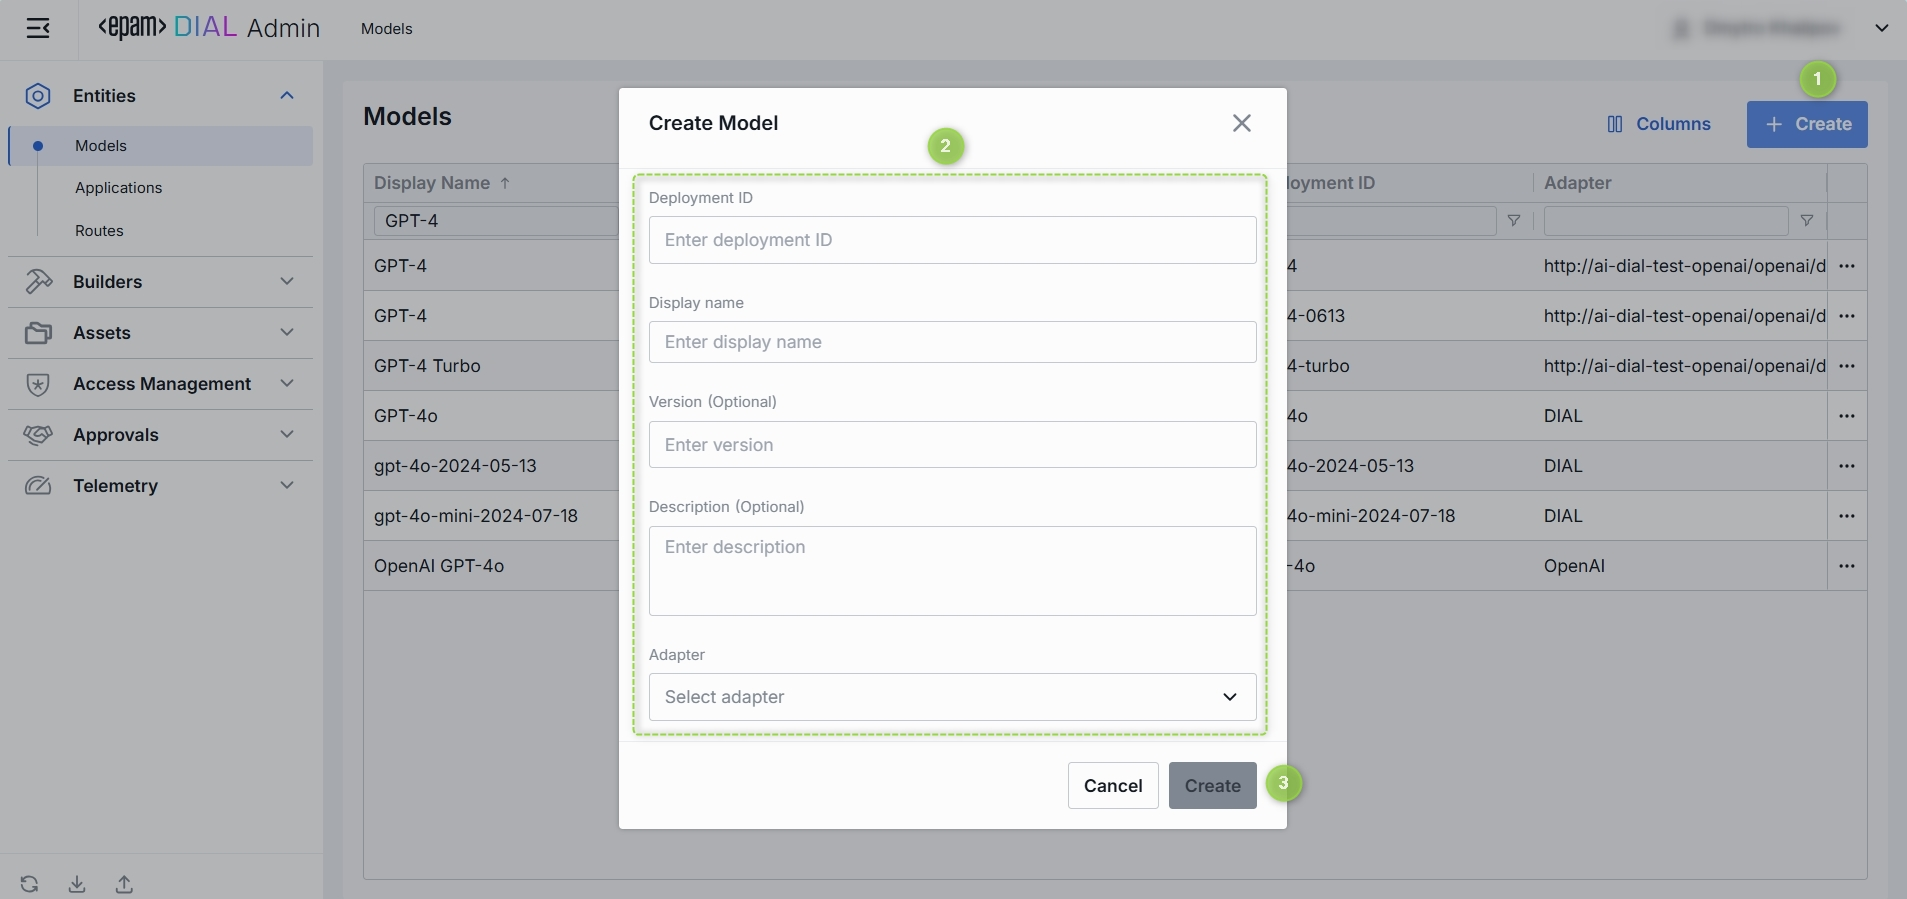
Create Model
-
Click + Create to invoke a Create Model modal.
-
Define parameters:
Field Required Definition & Guidance Deployment ID Yes A unique identifier used by the model adapter to invoke the model's backend. Display Name Yes A user-friendly label shown across the UI (e.g. "GPT-4 Turbo"). Version No Version is an optional tag to track releases when you register multiple variants of the same model. (e.g. 2024-07-18,v1)Description No Free-text note about the model’s purpose or distinguishing traits. Adapter Yes A model adapter that will handle requests to this model (e.g. OpenAI, DIAL). The chosen adapter supplies authentication, endpoint URL, and request formatting. -
Click Create to close the dialog and open the configuration screen. When done with model configuration, click Save. It may take some time for the changes to take effect after saving. Once added, the model appears in the Models listing and can be used by Routes and Applications.
Model Configuration
You can access the model configuration screen by clicking any model in the models grid and also when adding a new model. In this section, you can view and configure all settings for the selected language model deployment.
- Properties: Main definitions and runtime settings.
- Features: Optional capabilities and custom endpoints.
- Roles: User groups that can invoke this model and their rate limits.
- Interceptors: Custom logic to modify requests or responses.
- Dashboard: Real-time metrics and usage statistics.
Top Bar Controls
- Delete: Permanently removes the selected model's definition from DIAL Core. All Routes referencing it will throw an error until a replacement is created.
- JSON Editor (Toggle): Switch between the form-based UI and raw JSON view of the model’s configuration. Use JSON mode for copy-paste or advanced edits.
Properties
In the Properties tab, you can view and edit main definitions and runtime settings for model deployment.
- Basic identification: Deployment ID, Display Name, Version, Description.
- Adapter & Endpoint: Select the Adapter, API Type (Chat or Embedding), and read-only Endpoint URL.
- Presentation & Attachments: Override name, icon, topics, and attachment types.
- Upstream Configuration: Define upstream endpoints, authentication keys, weights, and extra data.
- Advanced Options: Tokenizer model, forward auth token, interaction limits, retry attempts.
- Cost Configuration: Set cost unit, prompt price, and completion price for real-time billing.
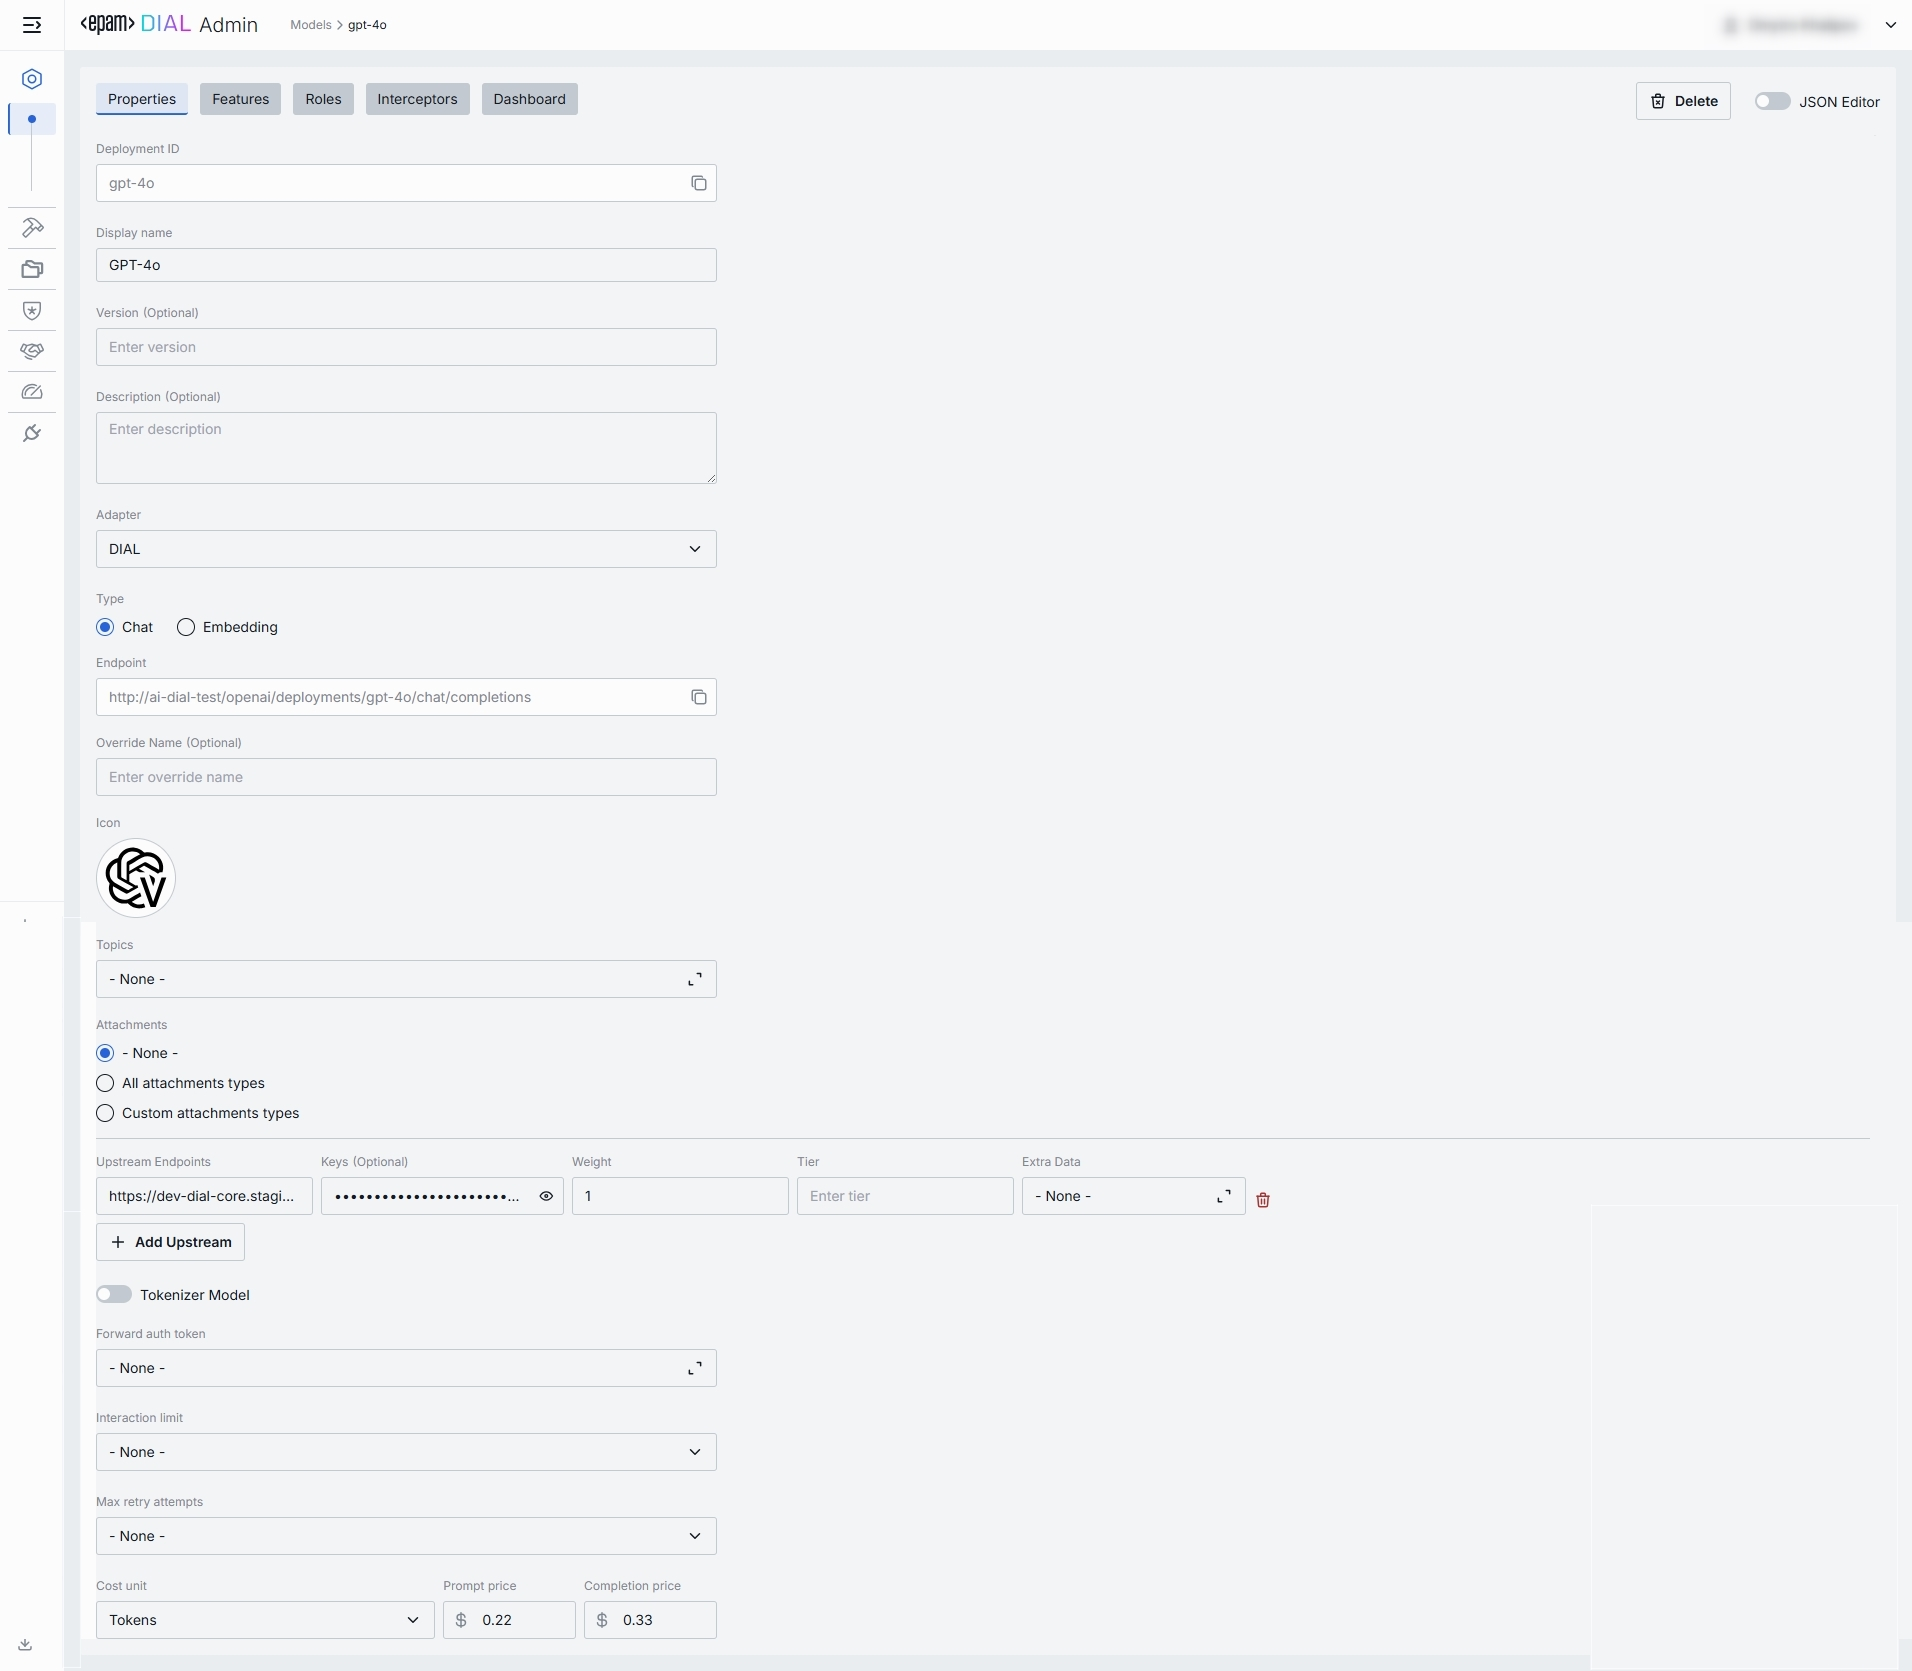
Basic Identification
| Field | Required | Description |
|---|---|---|
| Deployment ID | Yes | A unique key DIAL Core uses in the models section. Must match the upstream’s deployment or model name (e.g. gpt-4o, gpt-4-turbo). Routes refer to this ID when selecting a model. |
| Display Name | Yes | User-friendly label shown in tables and dropdowns in DIAL clients (e.g. "GPT-4o"). Helps users identify and select models on UI. |
| Version | No | An optional version tag for tracking releases (e.g. 0613, v1). Useful for A/B testing or canary rollouts. |
| Description | No | Free-text note describing the model’s purpose, fine-tune details, or its cost tier. |
Adapter & Endpoint
| Field | Required | Description |
|---|---|---|
| Adapter | Yes | An option to select a model adapter (connector)to handle requests to this model deployment (e.g. OpenAI, DIAL). Adapter defines how to authenticate, format payloads, and parse responses. |
| Type | Yes | A choice between Chat or Embedding API. Chat - for conversational chat completions. Embedding - for vector generation (semantic search, clustering). |
| Endpoint | Yes | Read-only URL that DIAL Core will invoke for this model/type. Auto-populated based on the model adapter and deploymentId when the model was created. |
Presentation & Attachments
| Field | Required | Description |
|---|---|---|
| Override Name | No | Custom display name for specific contexts. |
| Icon | No | A logo to visually distinguish models in the UI. |
| Topics | No | A tag that associates a model with one or more topics or categories (e.g. "finance", "support"). |
| Attachments | No | An option to select the attachment types (images, files) this model can have. None – no attachments allowed. All – unrestricted types. Optionally specify max number of attachments. Custom – specific MIME types. Optionally specify max number of attachments. |
Upstream Configuration
| Field | Required | Description |
|---|---|---|
| Upstream Endpoints | Yes | One or more backend URLs to send requests to. Enables round-robin load balancing or fallback among multiple hosts. Refer to Load Balancer to learn more. |
| Keys | No | API key, token, or credential passed to the upstream. Stored securely and masked—click the eye icon to reveal. |
| Weight | Yes | Numeric weight for this endpoint in a multi-upstream scenario. Higher = more traffic share. |
| Tier | No | Specifies an endpoint group. In a regular scenario, all requests are routed to endpoints with the lowest tier, but in case of an outage or hitting the limits, the next one in the line helps to handle the load. |
| Extra Data | No | Free-form JSON or string metadata passed to the model adapter with each request. |
| + Add Upstream | — | An option form registering additional endpoints if you need fail-over or capacity scaling. |
Advanced Options
| Field | Required | Description |
|---|---|---|
| Tokenizer Model | No | Identifies the specific model whose tokenization algorithm exactly matches that of the referenced model. This is typically the name of the earliest released model in a series of models sharing an identical tokenization algorithm. This parameter is essential for DIAL clients that reimplement tokenization algorithms on their side, instead of utilizing the tokenize endpoint provided by the model. |
| Forward auth token | No | Select a downstream auth token to forward from the user’s session (for downstream multi-tenant). |
| Interaction limit | No | This parameter ensures that the model does not exceed a specified token limit during interactions. Available values: None - DIAL does not apply any additional interaction limits beyond limits that your model enforces natively. Ideal for early prototyping or when you trust the LLM’s built-in safeguards. Total Number of Tokens - enforces a single, cumulative cap on the sum of all prompt + completion tokens across the entire chat. Separately Prompts and Completions - two independent limits: one on the sum of all input (prompt) tokens and another on the sum of all output (completion) tokens over the course of a conversation. |
| Max retry attempts | No | The number of times DIAL Core will retry a connection in case of upstream errors (e.g. on timeouts or 5xx responses). |
Cost Configuration
Enables real-time cost estimation and quota enforcement. Powers the telemetry dashboard with per-model spending metrics.
| Field | Required | Description |
|---|---|---|
| Cost unit | Yes | Base unit for billing. Available values: None - disables all cost tracking for this model. Tokens - every token sent or received by the model is counted towards your cost metrics. Char without whitespace - tells DIAL to count only non-whitespace characters (letters, numbers, punctuation) in each request as the billing unit. |
| Prompt price | Yes | Cost per unit for prompt tokens. |
| Completion price | Yes | Cost per unit for completion tokens (chat responses). |
Features
In the Features tab, you can enable, disable, or override optional capabilities for a specific model. You can use model's features to tailor DIAL Core’s Unified Protocol behavior—turning features on when your model supports them, or off when it doesn’t.
TIPs: Enable only the features you need. Extra toggles can cause errors if upstream doesn’t support them. After setting a custom endpoint, test it via a simple API call to confirm accessibility and authentication.
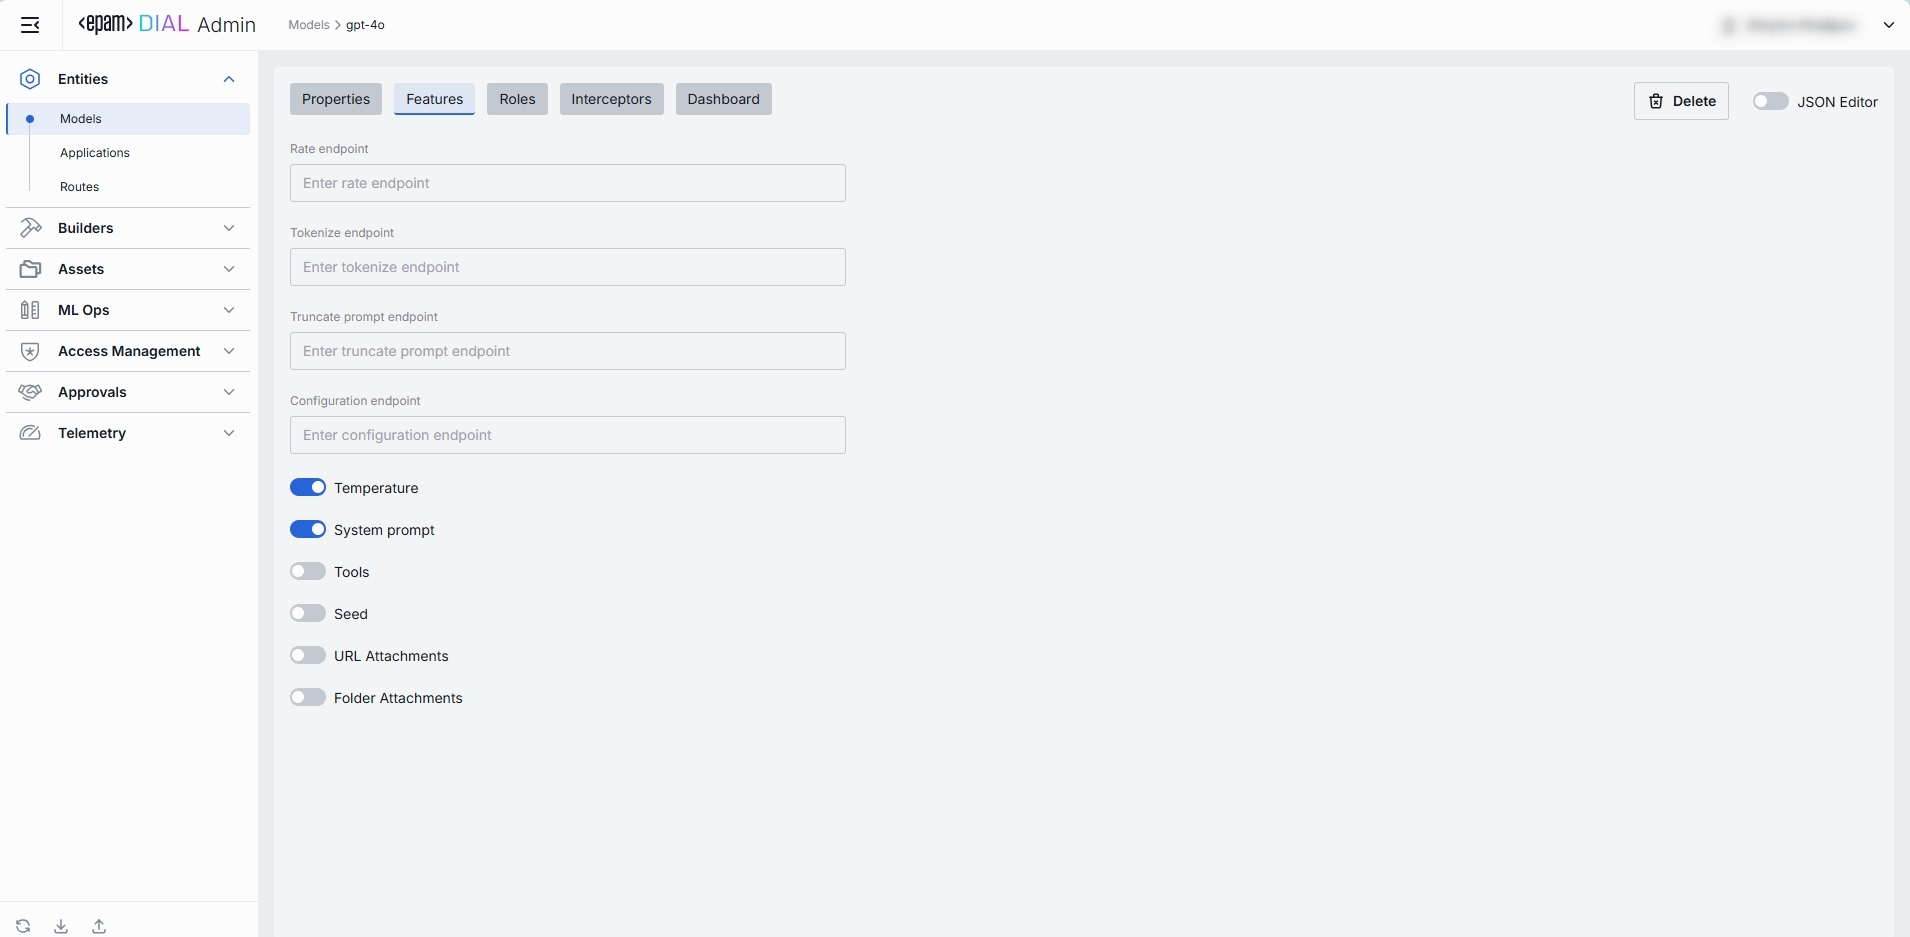
Custom Feature Endpoints
Some models adapters expose specialized HTTP endpoints for tokenization, rate estimation, prompt truncation, or live configuration. You can override the default Unified Protocol calls by specifying them in this section.
| Field | Description & When to Use |
|---|---|
| Rate endpoint | URL to invoke the model’s cost‐estimation or billing API. Call an endpoint that returns token counts & credit usage. Override if your adapter supports a dedicated "rate" path. |
| Tokenize endpoint | URL to invoke a standalone tokenization service. Use when you need precise token counts before truncation or batching. Models without built-in tokenization require this. |
| Truncate prompt endpoint | URL to invoke a prompt‐truncation API. Ensures prompts are safely cut to max context length. Useful when working with very long user inputs. |
| Configuration endpoint | URL to fetch model‐specific settings (e.g. max tokens, allowed parameters). Provide only for "configurable" deployments. |
Feature Flags (Toggles)
Each toggle corresponds to a capability in the Unified Protocol. Enable them only if your model and adapter fully support that feature.
| Toggle | What It Does |
|---|---|
| Temperature | Enables the temperature parameter in API calls. Controls randomness vs. determinism. |
| System prompt | Allows injecting a system‐level message (the "agent’s instructions") at the start of every chat. Disable for models that ignore or block system prompts. |
| Tools | Enables the tools (a.k.a. functions) feature for safe external API calls. Enable if you plan to use DIAL Add-ons or function calling. |
| Seed | Enables the seed parameter for deterministic output. Use in testing or reproducible workflows. |
| URL Attachments | Allows passing URLs as attachments (images, docs) to the model. Can be required for image-based or file-referencing prompts. |
| Folder Attachments | Enables attaching folders (batching multiple files). |
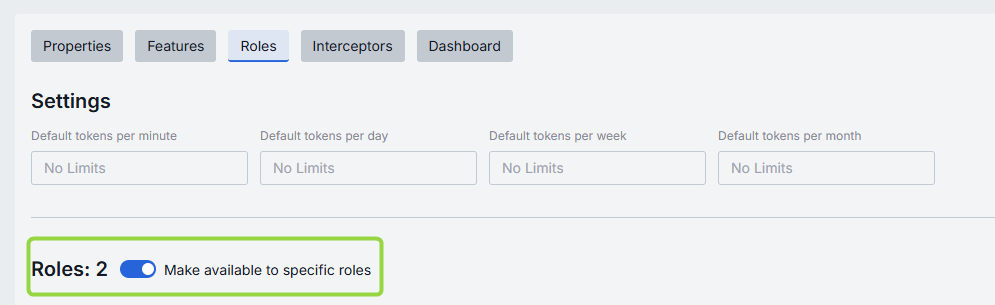
Roles
You can create and manage roles in the Access Management section.
In the Roles tab, you can define user groups that are authorized to use a specific model and enforce per-role rate limits. This is essential for multi-tenant governance, quota enforcement, and cost control across teams or customers, preventing runaway costs by enforcing a hard ceiling.
Important: if roles are not specified for a specific model, the model will be available to all users.
Refer to Access & Cost Control to learn more about roles and rate limits in DIAL.
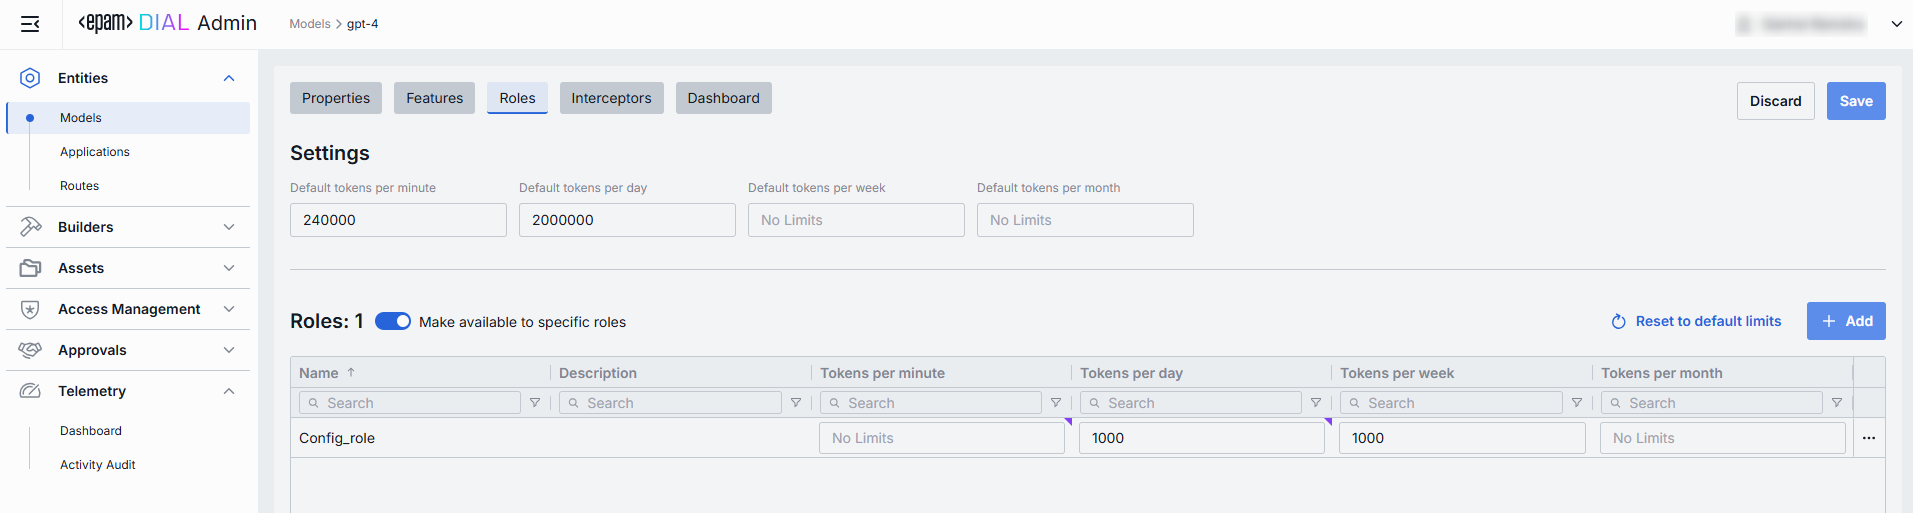
Roles grid
| Column | Description & Guidance |
|---|---|
| Name | A unique role's identifier. |
| Description | A user-friendly explanation of the role’s purpose (e.g., "DIAL Prompt Engineering Team"). |
| Tokens per minute | Per Minute tokens limit for a specific role. Blank = no limits. Inherits the default value. Can be overridden. |
| Tokens per day | Daily tokens limit for a specific role. Blank = no limits. Inherits the default value. Can be overridden. |
| Tokens per week | Weekly tokens limit for a specific role. Blank = no limits. Inherits the default value. Can be overridden. |
| Tokens per month | Monthly tokens limit for a specific role. Blank = no limits. Inherits the default value. Can be overridden. |
| Actions | Additional role-specific actions. When Make available to specific roles toggle is off - opens the Roles section in a new tab. When Make available to specific roles toggle is on, you can open the Roles section in a new tab, set no limits or remove the role from the list. |
Set Rate Limits
The grid on the Roles screen lists the roles that can access a specific model. Here, you can also set individual limits for selected roles. For example, you can give "Admin" role unlimited monthly tokens but throttle "Developer" to 100,000 tokens/day or allow the "External Partner" role a small trial quota (e.g., 10,000 tokens/month) before upgrade.
To set or change rate limits for a role:
- Click in the desired cell (e.g., Tokens per day for the "ADMIN").
- Enter a numeric limit or leave blank to enable an unlimited access. Click Reset to default limits to restore default settings for all roles.
- Click Save to apply changes.
Default Rate Limits
Default limits are set for all roles in the Roles grid by default; however you can override them as needed.
| Field | Description |
|---|---|
| Default tokens per minute | The maximum tokens any user can consume per minute unless a specific limit is in place. |
| Default tokens per day | The maximum tokens any user can consume per day unless a specific limit is in place. |
| Default tokens per week | The maximum tokens any user can consume per week unless a specific limit is in place. |
| Default tokens per month | The maximum tokens any user may consume per month unless a specific limit is in place. |
Role-Specific Access
Use Make available to specific roles toggle to define access to the model:
- Off: Model is callable by any authenticated user. All existing user roles are in the grid.
- On: Model is restricted - only the roles you explicitly add to the grid can invoke it.
Add
You can add a role only if Make available to specific roles toggle is On.
- Click + Add (top-right of the Roles Grid).
- Select one or more roles in the modal. The list or roles is defined in the Access Management section.
- Confirm to add role(s) to the table.
Remove
You can remove a role only if Make available to specific roles toggle is On.
- Click the actions menu in the role's line.
- Choose Remove in the menu.

Interceptors
DIAL uses Interceptors to add custom logic to in/out requests for models and apps, enabling PII obfuscation, guardrails, safety checks, and beyond.
You can define Interceptors in the Builders → Interceptors section to add them to the processing pipeline of DIAL Core.
Refer to Interceptors to learn more.
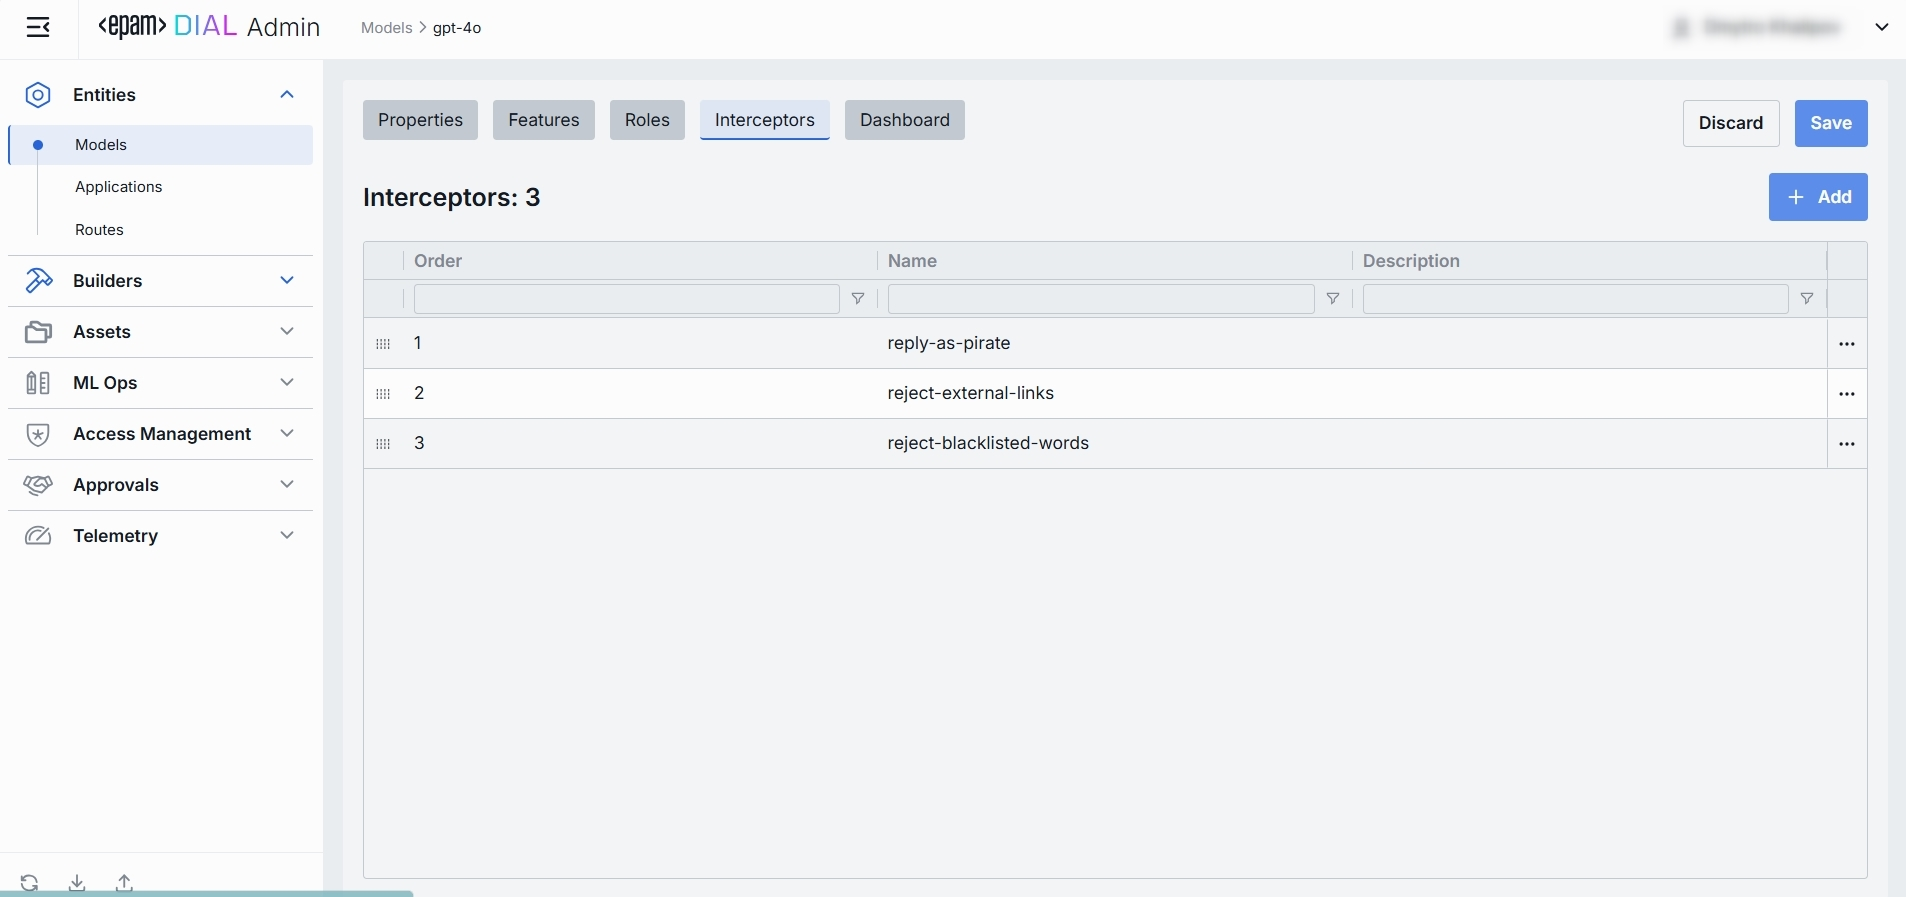
Interceptors Grid
| Column | Description |
|---|---|
| Order | Execution sequence. Interceptors run in ascending order (1 → 2 → 3...). A request will flow through each interceptor’s in this order.Response interceptors are invoked in the reversed order. |
| Name | The interceptor’s alias, matching the Name field in its definition. |
| Description | Free-text summary from the interceptor’s definition, explaining its purpose. |
| Actions | Additional role-specific actions. Open interceptor in a new tab. Remove the selected interceptor from the model's configuration. |
Add
- Click + Add (in the upper-right of the interceptors grid).
- In the Add Interceptors modal, choose one or more from the grid of defined interceptors.
- Apply to append them to the bottom of the list (are added in the same order as selected in the modal).
TIP: If you need a new interceptor, first create it under Builders → Interceptors and then revisit this tab to attach it to the model's configuration.
Reorder
- Drag & Drop the handle (⋮⋮⋮⋮) to reassign the order in which interceptors are triggered.
- Release to reposition; order renumbers automatically.
- Save to lock-in the new execution sequence.
Remove
- Click the actions menu in the interceptor's row.
- Choose Remove to detach it from this model.
- Save to lock-in the interceptors list.
Dashboard
TIP: You can monitor the entire system's metrics in Telemetry.
In the Dashboard tab, you can monitor real-time and historical metrics for the model. You can use it to monitor usage patterns, enforce SLAs, optimize costs, and troubleshoot anomalies.
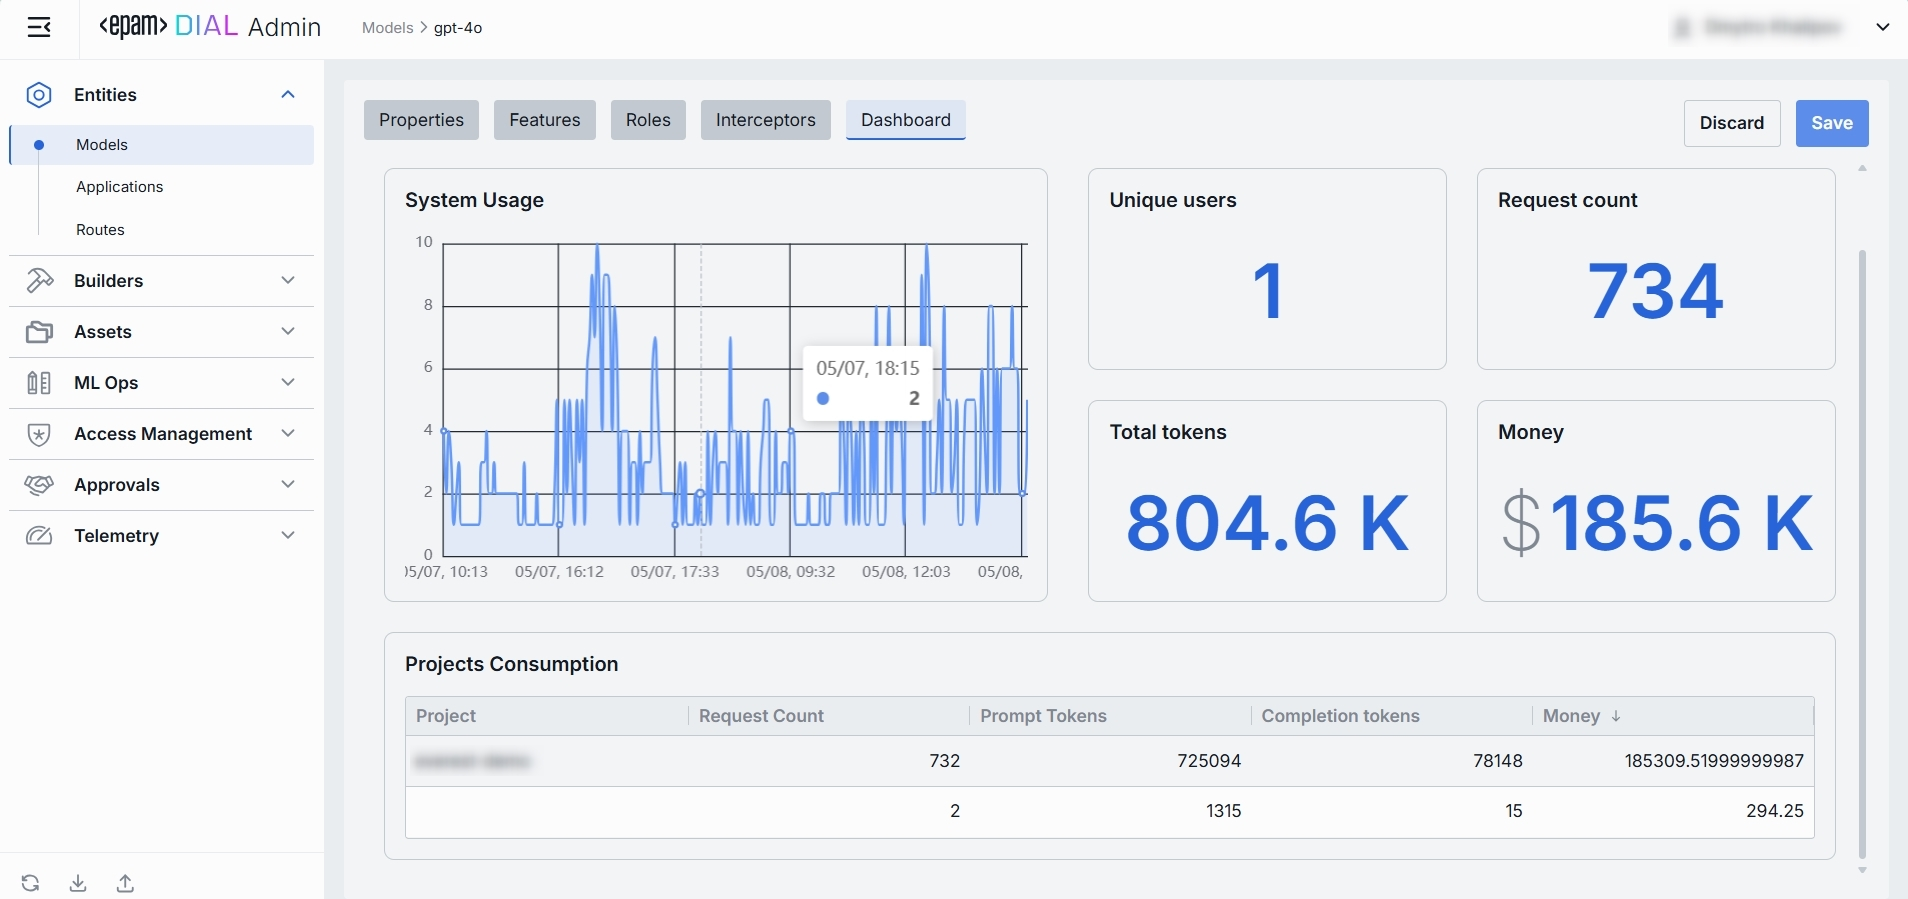
Top Bar Controls
| Control | What It Does |
|---|---|
| Time Period | An option allowing to select the date range for all charts and tables (e.g. last 15 min, 2 days, 7 days, 30 days). |
| + Add filter | A filter with options to drill into a specific project. |
| Auto refresh | Set the dashboard to poll for new data (e.g. every 1 min) or turn off auto-refresh. |
System Usage Chart
A time-series line chart of requests throughput over time. You can use it to monitor traffic peaks and valleys, correlate spikes with deployments or feature roll outs.
Key Metrics
Four high-level metrics are displayed alongside the chart. All calculated for the selected time period.
You can use them to:
- Chargeback to internal teams or external customers by "Money".
- Track adoption via "Unique Users".
- Monitor burst traffic with "Request Count".
- Watch token consumption to anticipate quota exhaustion.
| Metric | Definition |
|---|---|
| Unique Users | Count of distinct user IDs or API keys that have called this model. |
| Request Count | Total number of chat or embedding calls routed to this model. |
| Total Tokens | Sum of prompt + completion tokens consumed by this model. |
| Money | Estimated spending on this model. |
Projects Consumption Table
This table shows the KPIs breakdown by Project. You can use it to compare consumption across multiple projects.
| Column | Description |
|---|---|
| Project | The project utilizing this model. |
| Request Count | Number of calls directed to the model. |
| Prompt tokens | Total tokens submitted in the prompt portion of requests. |
| Completion tokens | Total tokens returned by the model as responses. |
| Money | Estimated costs. |
JSON Editor
For advanced scenarios of bulk updates, copy/paste between environments, or tweaking settings not exposed in the form UI—you can switch to the JSON Editor in any model’s configuration page.
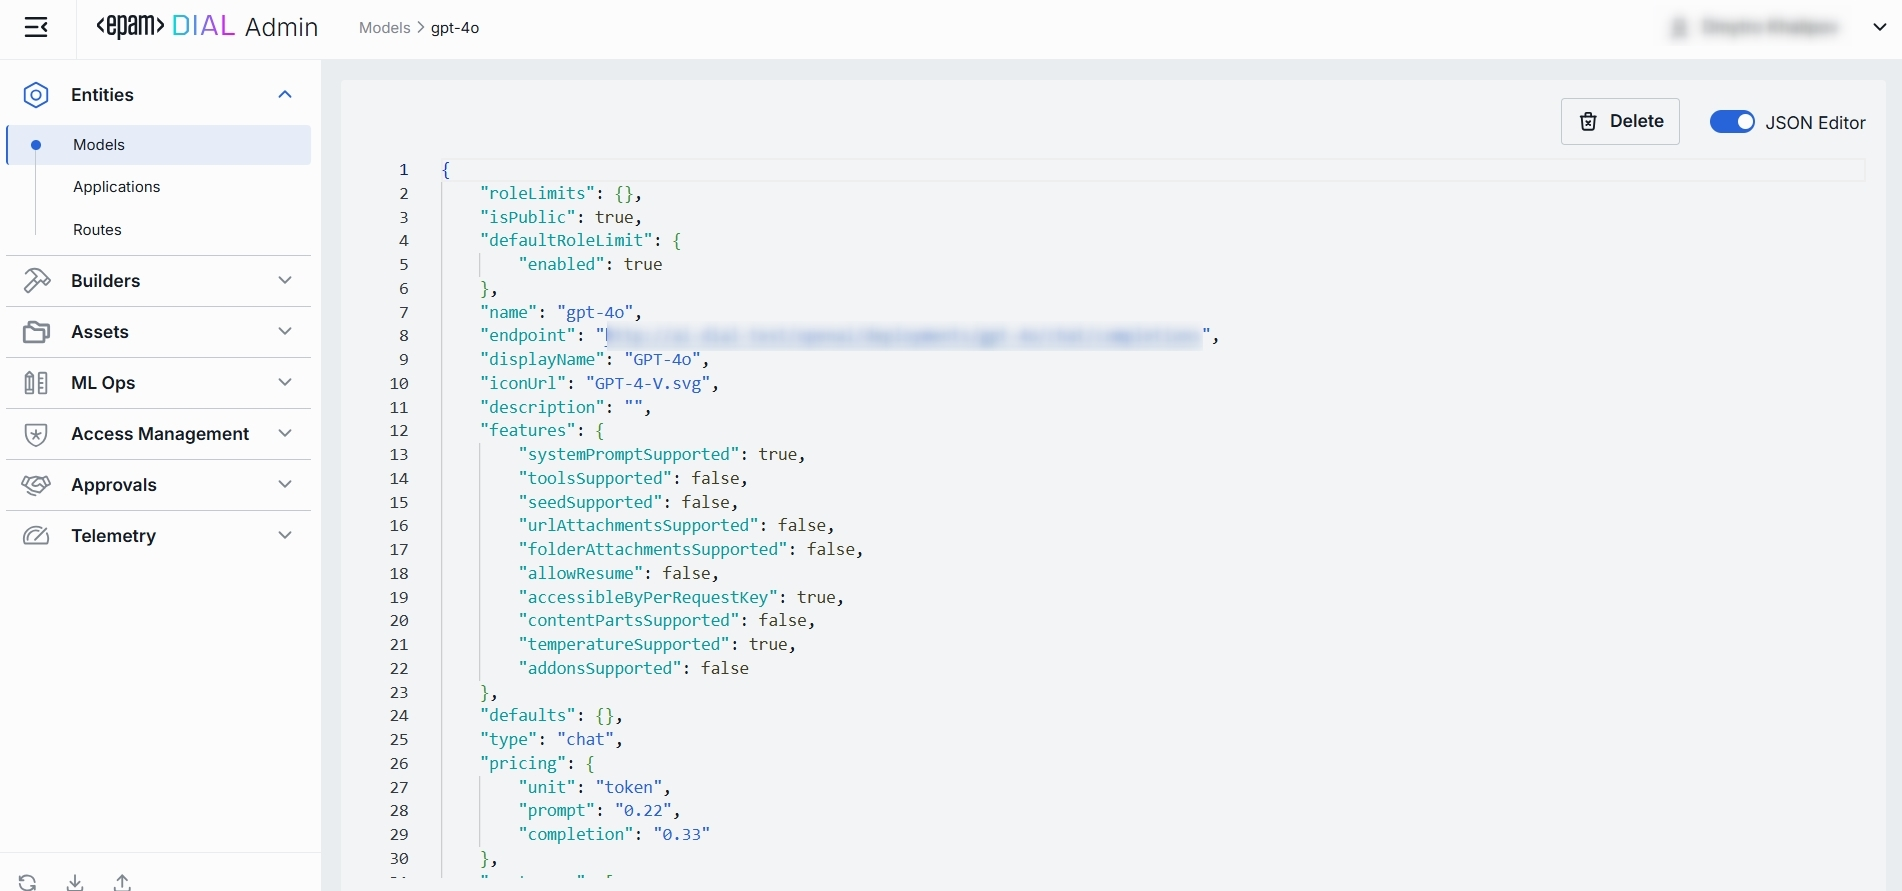
Switching to the JSON Editor
- Navigate to Entities → Models, then select the model you want to edit.
- Click the JSON Editor toggle (top-right). The UI reveals the raw JSON.
TIP: You can switch between UI and JSON only if there are no unsaved changes.