Applications
About Applications
Refer to DIAL-Native Applications to learn about applications in DIAL.
Applications List
In Applications, you can see, create and manage applications deployed in your instance of DIAL.
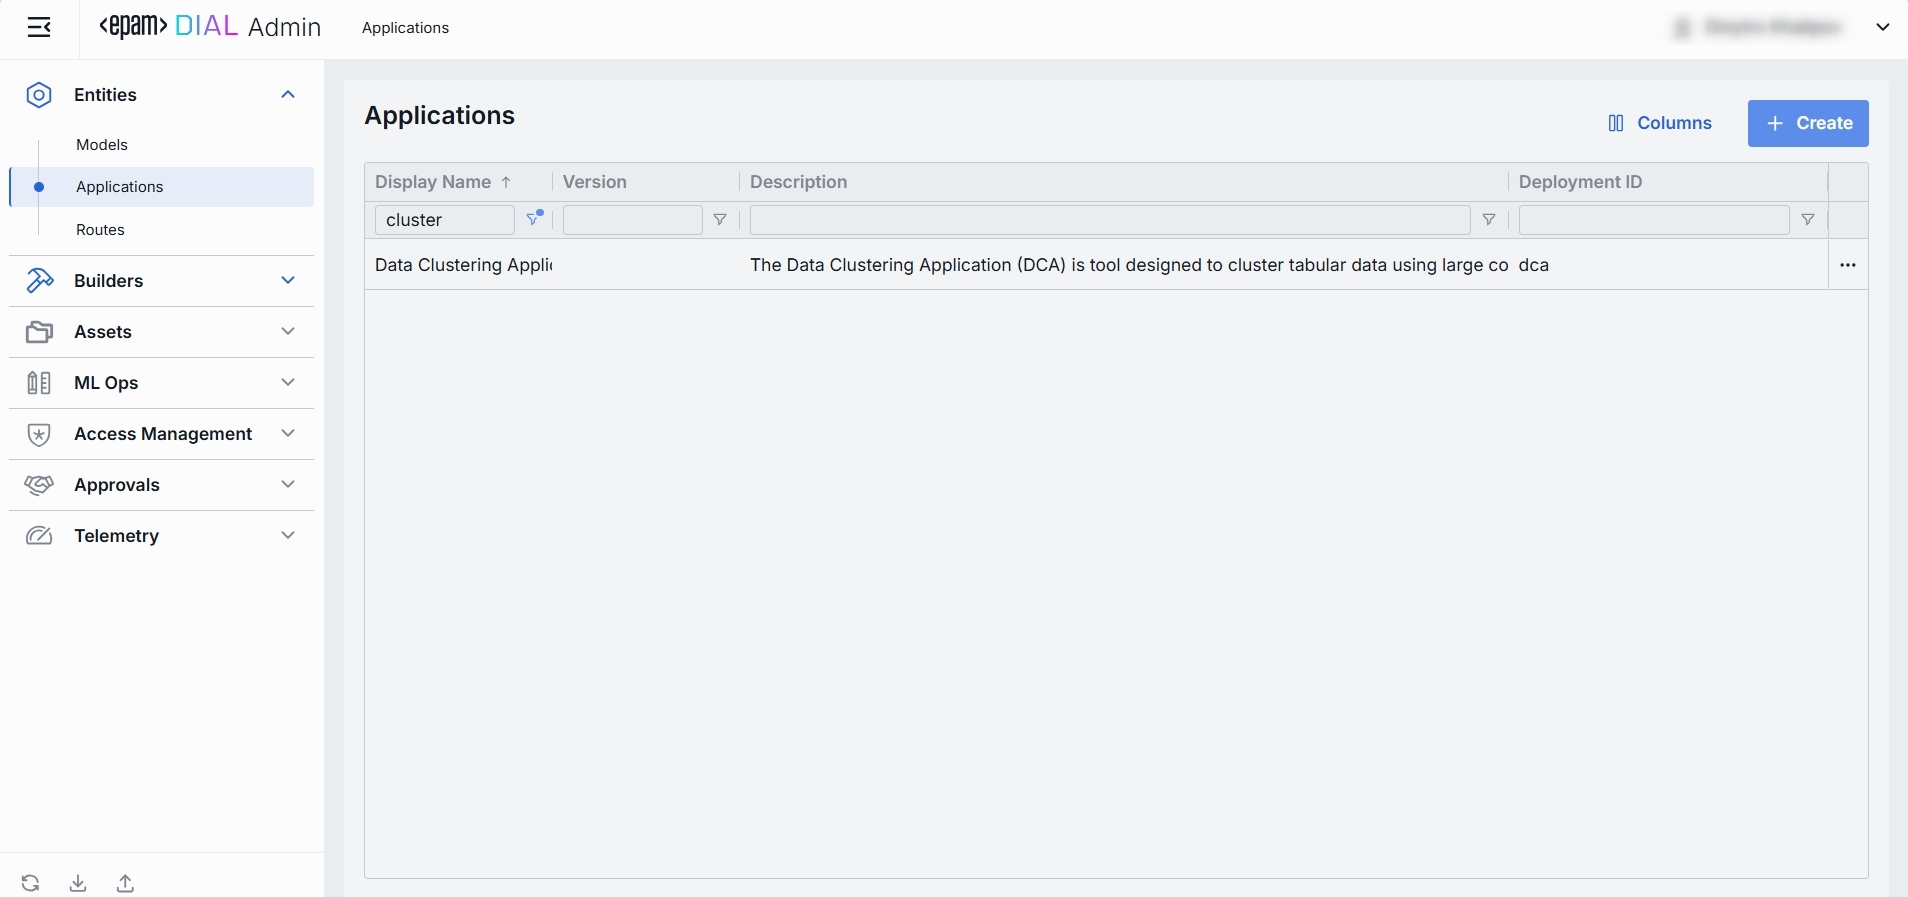
Applications grid
TIP: Use the Columns selector to customize which columns are visible in the grid.
| Field | Definition |
|---|---|
| Display Name | A user-friendly name of the application (e.g. "Data Clustering Application"). |
| Version | Version string or tag (e.g. v1, 2024-07-01). You can use a higher version to publish application updates without disrupting existing users. |
| Description | A brief free-text summary describing the application (e.g. "Clusters incoming text into semantic groups"). |
| Deployment ID | A unique identifier used in the DIAL dynamic settings (e.g. dca, support-bot). This is the path segment of the Application’s HTTP endpoint. |
| Endpoint | Full URL where the application is exposed. |
| Topics | Tags or categories (e.g. "finance," "support," "image-capable") you can assign for discovery, filtering, or grouping in large deployments. Helps end users and admins find the right application by the use case. |
| Attachment types | An option you can use to define which file attachments this application can accept. |
| Max attachment number | Maximum number of attachments allowed per single request. |
| Forward auth token | This parameter allow you to determine whether the Auth Token should be forwarded from the caller's session to the upstream API call. This enables multi-tenant scenarios or pass-through authentication for downstream services. |
Create Application
Refer to Enable App to learn more about enabling applications in DIAL.
-
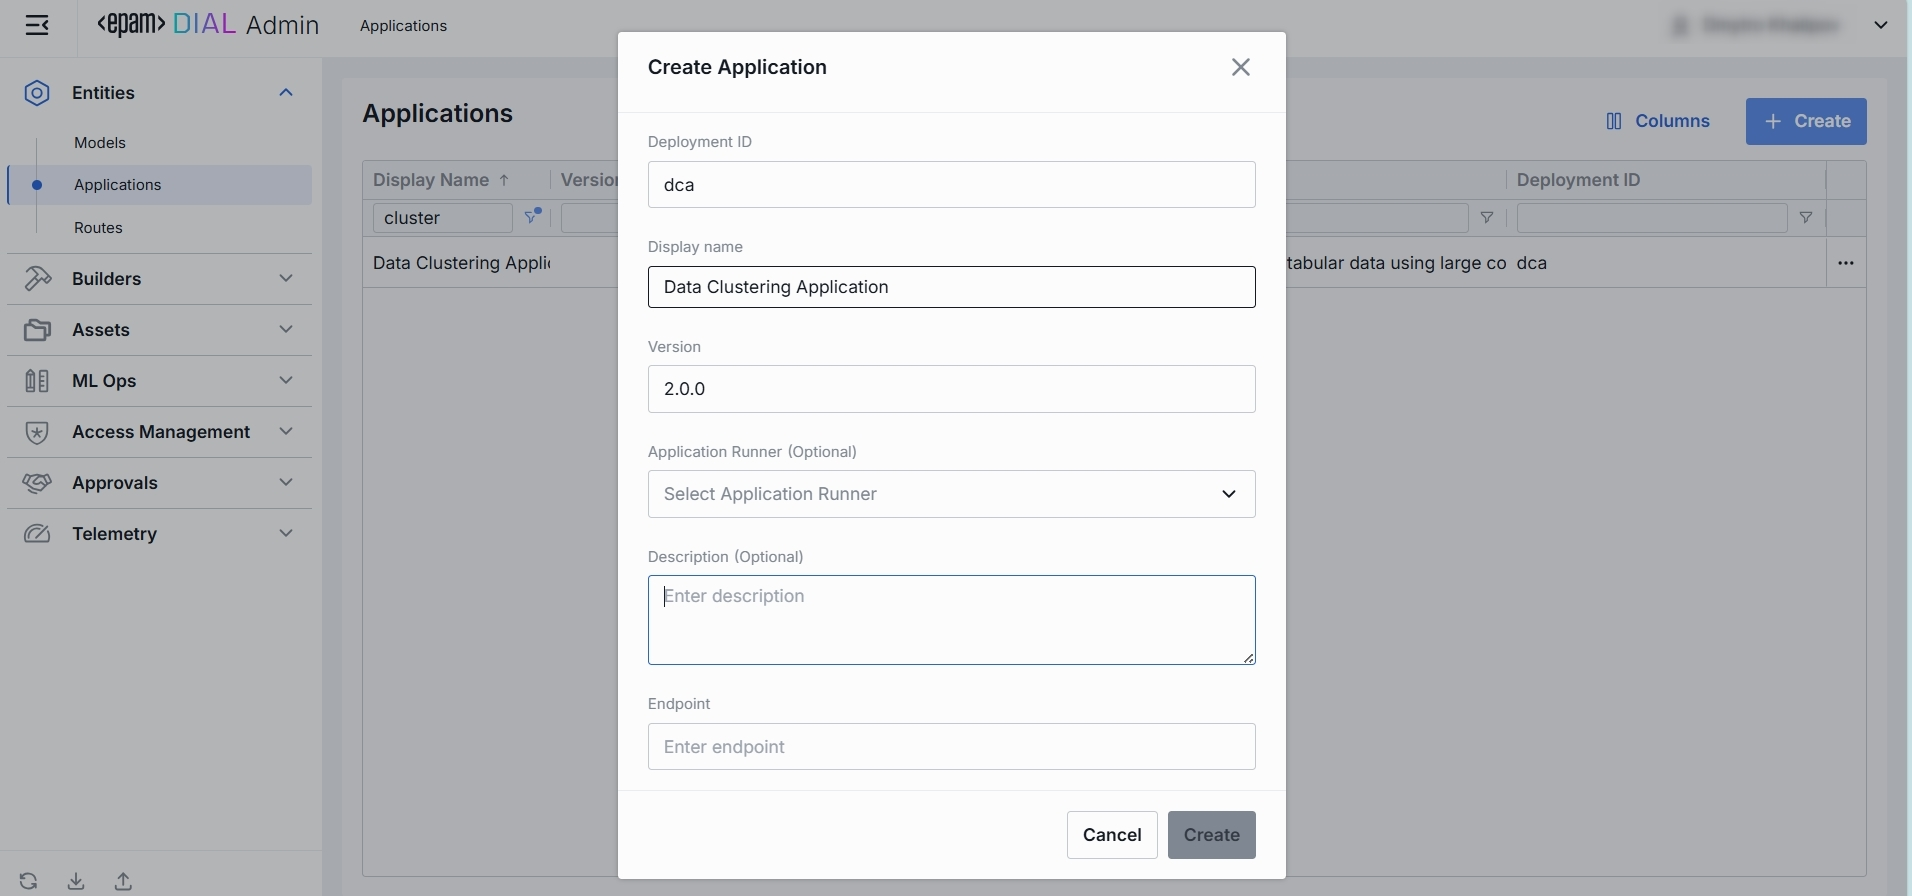
Click + Create to invoke the Create Application modal.
-
Define application's parameters
Field Required Definition & Guidance Deployment ID Yes A unique identifier under the applicationssection of DIAL Core’s dynamic settings (e.g. support-bot, data-cluster).Display Name Yes A user-friendly label (e.g. "Customer Support Bot") shown throughout the Admin UI. Version No An optional version tag to track apps releases (e.g. 2024-07-18,v1).Application Runner No Application type schema. Defined in Application Runners. Description No A free-text summary describing the application (e.g. supported inputs, business purpose). Endpoint Conditional The full URL where this Application’s API will be exposed once created. Not needed if Application Runner is selected. Required otherwise. -
Once all required fields are filled click Create. The dialog closes and the new application configuration screen is opened. This entry will appear immediately in the listing once created. It may take some time for the changes to take effect after saving.
Application Configuration
Top Bar Controls
- Delete: Permanently removes this application. All clients calling its endpoint will receive errors until a replacement is published.
- JSON Editor (Toggle): Switch between the form-based UI and raw JSON view of the application’s configuration. Use JSON mode for copy-paste or advanced edits.
Properties
In the Properties tab, you can define the application's identity, routing, UI metadata, and other basic runtime controls.
Once configured, your application is ready to orchestrate models and interceptors behind a single HTTP endpoint.

| Field | Required | Description |
|---|---|---|
| Deployment ID | Yes | A unique key under applications in DIAL Core�’s dynamic settings (e.g. data-clustering, support-bot). |
| Display Name | Yes | A user-friendly label shown on the UI (e.g. "Data Clustering Application"). Helps end user to identify and select applications. |
| Version | No | A version tag for rollout management (e.g. v1.0, 2024-07-15). Use this to publish a new version of an application without disturbing existing users. |
| Description | No | A free-text summary describing the application (e.g. tooling, supported inputs/outputs, SLAs). |
| Completion Endpoint | Optional | URL where the app is exposed. Clients use this to integrate. Auto-populated if Application Runner is selected. Required if Application Runner is not selected. |
| Application Runner | No | Application type schema. Defined in Application Runners. |
| Icon | No | A logo to visually distinguish the app on the UI. |
| Topics | No | Tags that you can assign to apps (e.g. "finance", "support"). Helps to split apps into categories for better navigation on UI. |
| Attachments | No | An option you can use to define the attachment types (images, files) this app can have: Available values: None – attachments are not allowed. All – unrestricted types. Optionally specify max number of attachments. Custom – enter specific MIME types. Optionally specify max number of attachments. |
| Forward auth token | No | Select a downstream auth token to forward from the user’s session (for multi-tenant downstream). |
| Max retry attempts | No | Number of times DIAL Core will retry a failed run (due to timeouts or 5xx errors). |
Features
In the Features tab, you can control optional capabilities of applications.
The difference between model and application features
While Model feature flags govern what each LLM integration can do, Application feature flags define which of those capabilities your orchestrated service exposes to clients. Also, you can plug in custom preprocessing endpoints.
Scope
- Model features apply per LLM, controlling what the model endpoint itself supports (e.g. whether GPT-4 can accept system prompts or function calls).
- Application features apply per orchestrated service, governing what your composed workflow will accept and pass through—regardless of which models are called under the hood.
Override Capability
- At the application level, you can disable a feature globally (even if models support it) or plug in custom endpoints that apply above all models.
- At the model level, toggles only reflect the true capabilities of that specific LLM integration.
Use Cases
- Model toggles ensure you don’t accidentally send unsupported parameters to a given model.
- Application toggles let you present a consistent API to your clients (e.g. always accept
temperatureor never allow attachments), even if different underlying models behave differently.
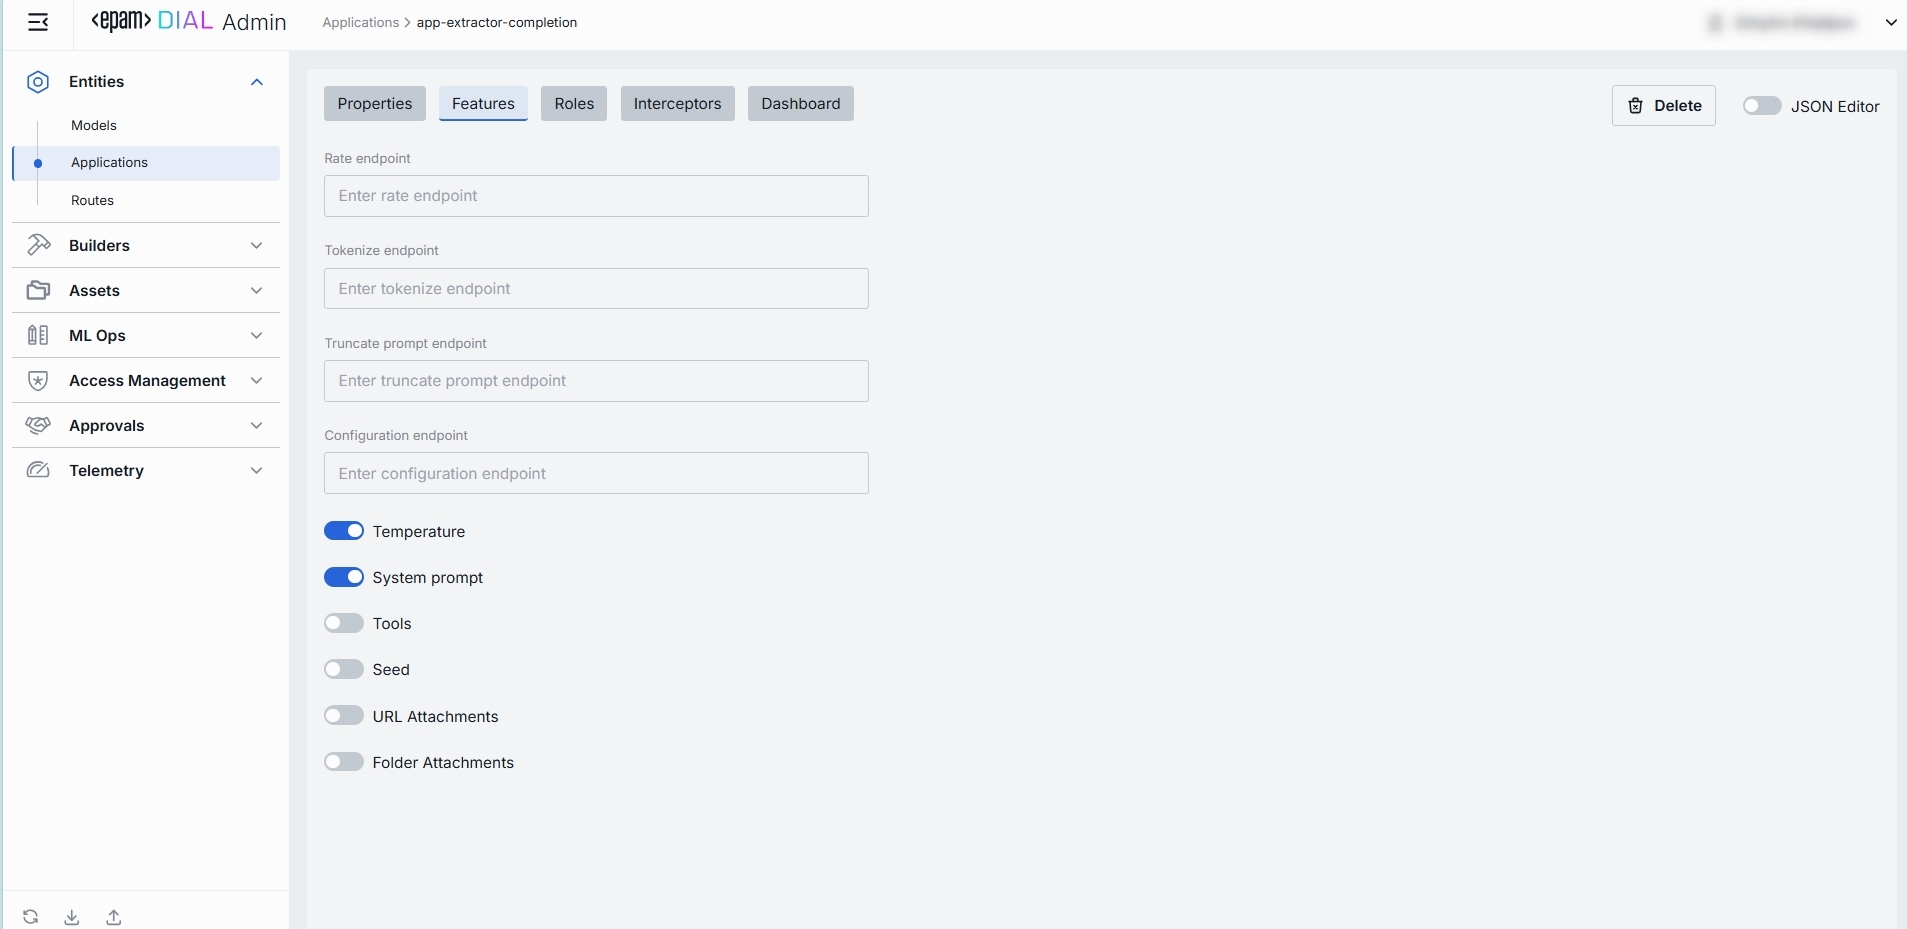
Endpoints
You can override or extend DIAL Core’s built-in protocol calls with your own HTTP services. Here, you can specify endpoints used by Application Runners (e.g. a Python or Node Runner) to perform preprocessing or policy checks before delegating to your underlying models and workflows.
| Field | Description & When to Use |
|---|---|
| Rate endpoint | A URL to call a custom rate-estimation API. Use this to compute cost or quota usage based on your own logic (e.g. grouping by tenant, complex billing rules). |
| Tokenize endpoint | A URL to call a custom tokenization service. When you need precise, app-wide token counting (for mixed-model or multi-step prompts) that the model adapter can’t provide. |
| Truncate prompt endpoint | A URL to call your own prompt-truncation API. Handy if you implement advanced context-window management (e.g. dynamic summarization) before the actual model call. |
| Configuration endpoint | A URL to fetch dynamic app-specific settings (e.g. per-tenant max tokens, allowed parameters). Use this to drive runtime overrides from a remote config store. |
Feature Flags (Toggles)
Enable or disable per-request options that your application accepts from clients and forwards to the underlying models. Toggle On/Off any feature as needed.
Note: Changes take effect immediately after saving.
| Toggle | What It Does |
|---|---|
| Temperature | Enables the temperature parameter in API calls. Disable if you want fixed-deterministic outputs or you have the temperature hard-coded in your workflow. |
| System prompt | Enables an initial "system" message injection. Useful for orchestrating multi-step agents where you need to enforce a global policy at the application level. |
| Tools | Enables tools/functions payloads in API calls. Switch on if your application makes external function calls (e.g. calendar lookup, database fetch). |
| Seed | Enables the seed parameter for reproducible results. Great for testing or deterministic pipelines. Disable to ensure randomized creativity. |
| URL Attachments | Enables URL references (images, docs) as attachments in API requests. Must be enabled if your workflow downloads or processes remote assets via URLs. |
| Folder Attachments | Enables attachments of folders (batching multiple files). |
Roles
In the Roles tab, you can create and manage roles defined in the Access Management section. Here, you can define user groups that can use specific applications and define rate limits for them.
Important: if roles are not specified for a specific application, it will be available to all users
Refer to Access & Cost Control to learn more about roles and rate limits in DIAL.

Roles grid
| Column | Description & Guidance |
|---|---|
| Name | A unique role identifier. |
| Description | A user-friendly description of the role (e.g., "Admin, Prompt Engineer, Developer"). |
| Tokens per minute | Per Minute tokens limit for a specific role. Blank = no limits. Inherits the default value. Can be overridden. |
| Tokens per day | Daily tokens limit for a specific role. Blank = no limits. Inherits the default value. Can be overridden. |
| Tokens per week | Weekly tokens limit for a specific role. Blank = no limits. Inherits the default value. Can be overridden. |
| Tokens per month | Monthly tokens limit for a specific role. Blank = no limits. Inherits the default value. Can be overridden. |
| Actions | Additional role-specific actions. Open Roles section in a new tab. Make all restrictions unlimited for the given role |
Set Rate Limits
The grid on the Roles screen lists roles that can access a specific application. Here, you can also set individual limits for selected roles. For example, you can give "Admin" role unlimited monthly tokens but throttle "Developer" to 100,000 tokens/day or allow the "External Partner" role a small trial quota (e.g., 10,000 tokens/month) before upgrade.
To set or change rate limits for a role:
- Click in the desired cell (e.g., Tokens per day for the "ADMIN").
- Enter a numeric limit or leave blank to set no limits. Click Reset to default limits to restore default settings for all roles.
- Click Save to apply changes.
Default Rate Limits
Default rate limits are set for all roles in the Roles grid by default; however you can override them for any role.
| Field | Description |
|---|---|
| Default tokens per minute | The maximum tokens any user can consume per minute unless a specific limit is in place. |
| Default tokens per day | The maximum tokens any user can consume per day unless a specific limit is in place. |
| Default tokens per week | The maximum tokens any user can consume per week unless a specific limit is in place. |
| Default tokens per month | The maximum tokens any user may consume per month unless a specific limit is in place. |
Role-Specific Access
Use Make available to specific roles toggle to define access to the application:
- Off: Application is callable by any authenticated user. All existing user roles are in the grid.
- On: Application is restricted - only the roles you explicitly add to the grid can invoke it.
Add
You can add a role only if Make available to specific roles toggle is On.
- Click + Add (top-right of the Roles Grid).
- Select one or more roles in the modal. The list or roles is defined in the Access Management section.
- Confirm to add role(s) to the table.
Remove
You can remove a role only if Make available to specific roles toggle is On.
- Click the actions menu in the role's line.
- Choose Remove in the menu.

Interceptors
DIAL uses Interceptors to add custom logic to in/out requests for models and apps, enabling PII obfuscation, guardrails, safety checks, and beyond.
You can define Interceptors in the Builders → Interceptors section to add them to the processing pipeline of DIAL Core.
Refer to Interceptors to learn more.

The difference between model and application interceptors
Scope of Invocation
- Model: Interceptors are triggered with each request to a model (i.e. before/after the LLM invocation).
- Application: Interceptors wrap the entire orchestrated workflow, including multi-model sequences and branching logic.
Use Cases
- Model: Ideal for prompt "pre-processing" or response transformations that are specific for each LLM.
- Application: Manage cross-cutting concerns across the whole application (e.g., tenant-based routing, unified logging, end-to-end policy enforcement).
Interceptors Grid
| Column | Description |
|---|---|
| Order | Execution sequence. Interceptors run in ascending order (1 → 2 → 3...). A request will flow through each interceptor’s in this order.Response interceptors are invoked in the reversed order. |
| Name | The interceptor’s alias, matching the Name field in its definition. |
| Description | Free-text summary from the interceptor’s definition, explaining its purpose. |
| Actions | Additional role-specific actions. Open interceptor in a new tab. Remove the selected interceptor from the model's configuration. |
Add
- Click + Add (in the upper-right of the interceptors grid).
- In the Add Interceptors modal, choose one or more from the grid of defined interceptors.
- Apply to append them to the bottom of the list (are added in the same order as selected in the modal).
TIP: If you need a new interceptor, first create it under Builders → Interceptors and then revisit this tab to attach it to the application's configuration.
Reorder
- Drag & Drop the handle (⋮⋮⋮⋮) to reassign the order in which interceptors are triggered.
- Release to reposition; order renumbers automatically.
- Save to lock-in the new execution sequence.
Remove
- Click the actions menu in the interceptor's row.
- Choose Remove to detach it from this application.
- Save to lock-in the interceptors list
Dashboard
In the Dashboard tab, you can see real-time and historical metrics for the application. You can use it to monitor usage patterns, enforce SLAs, optimize costs, and troubleshoot anomalies.

Top Bar Controls
| Control | What It Does |
|---|---|
| Time Period | Use to select the date range for all charts and tables (e.g. last 15 min, 2 days, 7 days, 30 days). |
| + Add filter | Use to drill into specific subsets by adding filters on Projects. |
| Auto refresh | Set the dashboard to poll for new data (e.g. every 1 min) or turn off auto-refresh. |
System Usage Chart
A time-series line chart of request throughput over time. You can use it to monitor traffic peaks and valleys, correlate spikes with deployments or feature roll outs.
Key Metrics
Four high-level metrics are displayed alongside the chart. All calculated for the user-selected period.
You can use them to:
- Chargeback to internal teams or external customers by "Money".
- Track adoption via "Unique Users".
- Monitor burst traffic with "Request Count".
- Watch token consumption to anticipate quota exhaustion.
| Metric | Definition |
|---|---|
| Unique Users | Count of distinct user IDs or API keys that have called this application. |
| Request Count | Total number of chat or embedding calls routed to this application. |
| Total Tokens | Sum of prompt + completion tokens consumed by this application. |
| Money | Estimated spending on this application. |
Projects Consumption Table
This table shows the KPIs breakdown by Project. You can use it to compare consumption across multiple projects.
| Column | Description |
|---|---|
| Project | The entity utilizing this application. |
| Request Count | Number of calls directed to the application. |
| Prompt tokens | Total tokens submitted in the prompt portion of requests. |
| Completion tokens | Total tokens returned by the application as responses. |
| Money | Estimated cost. |
JSON Editor
For advanced scenarios of bulk updates, copy/paste between environments, or tweaking settings not exposed in the form UI—you can switch to the JSON Editor in any app’s configuration page.

Switching to the JSON Editor
- Navigate to Entities → Applications, then select the application you want to edit.
- Click the JSON Editor toggle (top-right). The UI reveals the raw JSON.
TIP: You can switch between UI and JSON only if there are no unsaved changes.