Conversations
A conversation is a dialogue between you and an agent (a language model or an application). Within one conversation you can refer to earlier messages, but different conversations do not share context.
This page covers starting a conversation, selecting an agent, sending messages and attachments, working with responses, and organizing your conversation list.
Conversations are stored in DIAL in a folder dedicated to your user and accessible from any device. If you navigate away while a response is still streaming, the conversation is preserved as it was generated, without duplication.
Start a conversation
There are several ways to start a conversation:
- Start typing in the message composer to talk to the current agent.
- Click New chat.
- In the Catalog, open an agent and click Use in chat.
- Some applications display starter buttons near the message composer with predefined prompts. Click one to begin a conversation with that prompt.
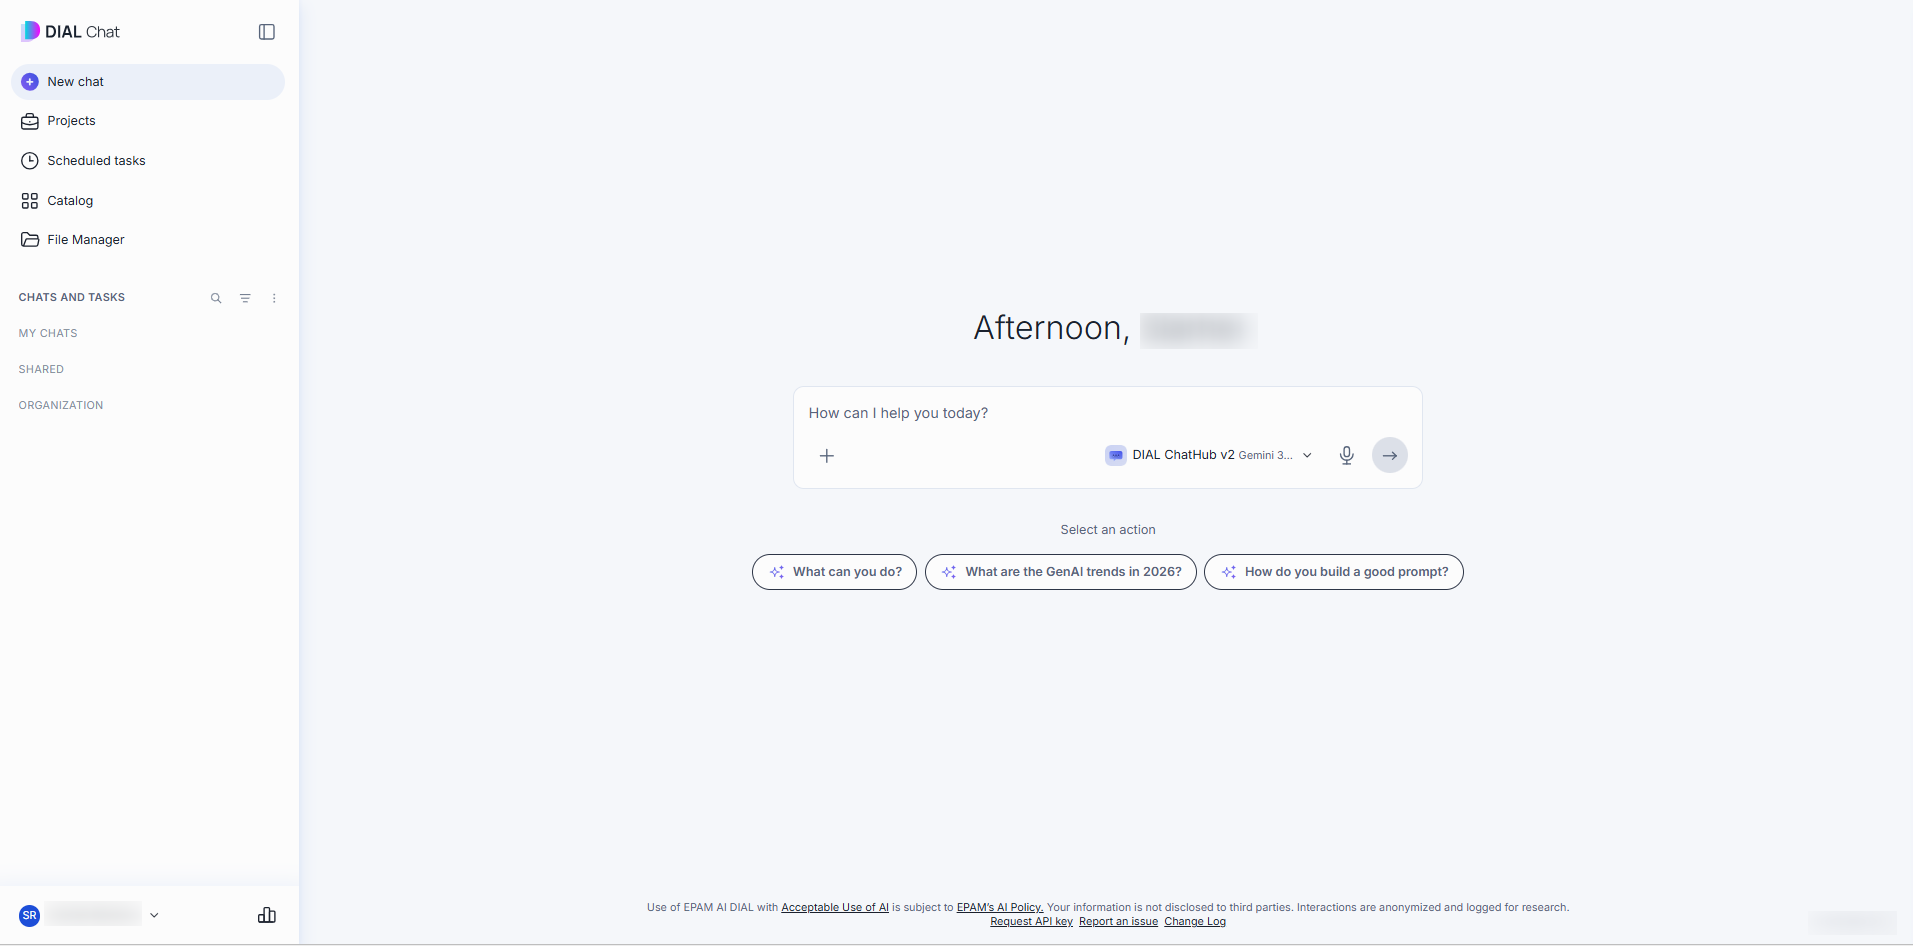
New conversations appear in the Chats and tasks panel on the left. If you start a conversation and close it while it is still empty, it is neither displayed nor saved.
Select an agent
In DIAL Chat you converse with agents: models and applications. You find available agents in the Catalog and add them to your favorites.
Click the agent selector next to the message composer. It shows the name of the currently selected agent. This opens a popup with a search box, My Collection, your Favorites, and a link to the Catalog to find more agents.
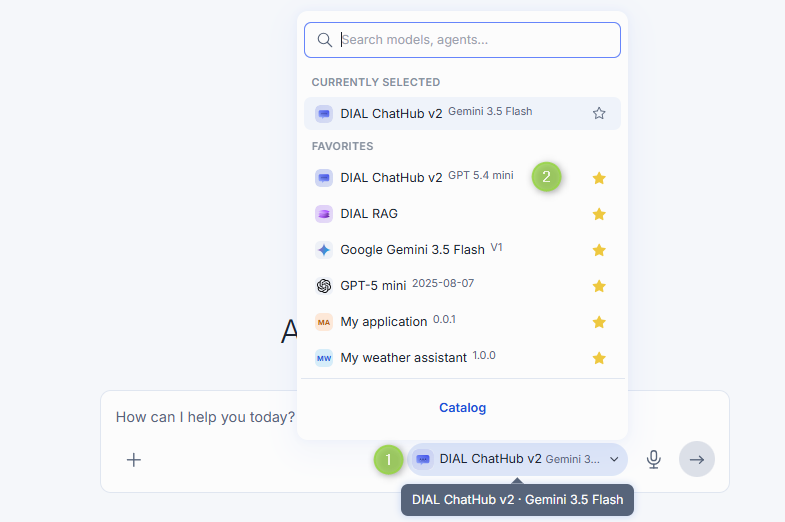
The agent selector is available before you start a conversation and at any point during it, including after the agent has already replied. Selecting a different agent switches it for the rest of the conversation. DIAL Chat posts an inline notice confirming the switch.

You cannot change the agent while a response is still streaming. If the agent used in a conversation is later removed from your environment, you need to select a new agent before you can continue that conversation.
Send a message
Enter your prompt in the text box and send it. If the agent uses a toolset that needs you to sign in, DIAL Chat asks you to sign in first. See Sign in when you start a conversation.
The Add menu
Click the + (Add) icon next to the message composer for everything you can add to a message. The available options depend on the selected agent, so you may not see all of them:
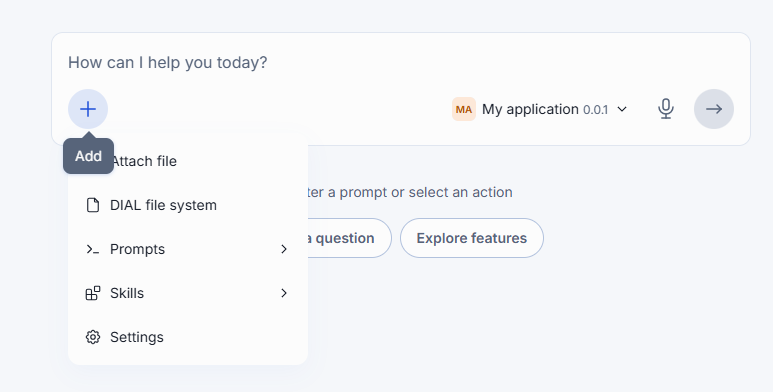
- Attach file — upload a file from your device.
- DIAL file system — select a file or folder you already have in the File Manager.
- Skills — attach a skill for the agent to use with your message. See Use a skill in a message.
- Prompts — insert a saved prompt. The submenu shows My Collection (prompts you starred) and a link to the Catalog, where you can browse all available prompts. Selecting a prompt inserts its text into the message composer. See Prompts for how to create and manage prompts.
- Record voice — record a message and attach it as an audio file. See Voice input.
- Settings — open conversation settings.
Attachments
Attachment support depends on the agent. When an agent supports files and folders, attach them from the Add menu. You can also drag files onto the chat page, paste an image from your clipboard, or paste a long text.
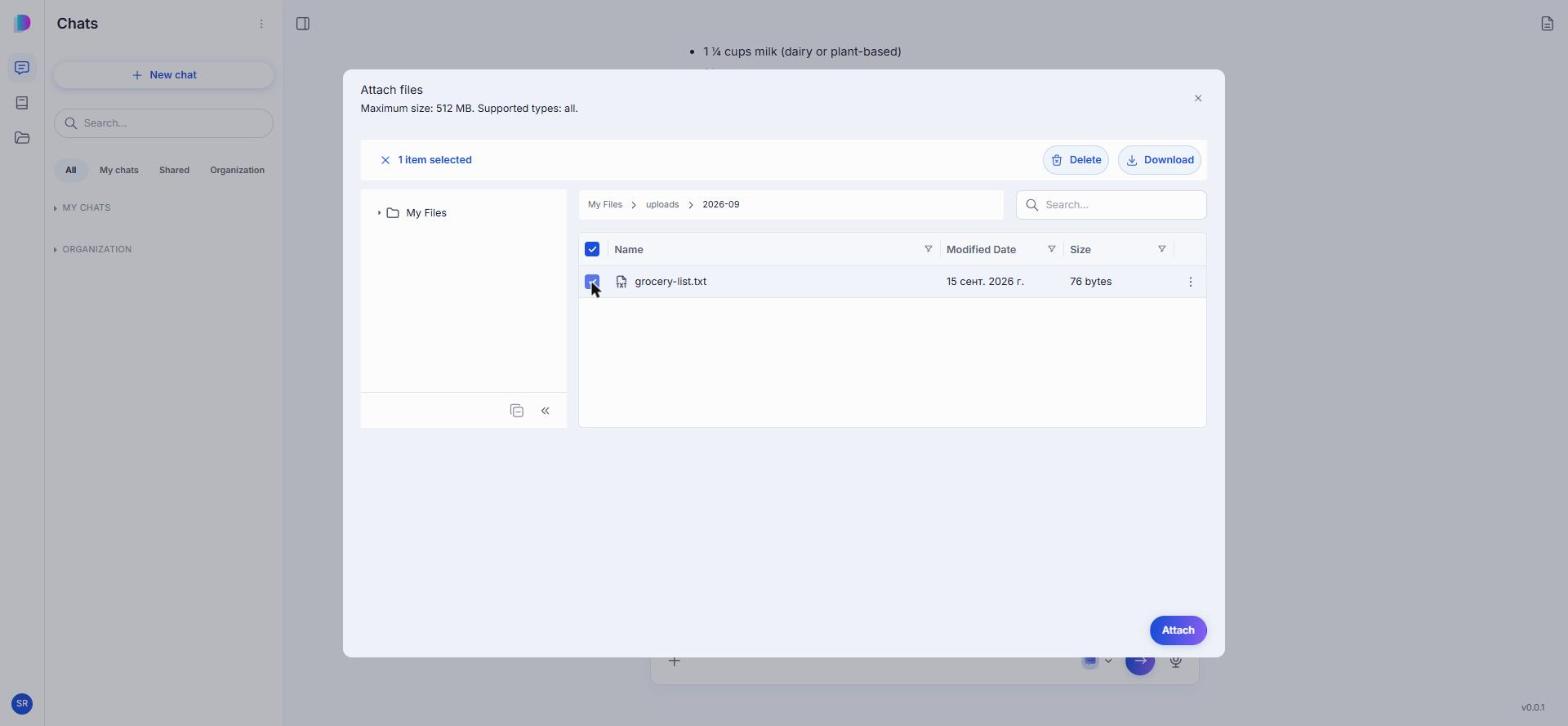
The attachment appears in the message composer, above the text box, and becomes available to the agent when you send your message.
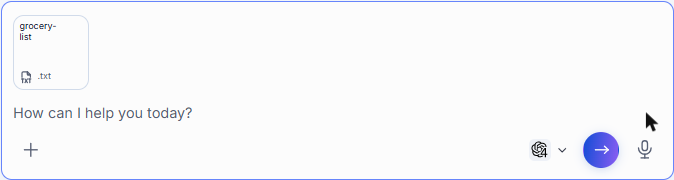
A file is uploaded the moment you add it. While it uploads, its tile shows Uploading. Click Remove attachment on a tile to take it out before you send. If an upload fails, click Retry upload.
Pasted images and text
- Image — an image you paste, such as a screenshot, is attached as
Screenshotfollowed by the date and time. - Long text — text longer than 4,000 characters is not pasted into the text box. DIAL Chat attaches it as a text file named
Pasted text, followed by the date and time, with the extension.txt. Click Expand pasted text on the tile to put the text into your message instead. This happens only when the agent accepts text files. Otherwise the text is pasted as usual.
When an attachment is refused
| Message | What it means |
|---|---|
| Attachments not supported | The selected agent does not accept file attachments. |
| File extension not supported | The file's type is not one the agent accepts. The attachment turns red above the text box and a warning pop-up lists the formats the agent can process. Remove the attachment and add a file in one of those formats. |
| File too large | The file is over the size limit, and the message gives it. Upload a smaller file. A file that is too large is refused before it is uploaded. |
| Network unavailable | Your connection was lost during an upload. Click Retry upload when it is back. |
Which file types an agent accepts, and how many files one message can carry, are set by the agent's owner in the editor, in Attachment types and Max. input attachments. See Create an agent. You cannot attach more files than that limit: a warning pop-up appears and tells you the limit. Hidden files cannot be attached.
Attached files are also available in the File Manager.
Use a skill in a message
A skill is a set of instructions the agent follows when it handles your message. There are three ways to use one in a conversation:
- In the Catalog, open a skill and click Use in chat. DIAL Chat opens a new conversation with the skill added to the composer.
- Click + (Add) in the composer and point to Skills.
- Type
/in the text box.
The last two open the same list, My Collection, which holds the skills you starred in the Catalog.
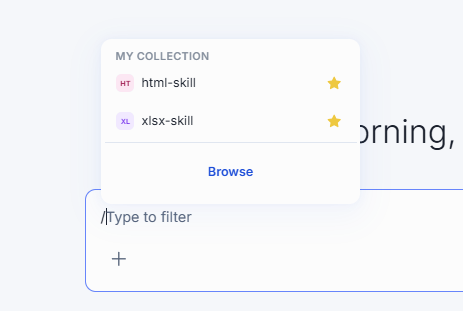
- To find a skill by name, type part of the name right after
/, for example/xlsx. The list shows only the matching skills in My Collection. Use the arrow keys and Enter to pick a skill, or click it. - Click the star next to a skill to remove it from My Collection. To add one, star it in the Catalog.
- Click Browse to open Use skill, which lists every skill you can use: your own, those shared with you, and published ones.
- Use View details on a skill to read its instructions before you pick it.
The skill appears in the message as a chip at the cursor position. Click the chip to see its description and View details, which opens the skill in the side panel. You can add several skills to one message, and each is sent with the message in the order you added them. To remove a skill, place the cursor right after the chip and press Backspace. This deletes the whole chip.
Skills work only with an agent or model that supports them. Check the Skills capability on its card in the Catalog. If the selected agent does not support skills, the Skills option is missing from the + menu and the / menu does not offer skills. A skill already in the message turns red and you cannot send the message. This happens with Use in chat too, because the skill is added to whichever agent is selected. Click the chip to read why, then remove the skill or select an agent that supports skills.
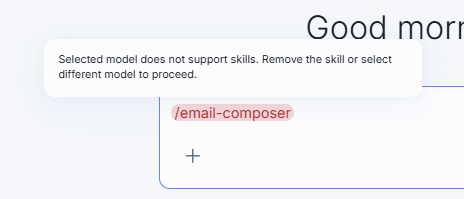
In a conversation you already sent, a skill chip that cannot be opened shows why when you click it: the skill was deleted, or it was not shared with you. In the second case, ask the person who owns the conversation to share the skill with you.
Voice input
There are two ways to use your voice, and they produce different results:
| Dictate | Record voice | |
|---|---|---|
| Where to find it | Microphone icon in the message composer | Record voice in the Add menu |
| What you get | Editable text in the text box | An audio file attached to your message |
| What the agent receives | Text | Audio |
Dictate turns speech into text you can review and edit before sending:
- Click the microphone icon and speak. Transcription does not happen while you talk. Click the confirm control to stop recording, and the text appears after a moment.
- The transcript is added to whatever is already in the text box, so you can dictate into a partly typed message.
- Nothing is sent automatically. Edit the text and send it yourself.
Record voice sends the recording itself, for agents that accept audio:
- Open the Add menu and select Record voice. Recording starts immediately.
- Click the confirm control to stop. The recording is attached to your message as an audio file, which you can play back to check it before sending.
- The recording is not transcribed. The agent receives the audio.
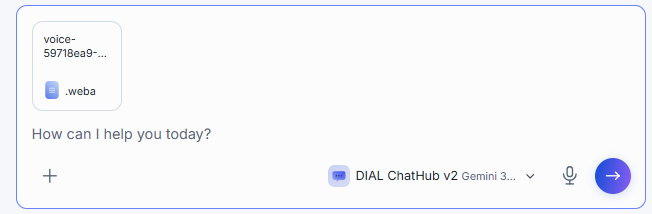
While Dictate converts your speech, the composer shows Transcribing audio…. If something goes wrong, DIAL Chat shows one of these messages:
| Message | What it means |
|---|---|
| "Could not transcribe audio. Please try recording again." | The speech could not be converted to text. Record it again. |
| "Speech recognition is temporarily unavailable. Please try again later." | The speech recognition service is busy. |
| "Voice input is not available." | Voice input is not set up for you. |
| "Audio recording exceeds the limit. Please shorten the recording and try again." | The recording is over the size limit, which the message gives. Record a shorter one. |
In both modes a waveform replaces the text box while you record. You cannot type or send until you stop. Click the discard icon to cancel without sending anything; your draft text and any existing attachments are preserved.
Voice input must be enabled in your deployment. Dictate also requires either a speech recognition model configured by your administrator or an agent that accepts audio. Record voice appears only when the selected agent accepts audio attachments, so switching agents can make it appear or disappear. Recordings are subject to a size limit set by your administrator.
Work with responses
Each response shows a row of action icons, in this order: Regenerate, Copy, Copy as Markdown, Like, and Dislike.

- Regenerate — generate a new answer to the same prompt.
- Copy — copy the response as plain text.
- Copy as Markdown — copy the response as Markdown.
- Like — click the thumbs-up icon to highlight a valuable response. It highlights immediately; click it again to undo.
- Dislike — click the thumbs-down icon to mark a response you find unhelpful or incorrect. This opens the Send negative feedback dialog, where you choose a feedback type and, optionally, add a comment before clicking Send.
The list of available feedback types can change over time.
A code block longer than 50,000 characters, or with a line longer than 2,000 characters, is shown as plain text without syntax highlighting, so that the page stays responsive.
Stages
When an agent performs tool calls, document retrieval, or multi-step reasoning while generating a response, DIAL Chat shows that work as a list of steps. While the agent works, the list stays open and shows a spinner with the name of the step that is running. When the response is finished, the list collapses to one line, such as Executed 3 steps, with the number of failed steps added if there are any. Click that line to open the list again.
Each step shows its status (running, completed, or failed) and, when the agent reports it, how long it took. Click a step to expand it. A step with nothing to show, such as no output, attachments, or sub-steps, is a plain row that does not expand.
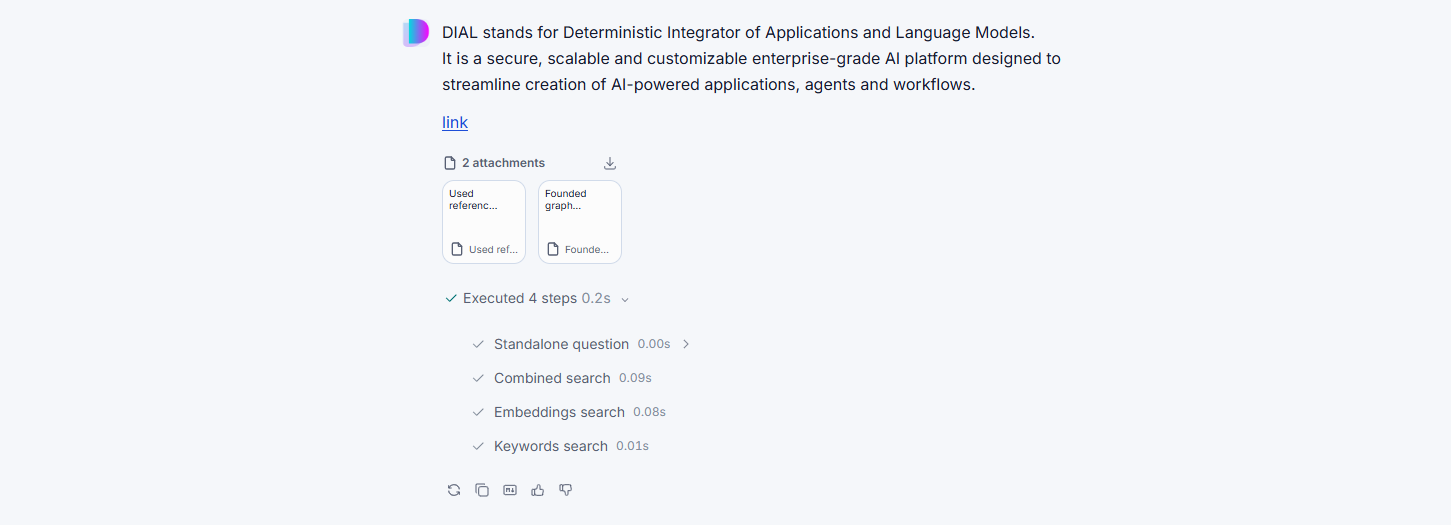
An expanded step can contain:
- Output — the text the step produced, such as the result of a tool call. Long output scrolls inside the step, and code blocks have a copy button.
- Attachments — files and results the step produced, such as the documents a search step found. They appear as tiles below the output. Click a tile to preview it.
- Sub-steps — steps that happened inside this step. When an agent calls another agent, the steps and attachments of the called agent appear inside the step of the agent that called it. Expand the parent step to follow the work down.
When the same step runs several times in a row, DIAL Chat combines the runs into one row with a count, such as ×3. Expand it to see each run as Attempt 1, Attempt 2, and so on. The row shows as running while any attempt is still running, and as failed if any attempt failed.
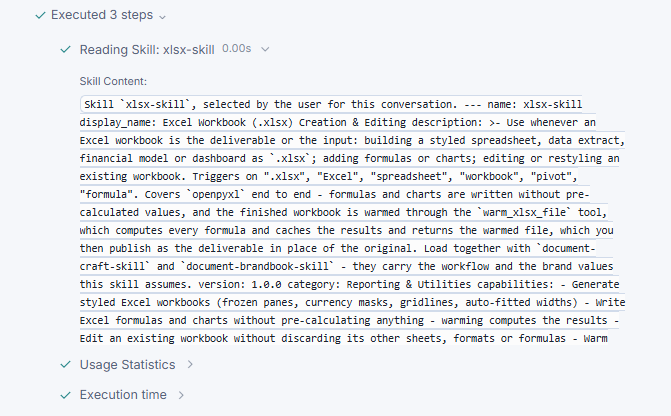
When you use a skill, the steps include a Reading Skill step named after the skill. Expand it to see the Skill Content the agent read.
MCP apps
When a toolset provides a visual interface for one of its tools, DIAL Chat renders that tool's output as an interactive app inside the response instead of plain text. The header names the tool and the app it belongs to, along with its version.
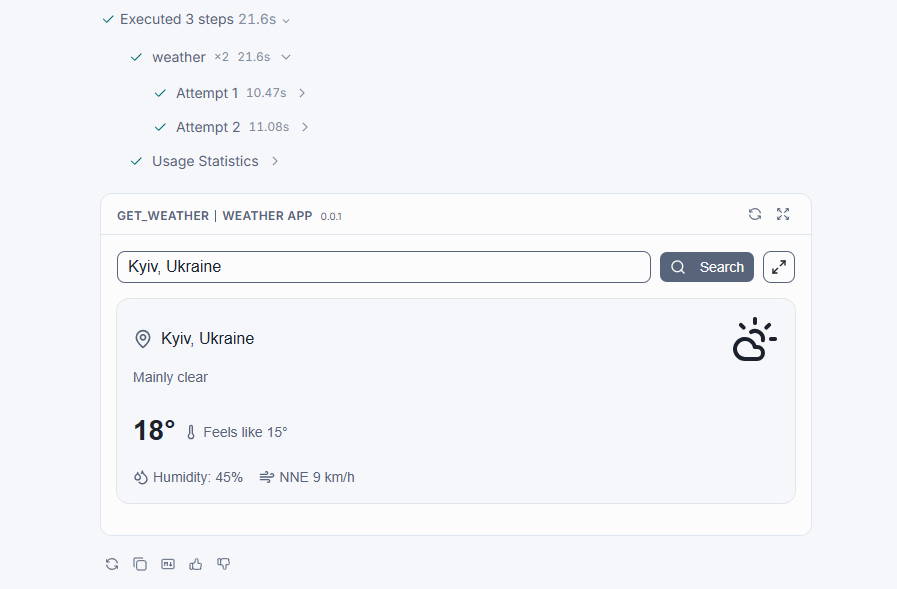
You can work with the app where it sits: fill in its fields, run a search, browse what it returns. Two controls in its header change how you view it:
- The expand icon opens the app in a side panel, which gives it more room for detailed results.
- The refresh icon reloads the app.
Each app runs in its own isolated sandbox, kept separate from the rest of DIAL Chat.
Citations
When an agent answers from your documents, it marks each statement with a citation naming the file it came from. Citations sit inline, next to the specific claim they support, rather than being collected at the end of the response.
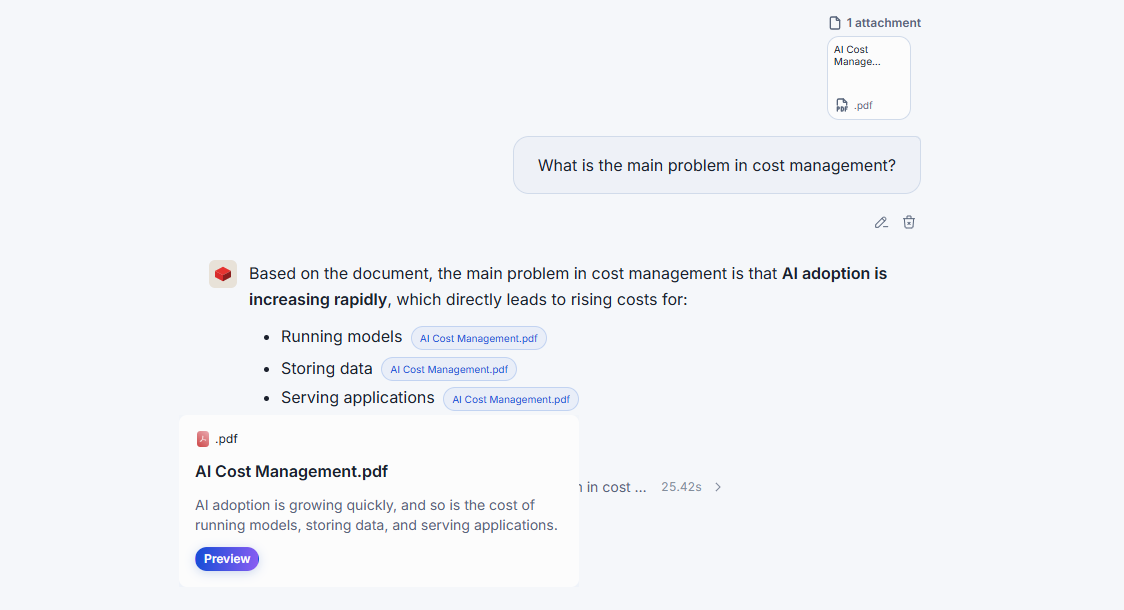
Each citation is a button that shows the name of the source file. When the agent cites several passages of the same source, the button adds a count, such as report.pdf +2.
What happens when you click a citation depends on what it points at:
- One passage of a file — the file opens directly in the preview panel on the right. A PDF opens at the cited place, so you can read the passage in context without downloading anything.
- Several passages of the same source, or a web link — a card opens first. For a file, the card header shows the file type icon and extension. Its switcher (1/3, with previous and next arrows) moves between the passages, which can come from different files. The card shows the passage the agent drew on, quoted from the source. A long quote is cut off, and Show more expands it. Click Preview to open the file, or Download to save it. For a web link, the button reads Open in browser instead.
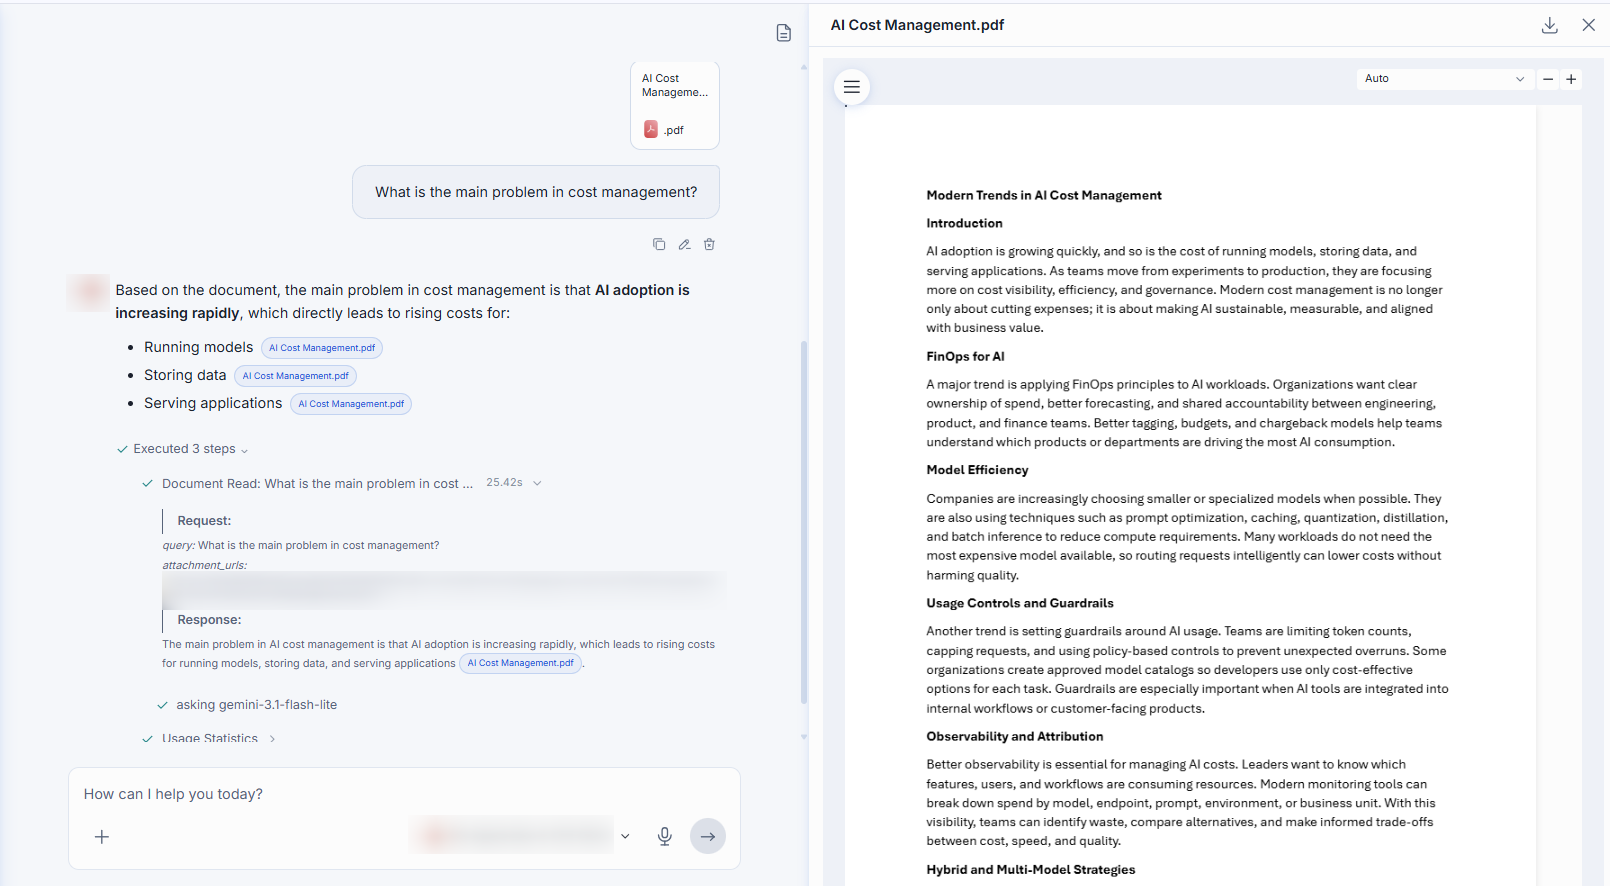
While the preview panel is open, clicking another single-passage citation switches the preview to that file, so you can check several sources one after another. The preview panel has Download and close icons in its top-right corner.
A citation points at a location, not just a file: the passage in a text document, the relevant rows of a table, or the region of a PDF page.
Citations also appear in the output of a step, for example in the result of a document search.
Sources panel
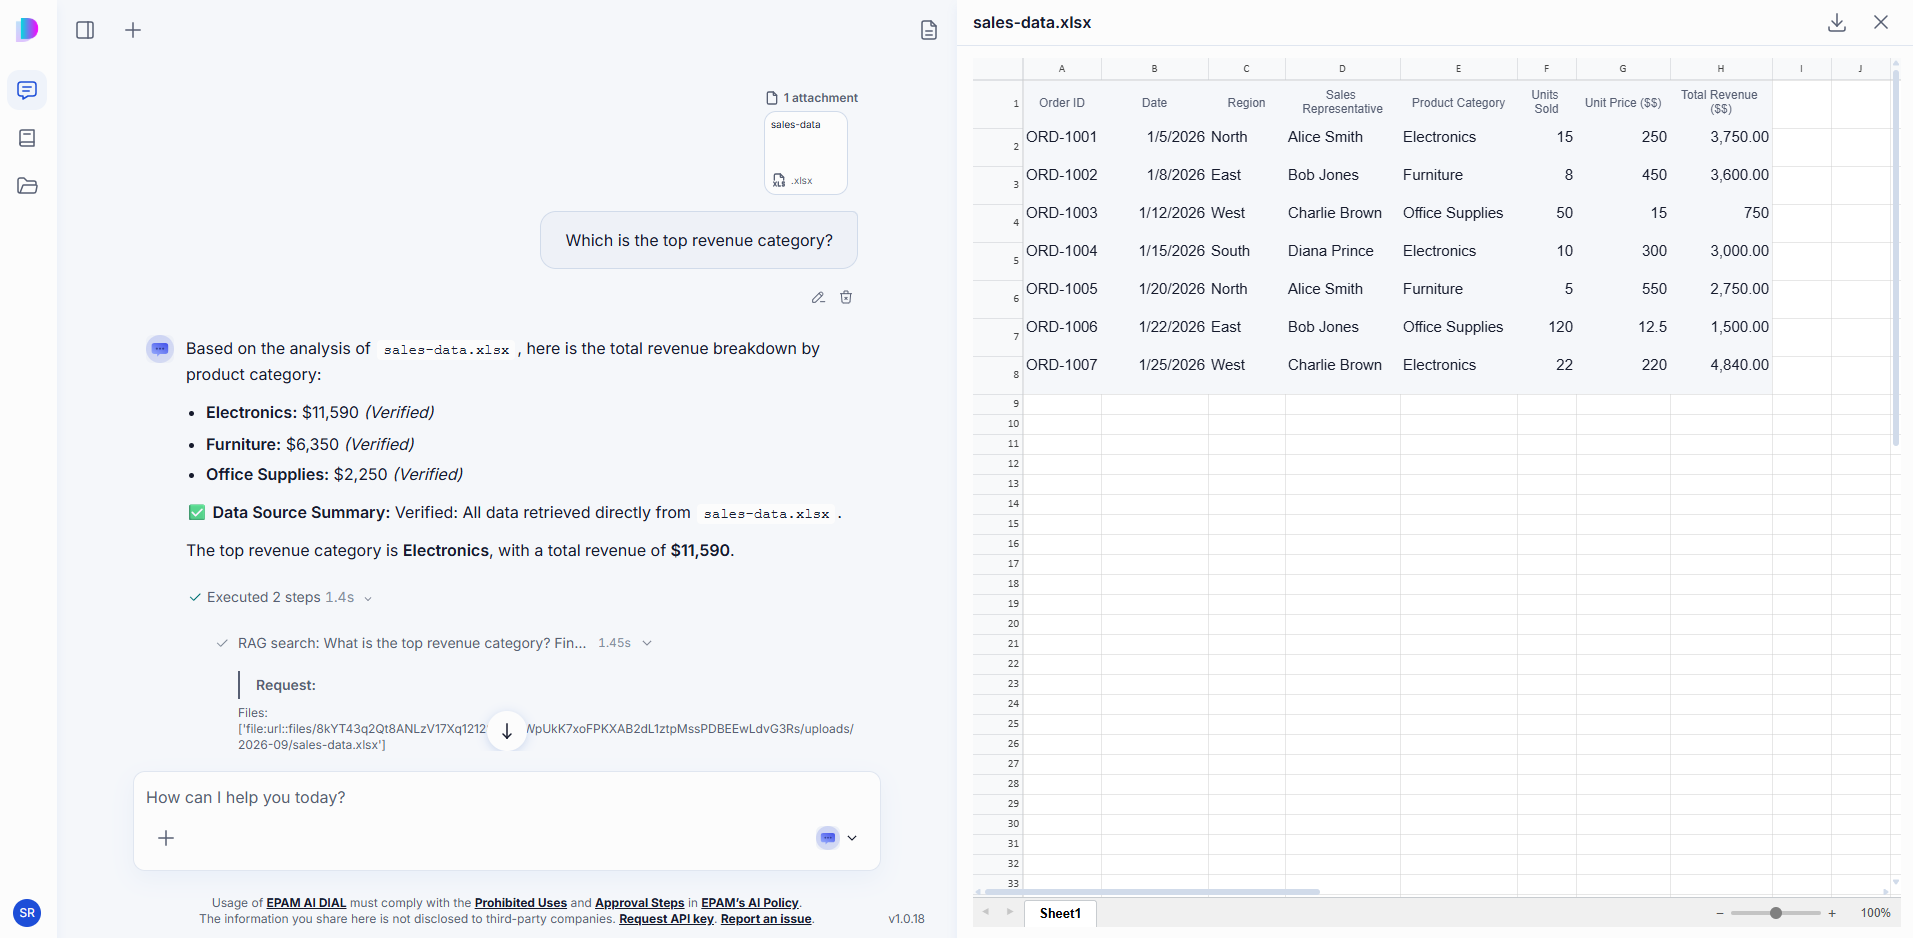
Click the panel icon in the top-right corner of the chat area to open the sources panel. It lists the files you uploaded for the conversation and any sources the agent found or generated while answering, such as retrieved documents or generated artifacts.
Click an entry to preview it in place, without downloading it. Previews cover text files, Word documents, Excel spreadsheets, PDFs, and images, and you can play audio files directly in the panel. Any entry can also be downloaded.
Work with your messages
Each message you sent shows Copy, Edit, and Delete icons, in this order.

Copy a message
Click Copy to copy the text of your message. If the message uses skills, the copied text includes a link to each skill.
Edit a message
Click Edit to change a message in the ongoing conversation. You can also attach a file to the edited message. Click Save & Submit to regenerate the response, or Cancel to discard your changes. After you save an edit, the response is regenerated and all messages after the edited one are deleted.

Delete a message
Click Delete to delete a message in the ongoing conversation. The corresponding response is deleted too.
Reply to part of a message
Use Reply to ask about a specific passage of a message, yours or a response:
- Select the text you want to ask about.
- Click the Reply button that appears next to the selection.
DIAL Chat attaches the selected text to your next message as a text file and puts the cursor in the message composer. Write your question and send it. The file is named reply- followed by a random identifier and .txt, and it appears above the text box like any other attachment. You can remove it before you send.
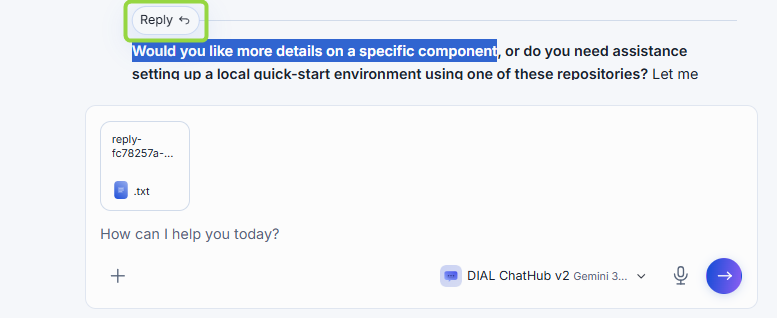
To use the keyboard, select text with Shift and the arrow keys, then press Tab to move to the Reply button. Press Esc to hide the button.
Reply does not appear when the selection is inside a button or other control, such as a code block's actions. It is also unavailable while a response is being generated, while you edit a message, and when the selected agent does not accept text file attachments. In a conversation that someone shared with you, Reply is not available at all, because you cannot add messages to it. To ask about a shared conversation, duplicate it first.
Conversation settings
Click the + (Add) icon next to the message composer and select Settings. Conversation settings are available before and during a conversation:
- Response format — choose whether the agent's response renders as Markdown or Plain text.
- System prompt — the initial set of instructions you give the model. It guides the model to stay aligned with the intended purpose and outcome of the conversation.
- Temperature — how much variation the model allows in its answers. A lower value keeps responses focused and repeatable, which suits factual work; a higher value produces more varied and creative output.
Click Apply changes to save.
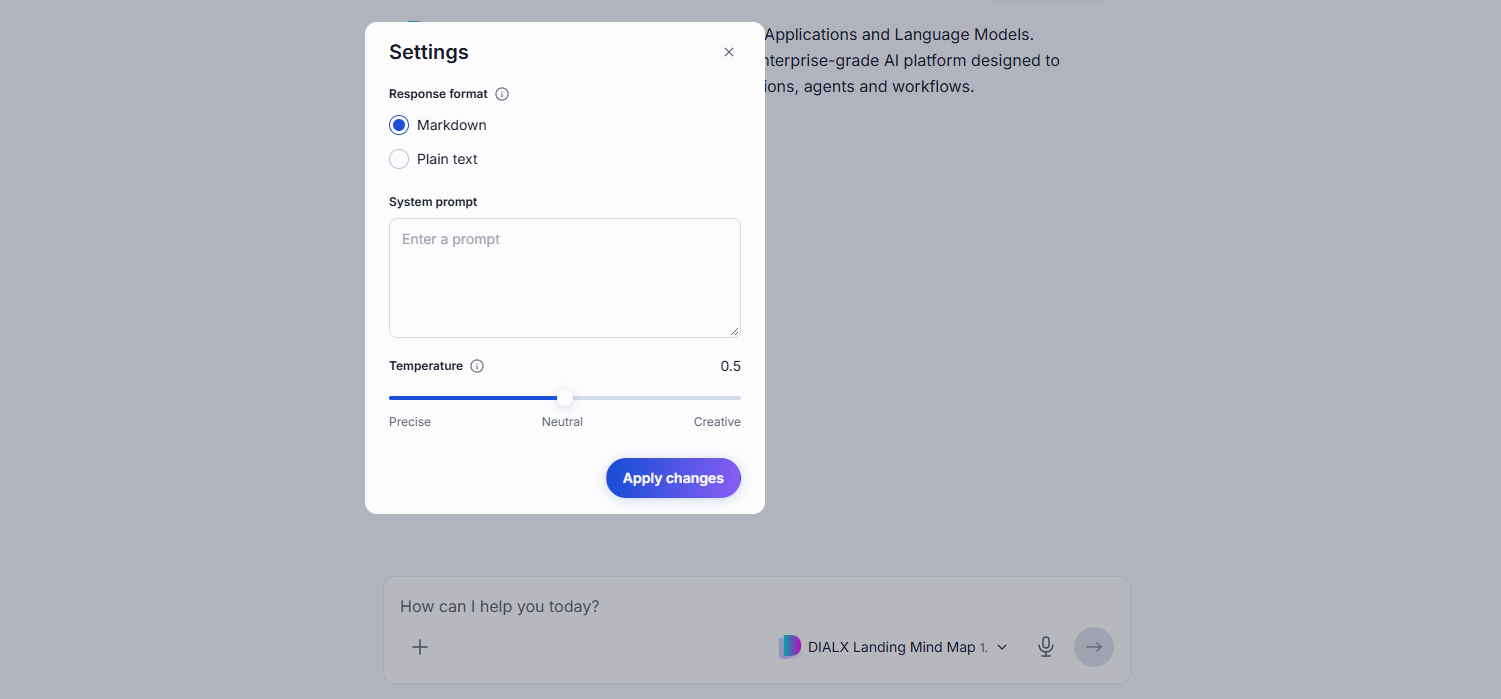
Conversation settings vary by agent. Some agents have no configurable settings.
Organize your conversations
Your conversations are in the Chats and tasks panel on the left. Its header has three icons, and each conversation has its own three-dot menu.
| Where | What it does |
|---|---|
| Search icon in the header | Finds conversations by name. See Search and filter. |
| Filter icon in the header | Narrows the list by type and origin. See Search and filter. |
| Three-dot icon in the header | Actions for all your conversations: Export conversations, Import conversations, and Delete all conversations. See Export and import conversations and Delete conversations. |
| Three-dot icon on a conversation | Actions for that conversation. See Conversation actions. |
Search and filter
Click the Search icon and type to find conversations by name.
Click the Filter icon to narrow the list. A dot on the icon shows that a filter is applied.
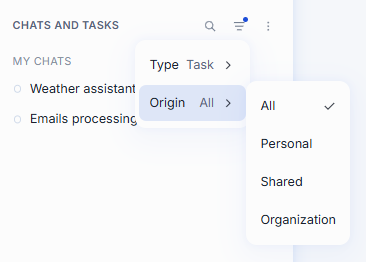
Type says what kind of conversation you see. It appears only when scheduled tasks are enabled in your deployment.
| Type | Shows |
|---|---|
| All | Ordinary chats and the runs of your scheduled tasks. |
| Chat | Only ordinary chats. |
| Task | Only the runs of your scheduled tasks. |
Origin says where a conversation comes from.
| Origin | Shows |
|---|---|
| All | Every conversation you can see, in the sections below. |
| Personal | Conversations you own. They are listed under My chats. |
| Shared | Conversations others shared directly with you. |
| Organization | Conversations published to your organization. |
With All, the list is grouped into the sections Pinned, My chats, Shared, and Organization. Pinned holds the conversations you pinned.
Conversation actions
Point to a conversation in the list and click its three-dot icon for actions on that conversation:
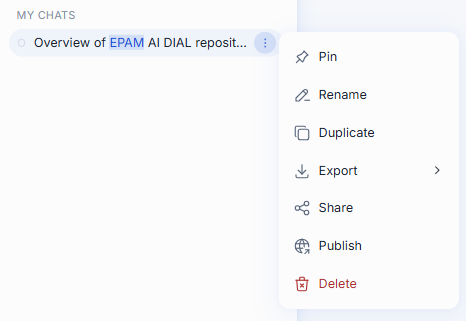
Available actions vary by conversation. A conversation shared with you or published to your organization only offers Pin, Duplicate, Export, and (for a conversation shared with you) Remove from My List. Rename, Share, Publish, and Delete are unavailable for it.
Pin a conversation
Select Pin in the conversation actions menu to keep a conversation at the top of your list. A pinned conversation moves to the Pinned section, above My chats. To move it back, select Unpin in its actions menu.

Rename a conversation
A new conversation is named in two steps. When you send your first message, the conversation takes its name from that message. Once the agent has replied, DIAL replaces it with a short title that describes what you asked about, written in the language you used. This happens only once, so the name does not keep changing as the conversation grows.
To set the name yourself, select Rename in the conversation actions menu, edit the name, and click Save.

Click Rename with AI next to the field to generate a name from the conversation as it stands now, which is useful when a conversation has moved on from the topic it started with. The generated name appears in the field for you to review, so you can edit it or close the dialog without saving.
Generated names require a utility model configured by your administrator. Without one, Rename with AI reports an error and conversations keep the name taken from your first message.
Some characters are not allowed in a conversation name and are dropped as you type: tab, ", :, ;, /, \, ,, =, {, }, %, and &. You can use a period at the start of a name or inside it, but a period at the end is removed automatically.
Duplicate a conversation
Duplicate creates an independent copy in My chats, under the same name as the original. The copy is yours, so changes to it do not affect the conversation you copied.
Use it to branch one of your own conversations and take it in a different direction without losing the original. It also works on conversations shared with you or published to your organization, which is the way to get a version of one of those you can actually edit and continue.

Export and import conversations
To export a single conversation, point to Export in its actions menu and click With attachments to get a ZIP archive, or Without attachments to get a JSON file.
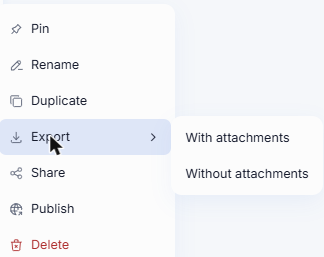
To export everything, click the three-dot icon in the header of the Chats and tasks panel and select Export conversations. All conversations are exported without attachments, as a single JSON file.
To import, click the three-dot icon in the header of the Chats and tasks panel, select Import conversations, and choose your file. A JSON file carries conversations on their own; a ZIP archive can carry several conversations together with their attachments.
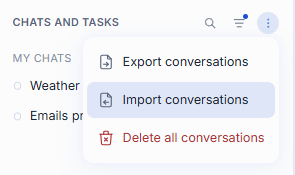
Imports and exports run in a queue that shows each file with its progress, for example Importing 1 file. You can cancel a file while it is in progress. When a file is done, DIAL Chat shows a message: Import successful or Export successful, with the names, or an error such as "was not imported. Please try again." or, for an export that is too large, "The file is too large." If a file is not a valid export file, the message reads "This file could not be imported. Please choose a valid export file." If some attachments cannot be uploaded or exported, they are skipped and a warning says so.
An import always adds new conversations. It never replaces one you already have, even when the names match. Attachments that come in with an import are available afterwards in the File Manager.
Share or publish a conversation
Share hands specific people a link that gives them access as soon as they open it. What they see stays live, so messages you add after sharing appear for them too.
Publish submits the conversation for review by an administrator, who can approve it into a folder under Organization where anyone with matching access can find it.
Both actions are in the conversation actions menu. See Sharing and publishing for the full workflow, access rules, and how to revoke access.
Remove a shared conversation from your list
A conversation someone shared with you stays in your Shared list until you remove it. Select Remove from My List in its actions menu.
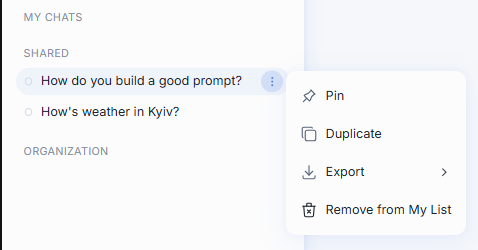
This gives up your access rather than deleting anything. The conversation still belongs to whoever shared it, and you need a new link to get back in.
Delete conversations
To delete one conversation, select Delete in its actions menu and confirm.
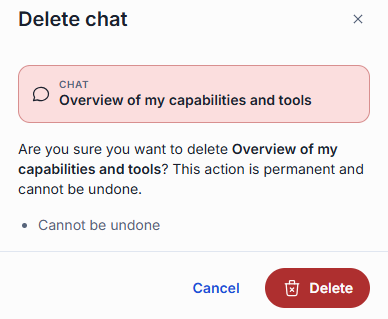
To delete all of them, click the three-dot icon at the top of the Chats and tasks panel and select Delete all conversations.
Further reading
- Sharing and publishing — share a conversation or publish it to your organization
- Chat User Guide: Catalog — find and add agents to your favorites
- Agents — talk to, create, and edit agents in the Catalog
- Chat User Guide: Prompts — save reusable prompt templates
- File Manager — where uploaded and shared files live
- Scheduled tasks — send recurring messages to a model or agent