Manage containers
This page explains how to create, run, stop, configure, and delete containers for AI model adapters, applications, interceptors, and MCPs in DIAL Admin. Administrators use this page to deploy self-hosted workloads and register the resulting endpoints as DIAL entities. Familiarity with DIAL deployment images is assumed.
Prerequisite: The Deployments section requires DIAL Deployment Manager to be installed and configured in your DIAL environment.
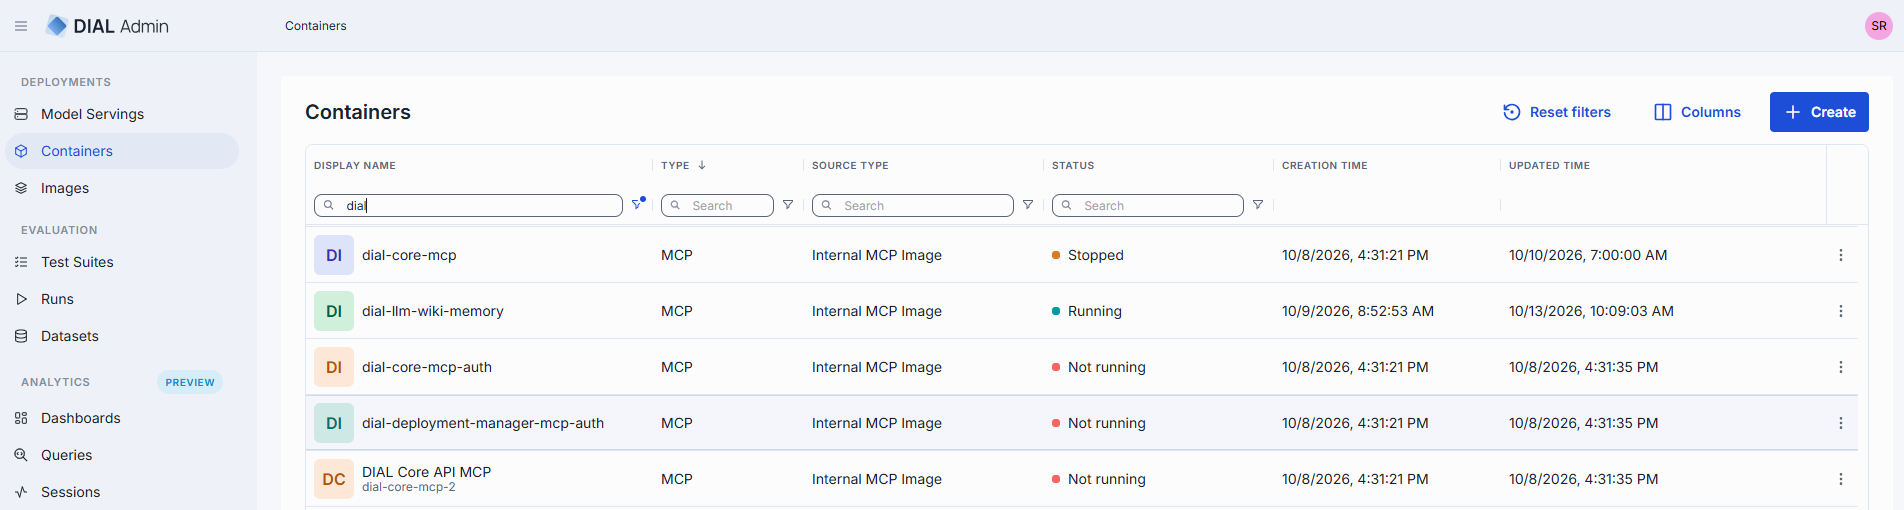
Use a container in DIAL
A container is a means to create DIAL entities. The workflow is the same for every container type:
- Create a container and run it. Wait for the status to change to Running.
- On the container screen, click Create <Entity>.
- Review the pre-populated values in the dialog and click Create.
The button is available only while the container is Running. The new entity is linked to the container, and DIAL Admin pre-populates the endpoint path, so you don't enter the container URL. Refer to Create an entity from a running container for details.
| Container | Button | Entity created | Pre-populated by DIAL Admin |
|---|---|---|---|
| Model serving | Create Model | Model | Link to the container, endpoint path openai/v1/chat/completions, Override Name set to the container name. |
| Adapter | Create Adapter | Adapter | Link to the container, completion endpoint path v1. |
| Application | Create Application | Application | Link to the container. |
| Interceptor | Create Interceptor | Interceptor | Link to the container. |
| MCP | Create | Toolset or Asset Toolset | Link to the container (Toolset), or the container URL as the endpoint (Asset Toolset), and the container transport. |
Shared container lifecycle
The following steps, properties, and behaviors apply to all container types (adapter, application, interceptor, and model serving) unless a per-type section below states otherwise.
Container grid columns
Each container list screen shows the following columns:
| Column | Description |
|---|---|
| Display Name | Name of the container rendered in the UI. |
| Description | Brief description of the container. |
| Status | Current status (e.g., Running, Stopped). |
| Type | Type of the container: Adapter, Application, Interceptor, MCP, Model Serving. |
| Source type | Docker Image Reference for external Docker images; Internal <Type> Image for DIAL self-hosted images. |
| Source Name | Docker image name or ID of the internal image. |
| Container URL | URL to access the running container. |
| Author | Email address of the container creator. |
| Creation Time | Container creation timestamp. |
| Updated Time | Timestamp of the last update. |
| Topics | Semantic labels associated with the container. |
| CPU request | The minimum CPU guaranteed for the container; used for scheduling. |
| CPU limit | The maximum CPU the container is allowed to use. |
| Memory request | The minimum memory guaranteed for the container; used for scheduling. |
| Memory limit | The maximum memory the container is allowed to consume. |
| Actions | Per-row actions: Open in a new tab, Duplicate, Stop/Run, Delete. |
Create a container
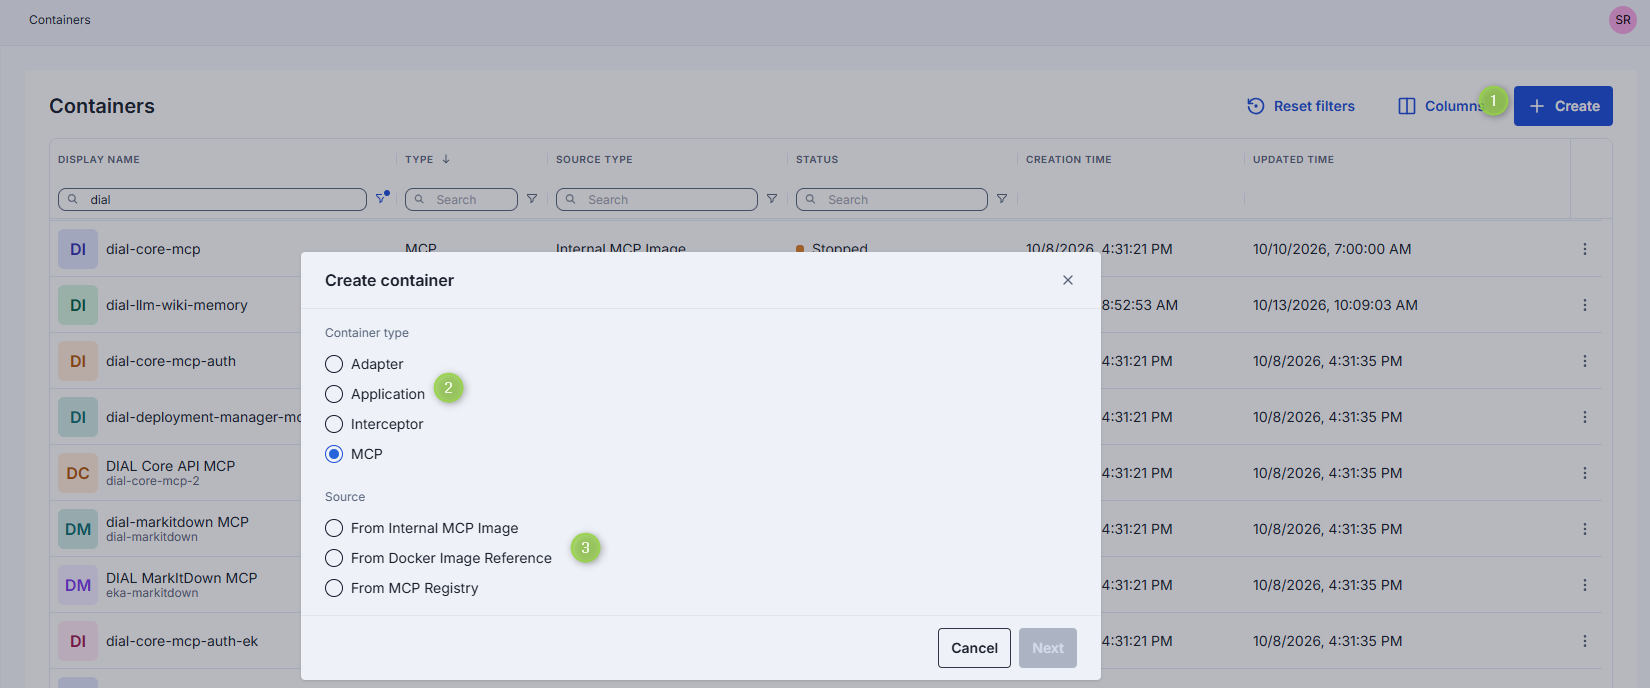
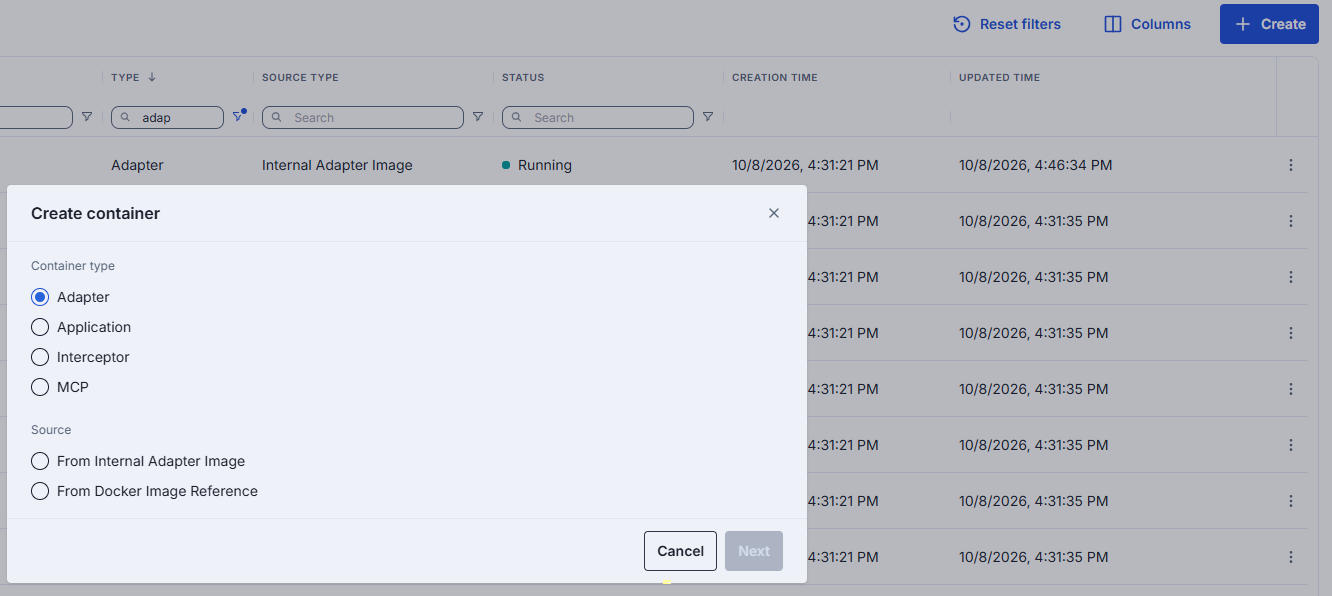
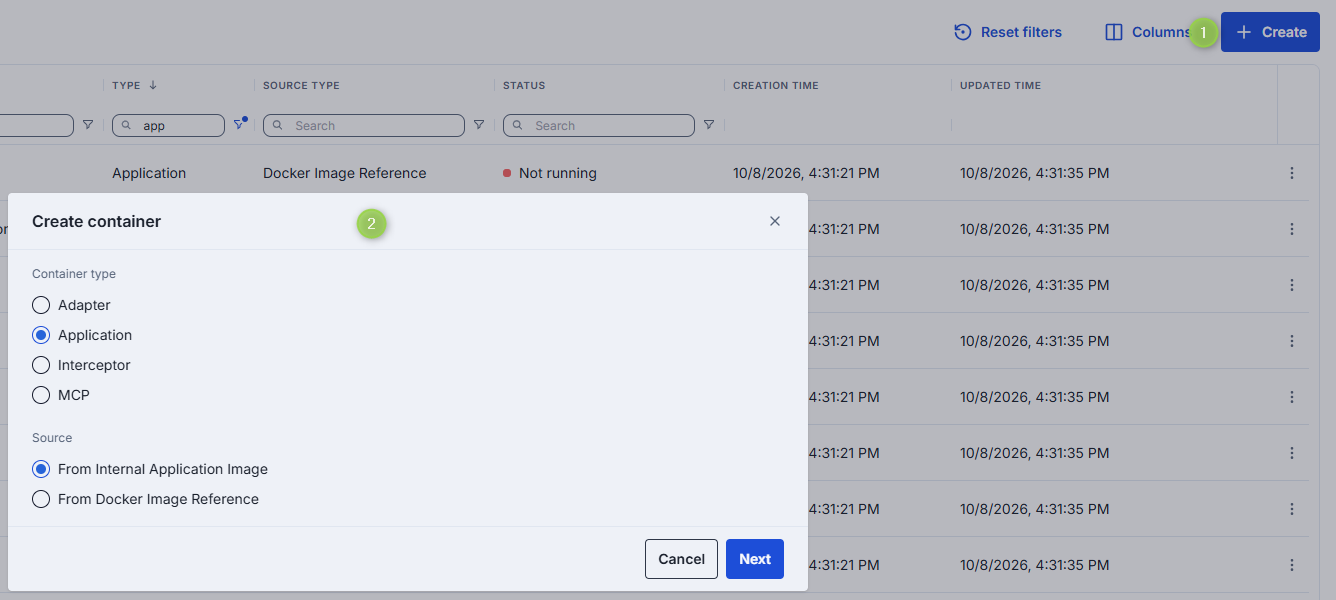
On the main screen, click Create to create containers of several types: Adapter, Application, Interceptor, MCP.
- From Internal <Type> Image: Select the desired image from the list and choose an installed version (marked with a green indicator).
- From Docker Image Reference (or External Docker Image Reference): Provide the URI of the external Docker image you want to use.
- From MCP Registry
Specify ID, Display Name, and Description, then click Finish (or Create) to create the container. The configuration screen opens. You can modify settings, run, stop, or delete the container from there.
Container actions
Click any container to access the configuration screen.
The configuration screen header provides the following actions for all container types:
| Action | Description |
|---|---|
| Create <Entity> | Available for running containers. Opens a dialog to create the corresponding DIAL entity (adapter, application, interceptor, toolset or model). See Create an entity from a running container. |
| Run / Stop | Start or stop the container. |
| Delete | Remove the container. Deleting a container affects entities created from it. |

Get the container URL
When the container status is Running, its URL appears in the screen header next to the status. Click the copy icon to copy it. The URL is not shown for a container that is not running.
In the container grid, the Container URL column is hidden by default. Enable it in the column settings.
Create an entity from a running container
-
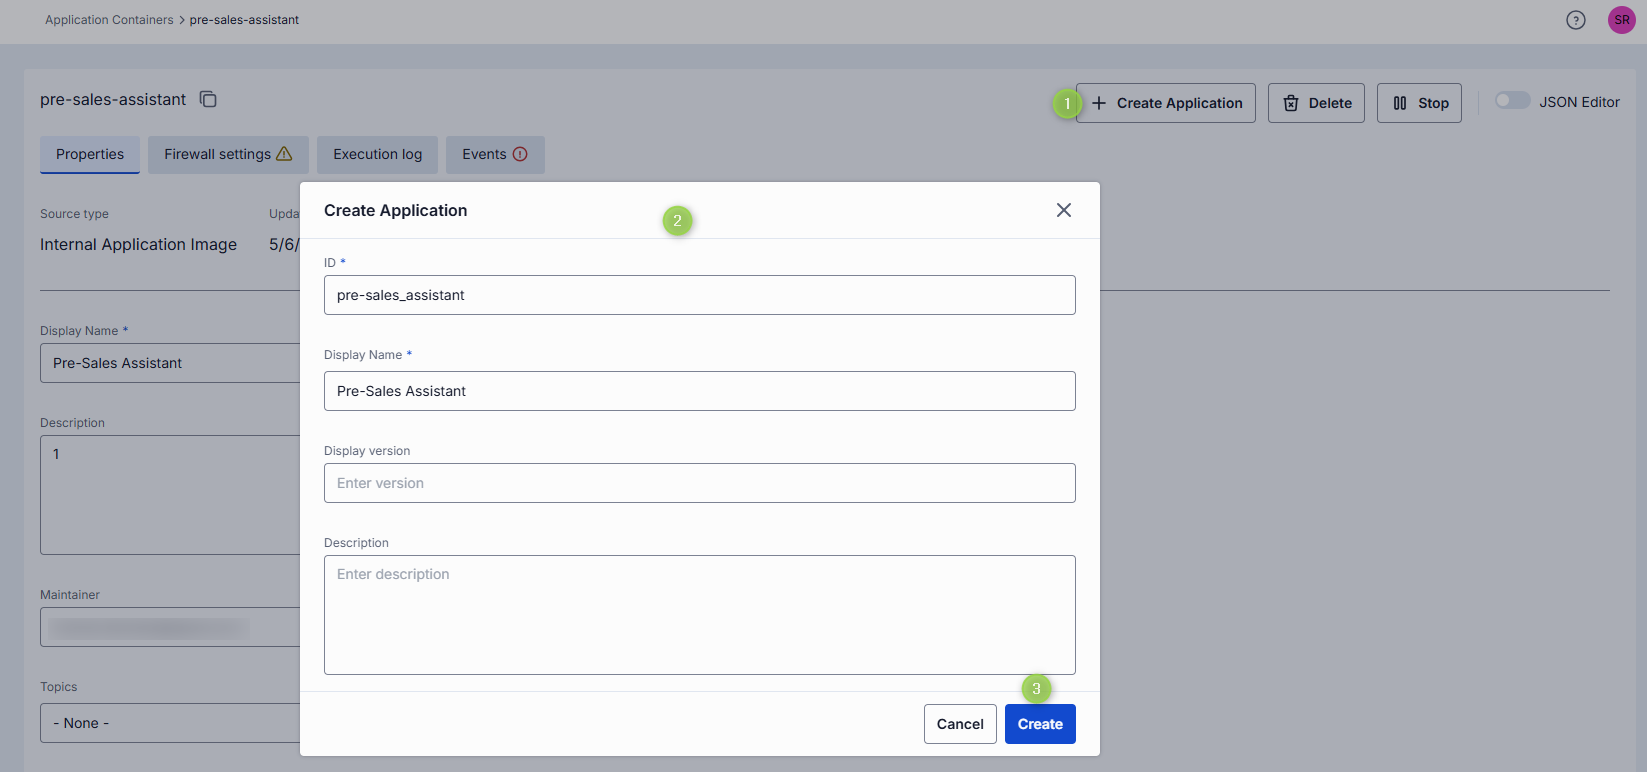
On the configuration screen of the running container, click Create <Entity>. Containers of the MCP type offer a Create dropdown instead. See MCP-specific actions.
-
Fill in the dialog:
- ID: Unique identifier. Auto-populated from the container.
- Display Name: Name shown in the UI. Auto-populated from the container.
- Description: Brief description.
Some entity types have additional fields, such as Display Version for models.
-
Click Create. Repeat to create additional entities from the same container.
The dialog pre-populates the container link and the endpoint path for the entity type. Refer to the table in Use a container in DIAL for the values per container type.
Properties
The Properties tab contains the following fields for all container types. Per-type differences are noted in each type's section.
Note
Configuration fields are disabled for editing when a container is in a transition state (pending or stopping).
| Property | Required | Editable | Description |
|---|---|---|---|
| ID | — | No | Unique read-only identifier. 2–36 characters. Lowercase letters, numbers, and hyphens only. |
| Source Type | — | No | Read-only source type used to create the container. |
| Creation Time | — | No | Container creation timestamp. |
| Updated Time | — | No | Timestamp of the last update. |
| Status | — | No | Current status (e.g., Running, Stopped). |
| URL | — | No | URL to access the running container. |
| Restarts | — | No | Restart counter for launching containers. Use to identify crash loops. Details are in the Execution log. |
| Display Name | Yes | Yes | Name rendered in the UI. 2–255 characters. |
| Description | No | Yes | Brief description of the container. |
| Maintainer | No | Yes | Email address of the maintainer. |
| Topics | No | Yes | Semantic labels (e.g., "finance", "support") for navigation. Custom topics: maximum 255 characters, no leading or trailing spaces. |
| Image reference | Conditional | Yes | The internal image, MCP image or external Docker image used for this container. See per-type sections for exact field names. Changing the internal image redeploys the container. |
| Endpoint Configuration | No | Yes | Endpoint and port settings for the container. Changes to a running container trigger a RollingUpdate restart. |
| Autoscaling | No | Yes | Replica scaling settings: - Automatic scale to zero: Reduce replicas to zero after a period of inactivity (default: 5-minute delay for new containers). - Min and Max Replicas: Minimum and maximum number of running instances. Default for new containers: 0 to 1 replica. - Pending requests to trigger autoscaling: Queue depth that triggers scale-up. Note > Existing containers retain their current autoscaling configuration after an upgrade. |
| Environment Variables | No | Yes | Environment variables for the container. Changes trigger a RollingUpdate restart. - Name: 1–253 characters. Letters, numbers, dots ( .), hyphens (-), and underscores (_).- Value: 1–253 characters. Letters, numbers, dots ( .), hyphens (-), and underscores (_). |
| Resources | No | Yes | CPU, memory, and GPU resource requests and limits. Changes trigger a RollingUpdate restart. Validation rules: - Values must be numeric and greater than 0. - Maximum allowed values for cpu, memory, and nvidia.com/gpu are defined on the backend.- For each resource key (e.g., cpu), the limit must not be less than the request. |
| Compute | No | Yes | The Compute section groups resource requests/limits and the node pool selector. See Node pool selection. |
| Configuration | No | Yes | Executable command and arguments used to launch the container. |
| Startup probe | No | Yes | Health check that signals when the container is ready to serve traffic. - Type: HTTP (GET request; success = HTTP 200–399) or TCP (connection success). - Port: Container port for the probe. - Path: Request path. Applies to HTTP type only. - Initial delay seconds: Wait time after container start before the first probe. - Period seconds: Interval between consecutive probes. - Timeout seconds: Maximum time allowed for a single probe to complete. - Failure threshold: Consecutive failures before the container is marked as failed. |
Note
Advanced users can switch to the JSON editor view for bulk updates, copying configuration between environments, or adjusting settings not exposed in the form UI.
Firewall settings
The firewall settings for a container specify which external domains the container is allowed to connect to. This controls outgoing traffic, restricting communication to trusted domains only.
Domain name requirements: Enter domain names without a protocol prefix, for example github.com. Each domain must contain at least one dot. Labels may include letters, numbers, and hyphens (1–63 characters each, not starting or ending with a hyphen). The top-level domain must be at least two letters.
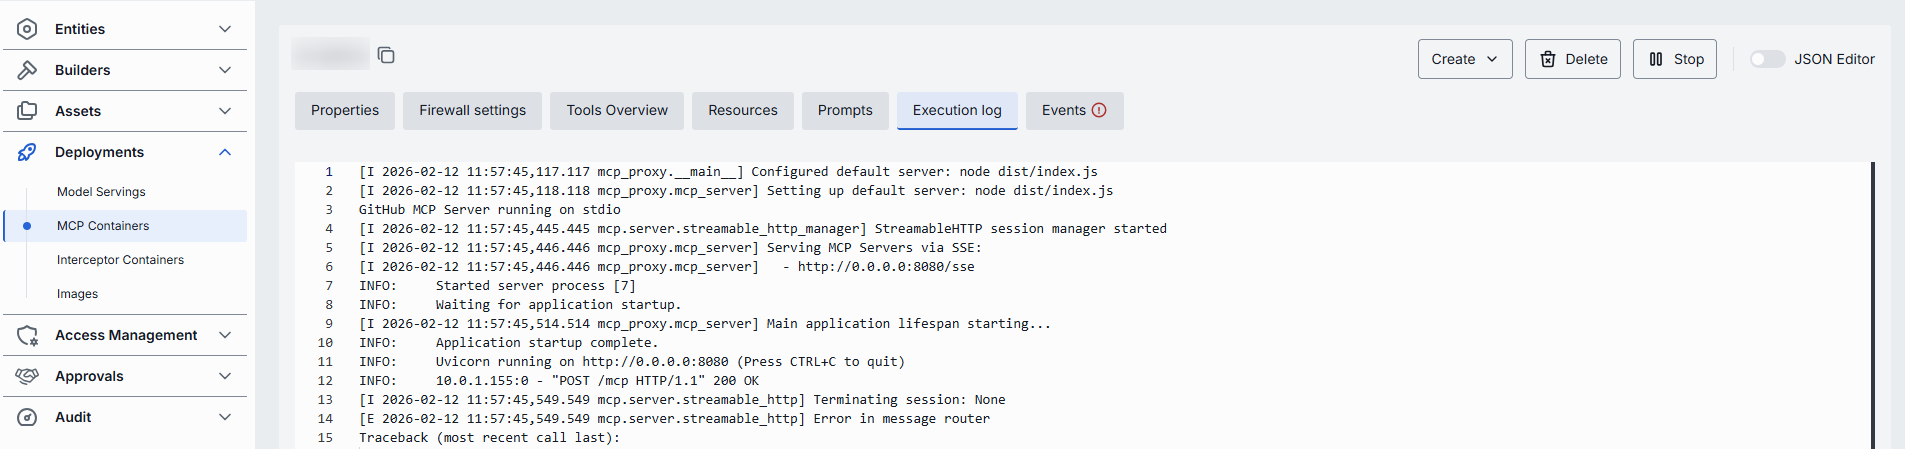
Execution log
The Execution Log tab shows real-time logs generated by the container, including errors and operational events.
When a container starts with more than one pod, logs are shown per pod:

When issues occur, health indicators appear:
| Indicator | Description |
|---|---|
| Restarts | Restart counter. Use to identify crash loops. |
| Last restarted at | Timestamp of the last restart. |
| Last reason | Restart failure reason. |
| Termination message | The message from the pod's last terminated state, if available. Shows why the container was terminated (for example, OOMKilled or an application-level error). |
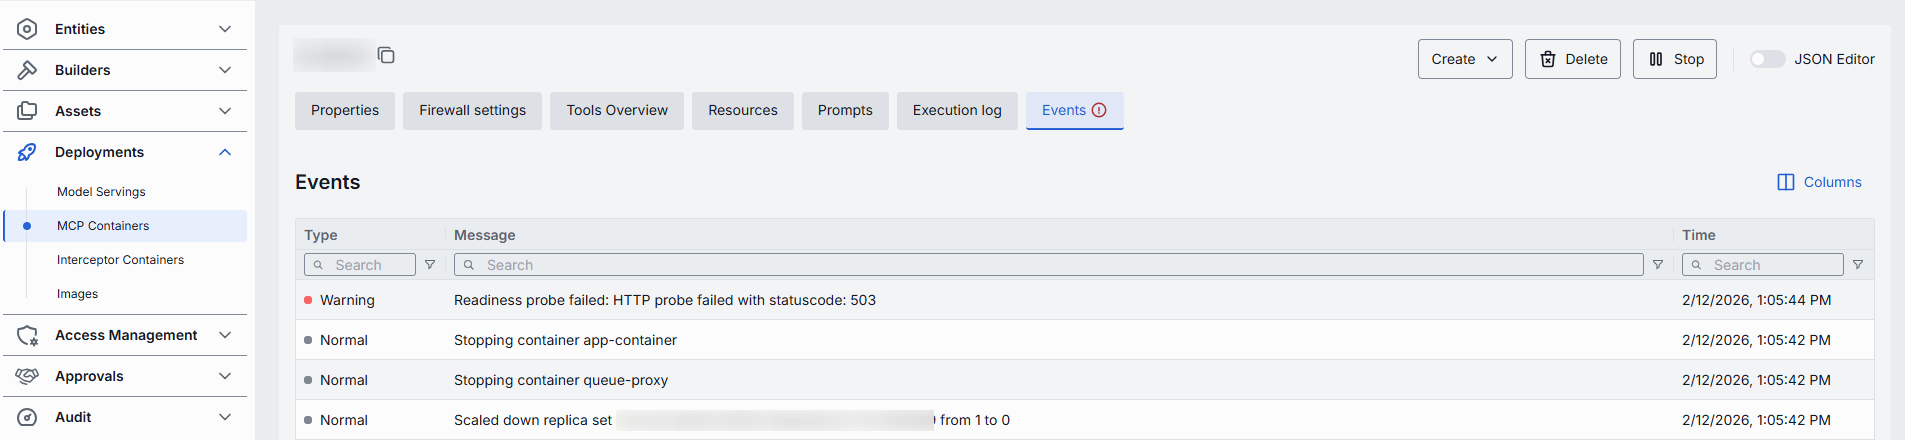
Events
The Events tab shows significant state changes, such as start and stop actions, errors, and configuration changes.
Audit
The Audit tab shows activity, usage, and operational metrics for the container, including configuration changes and runtime actions.
Note
This tab shows the same data as the global Activity section, scoped to the selected container.
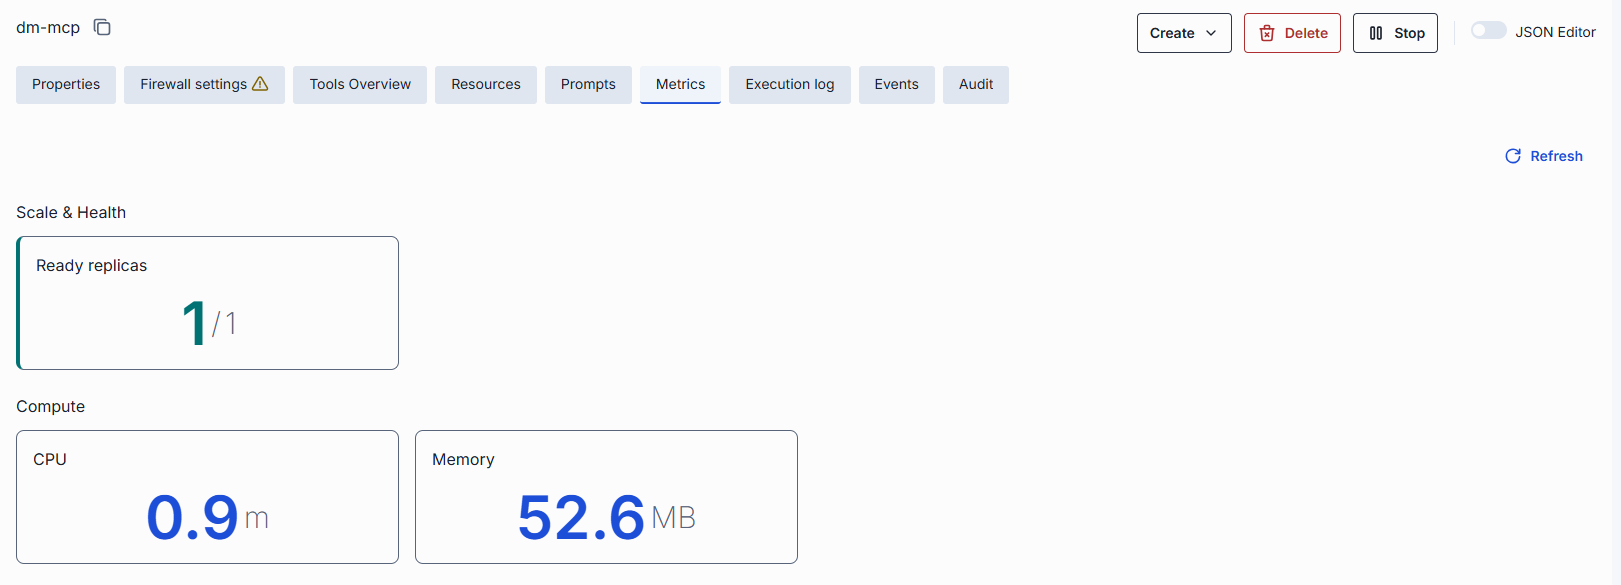
Metrics
The Metrics tab displays live operational metrics for a running container. The tab is disabled when the container is not in Running status. Metrics are organized into sections:
| Section | Availability | Metrics |
|---|---|---|
| Scale & Health | All container types | Ready replicas (ratio of ready to total), request error ratio (Model Servings with text-generation inference task only). |
| Throughput | Model Servings only | Tokens per second (prompt and generation), requests per second. |
| Compute | All container types | CPU usage (millicores), memory usage, GPU memory usage and GPU utilization percentage (Hugging Face model servings only). |
| Latency | Model Servings only | Time to first token (TTFT), inter-token latency, end-to-end latency, request latency (text-classification only). Shown as p50/p95/p99 distribution. |
| Load | Model Servings only | Running requests, queue depth, KV-cache usage (gauge with color-coded zones). |
Metrics are filtered by inference task type when applicable. Data is provided by the Deployment Manager metrics endpoint and refreshed automatically.
Note
The Metrics tab uses Deployment Manager's workload metrics snapshot. CPU/memory metrics need metrics-server; GPU metrics need the NVIDIA DCGM exporter. Platform engineers configure these separately in Workload metrics.
Node pool selection
When node pools are configured in the Deployment Manager, the Compute section of a container's properties displays a Node Pool selector. Node pools let you pin workloads to specific infrastructure — for example, GPU-backed pools for model servings and CPU pools for adapters.
| Field | Description |
|---|---|
| Node Pool | Select a node pool from the dropdown to assign the container to that pool. If no pool is selected, the container uses the system default. |
Platform engineers define the available pools and creation-time defaults in DIAL Deployment Manager node-pool settings. Changing a default does not move existing containers to another pool.
Adapter containers
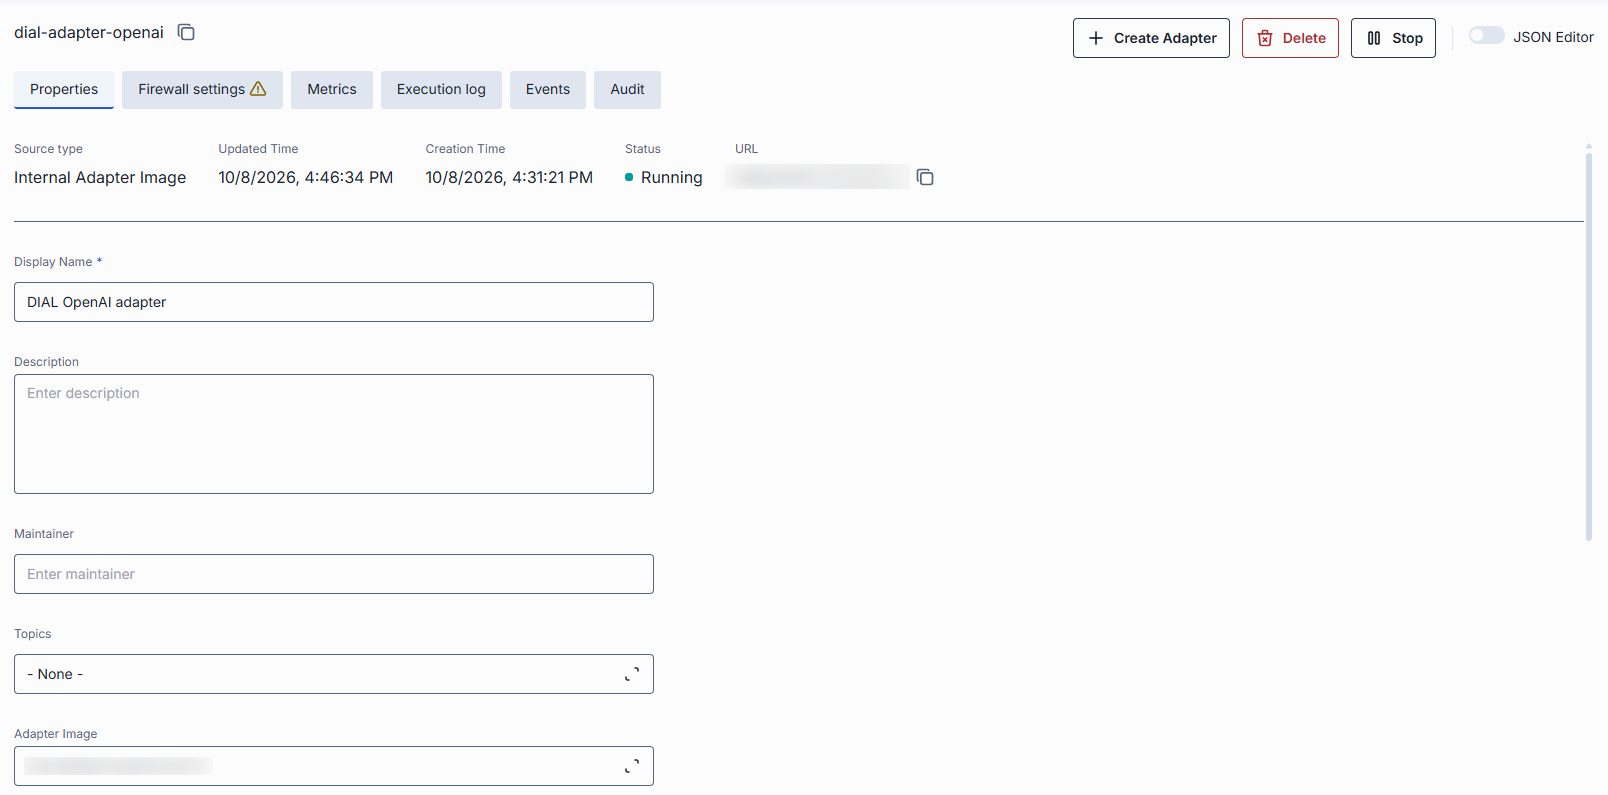
Adapter containers host self-hosted AI model adapters. Once running, create an adapter from the container.
Create an adapter container
Follow the shared creation steps. Select from Internal Adapter Image or External Docker Image Reference.
Adapter-specific actions
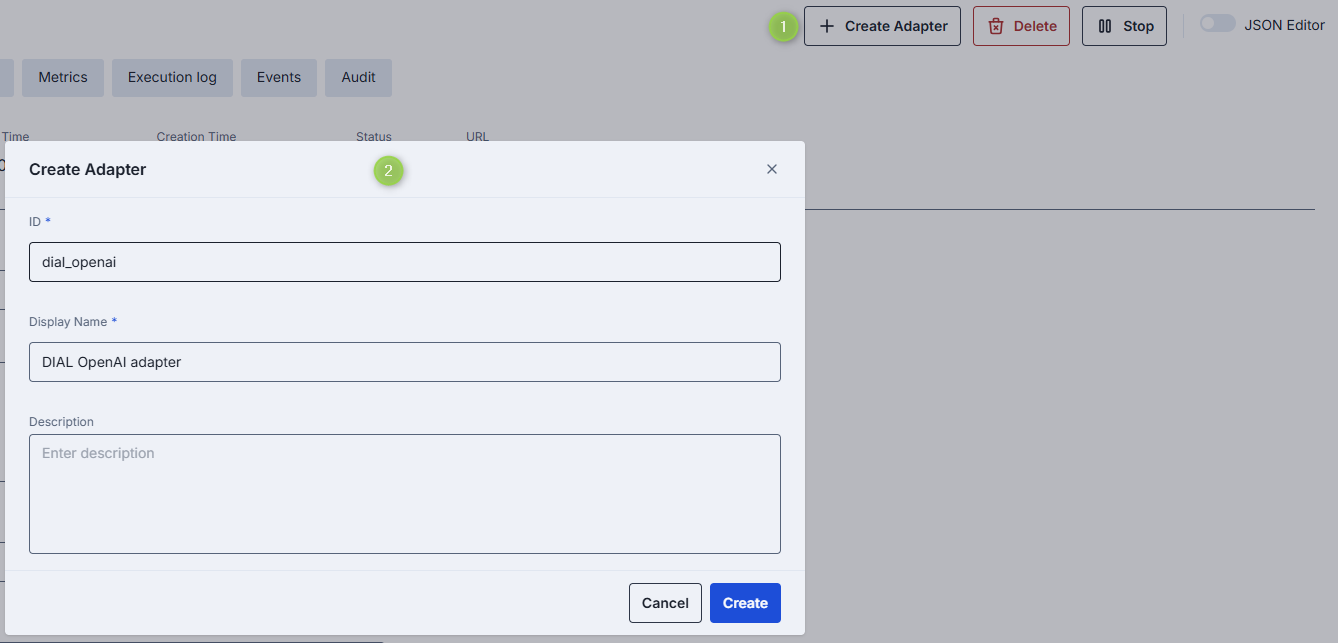
| Action | Description |
|---|---|
| Create Adapter | Available for running containers. Opens a dialog to create an adapter linked to the container. DIAL Admin pre-populates the completion endpoint path with v1. |
Follow Create an entity from a running container.
Adapter-specific properties
In addition to the shared properties, adapter containers include:
| Property | Editable | Description |
|---|---|---|
| Adapter Image | Yes | Internal Adapter image used to create the container. Click to change the source image. Changing the image redeploys the container. |
| Docker Image Reference | Yes | External Docker image reference. Available only when the container was created from an external image. |
Application containers
Application containers host self-hosted DIAL applications. Once running, create an application from the container.
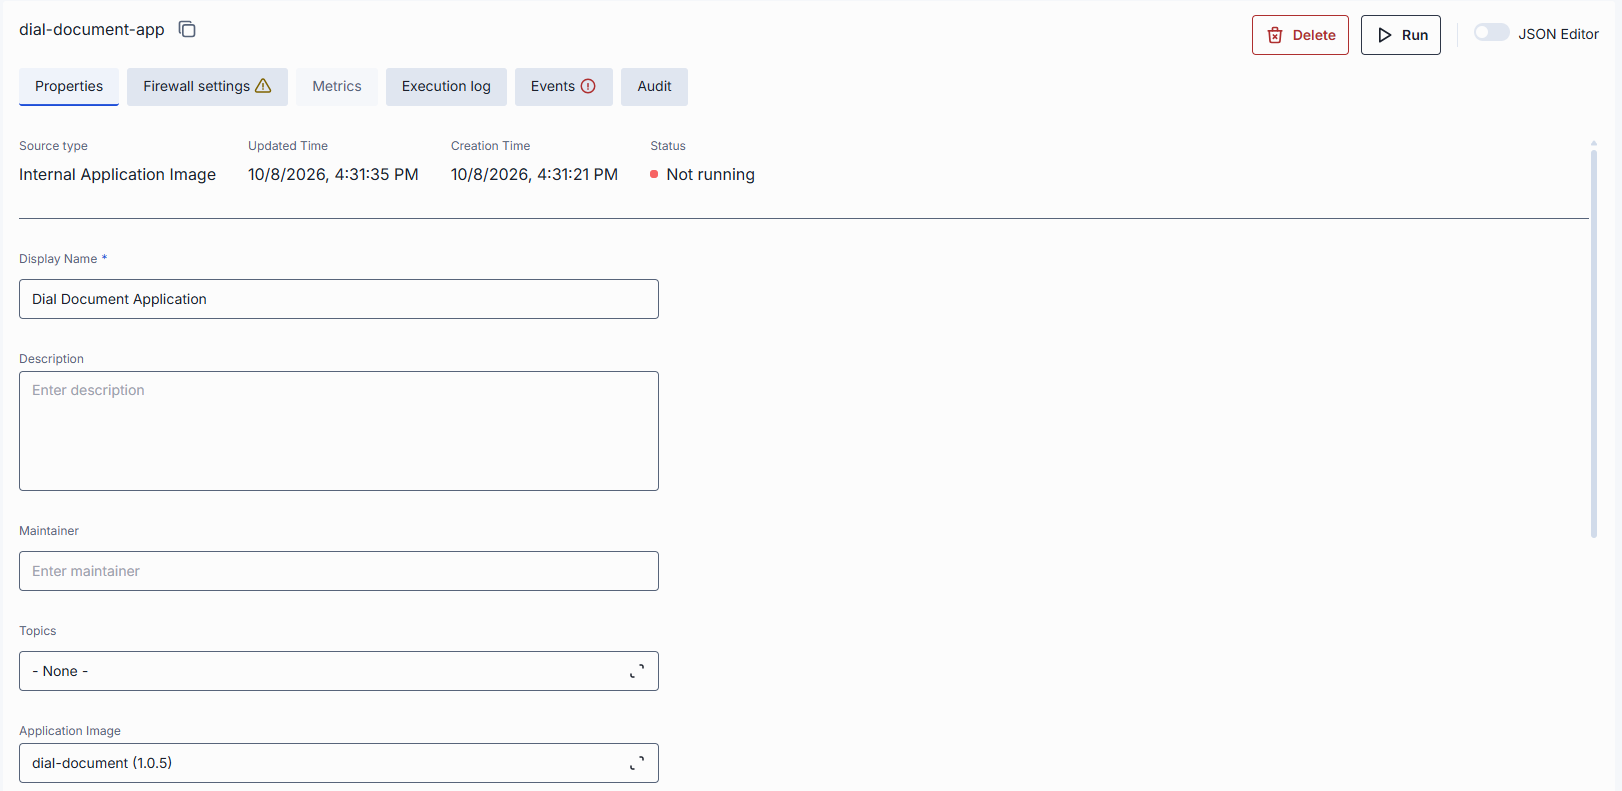
Create an application container
Follow the shared creation steps. Select from Internal Application Image or Docker Image Reference.
Application-specific actions
| Action | Description |
|---|---|
| Create Application | Available for running containers. Opens a dialog to create an application linked to the container. |
Follow Create an entity from a running container.

Application-specific properties
In addition to the shared properties, application containers include:
| Property | Editable | Description |
|---|---|---|
| Application Image | Yes | Internal application image used to create the container. Disabled when an external Docker image was used. |
| Docker Image Reference | Yes | External Docker image reference. Disabled when an internal image was used. |
Note
For new application containers, autoscaling defaults to scale to zero enabled with a 5-minute inactivity delay and a replica range of 0 to 1.
Interceptor containers
Interceptors are middleware components that modify incoming or outgoing requests to or from applications and AI models. Use cases include PII obfuscation, guardrails, and safety checks. Interceptor containers host self-hosted interceptors deployed from Docker images.
There are three ways to add interceptors in DIAL:
- Provide the endpoint of your custom interceptor directly using the External Endpoint source type in Interceptors.
- Deploy custom interceptors using Docker images, create containers, and use the container as a source type — as described on this page.
Tip
Use the Interceptors SDK to create custom interceptors.
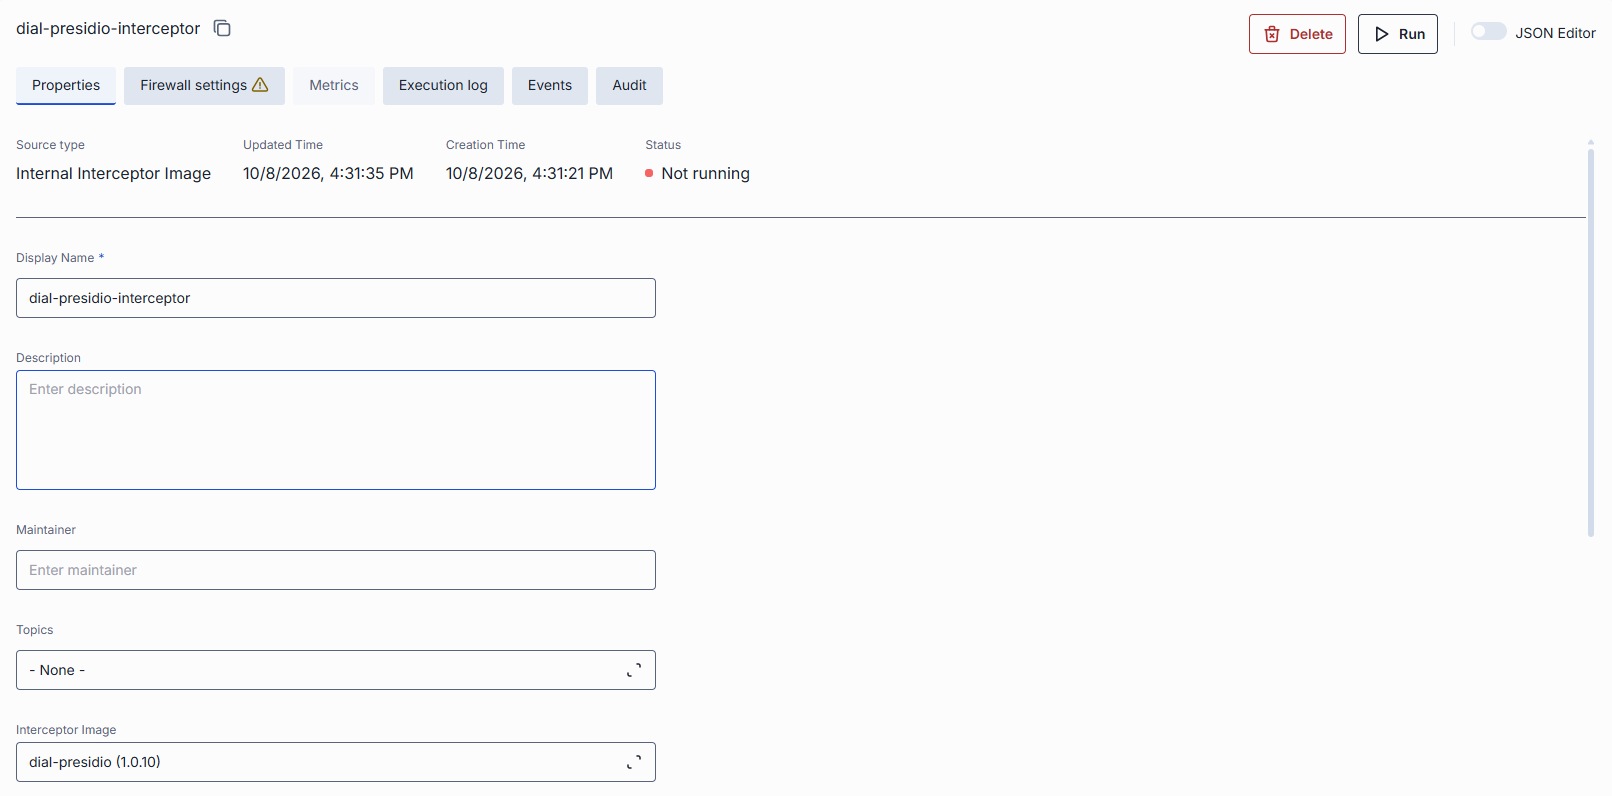
Create an interceptor container
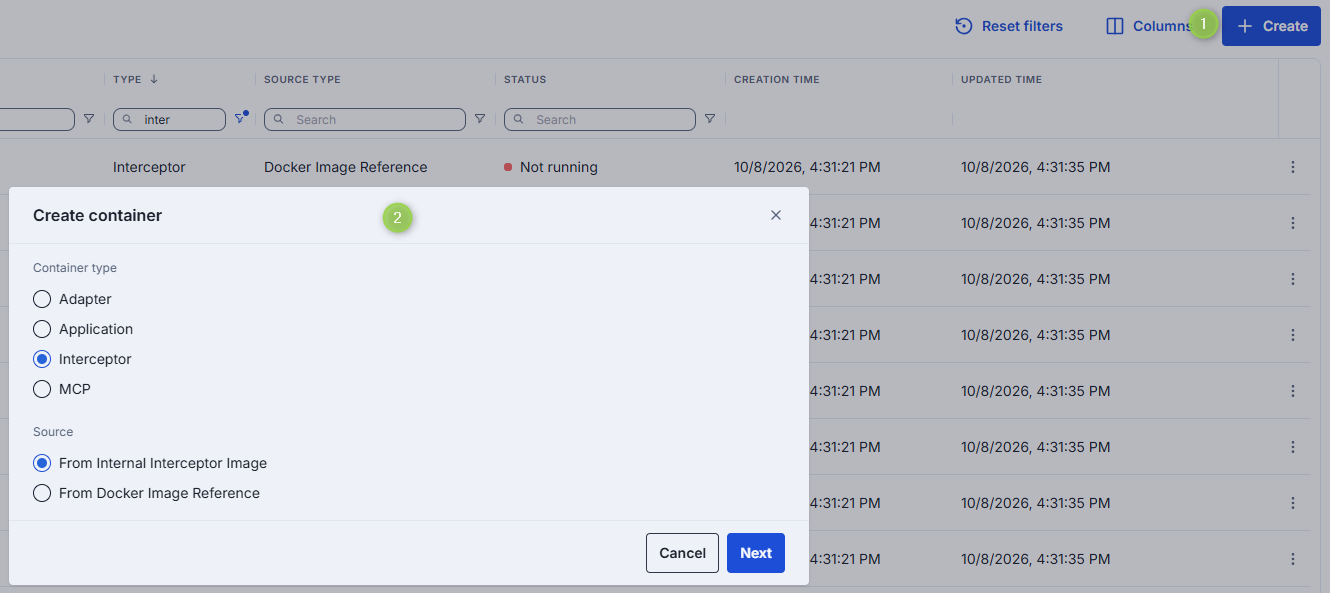
Follow the shared creation steps. Select from Internal Interceptor Image or Docker Image Reference.
Interceptor-specific actions
| Action | Description |
|---|---|
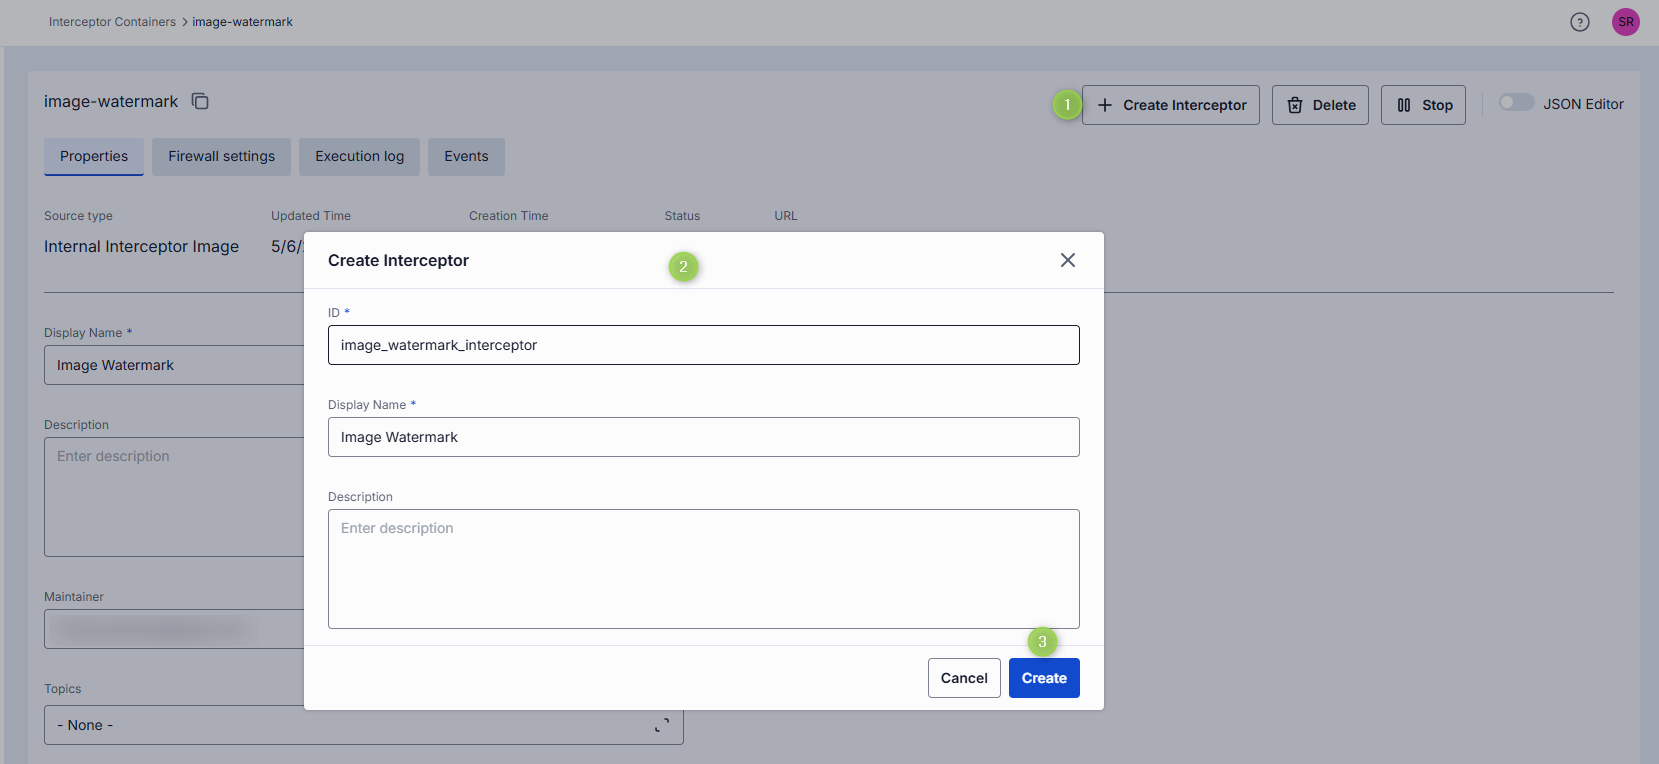
| Create Interceptor | Available for running containers. Opens a dialog to create an interceptor linked to the container. |
Follow Create an entity from a running container. The interceptor can then be used by DIAL applications, toolsets, and models, or set as a global interceptor.

Interceptor-specific properties
In addition to the shared properties, interceptor containers include:
| Property | Editable | Description |
|---|---|---|
| Docker Image Reference | Yes | External Docker image reference. Available only when the container was created from an external image. |
| Interceptor Image | Yes | Internal Interceptor image used to create the container. Click to change the source image. Changing the image redeploys the container. |
MCP containers
Administrators can add MCP containers from internal images, external Docker references, or the MCP Registry, and then expose their capabilities as toolsets to DIAL users. Familiarity with DIAL deployment images is assumed.
Create an MCP container
Follow the shared creation steps. Select from Internal MCP Image or Docker Image Reference or MCP Registry.
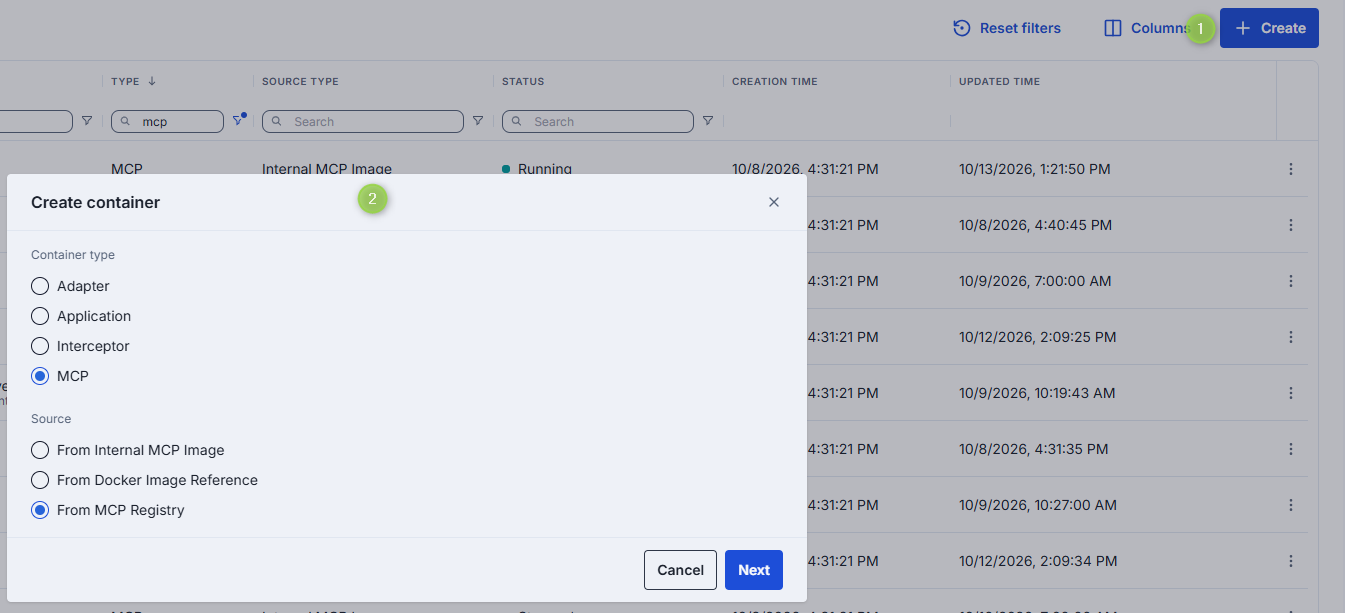
- From Internal MCP Image: Select the desired image from the list and choose an installed version (marked with a green indicator).
- From Docker Image Reference: Provide the URI of the external Docker image you want to use.
- From MCP Registry: Enter the name of an MCP server from the MCP Registry. Start typing to search, or click Select from registry to browse available servers and their details.
Warning
When creating from MCP Registry, the selected MCP server must have an OCI package and must support Remote transport:
streamable-httporsse.
Specify ID, Display Name, and Description, then click Finish to create the container. The configuration screen opens immediately.
MCP-specific actions
The configuration screen header provides the following actions:
| Action | Description |
|---|---|
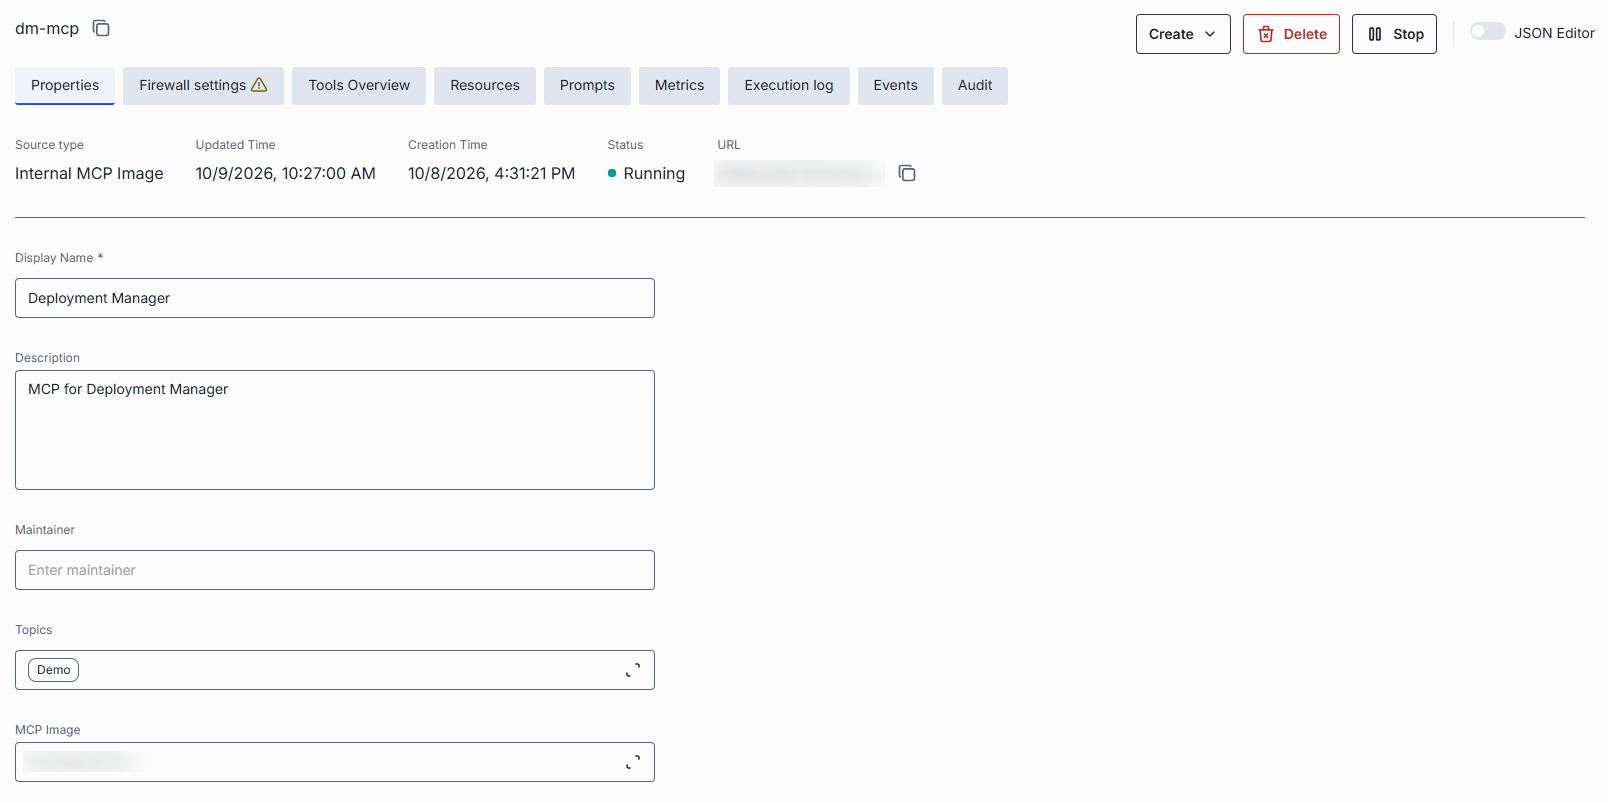
| Create | Available for running containers. Opens a dropdown to create a Toolset or an Asset Toolset. |

The high-level flow for making an MCP server available to DIAL users as a toolset is:
- Deploy an image of type MCP.
- Create an MCP container from the installed image (described on this page).
- Run the container and, on its configuration screen, use the Create button to create a toolset.
Toolsets created this way can be used in Quick Apps workflows to perform specific tasks.
Create a toolset
Select Toolset in the Create dropdown and follow Create an entity from a running container. The toolset uses the container as its source. The transport of the container is pre-populated.
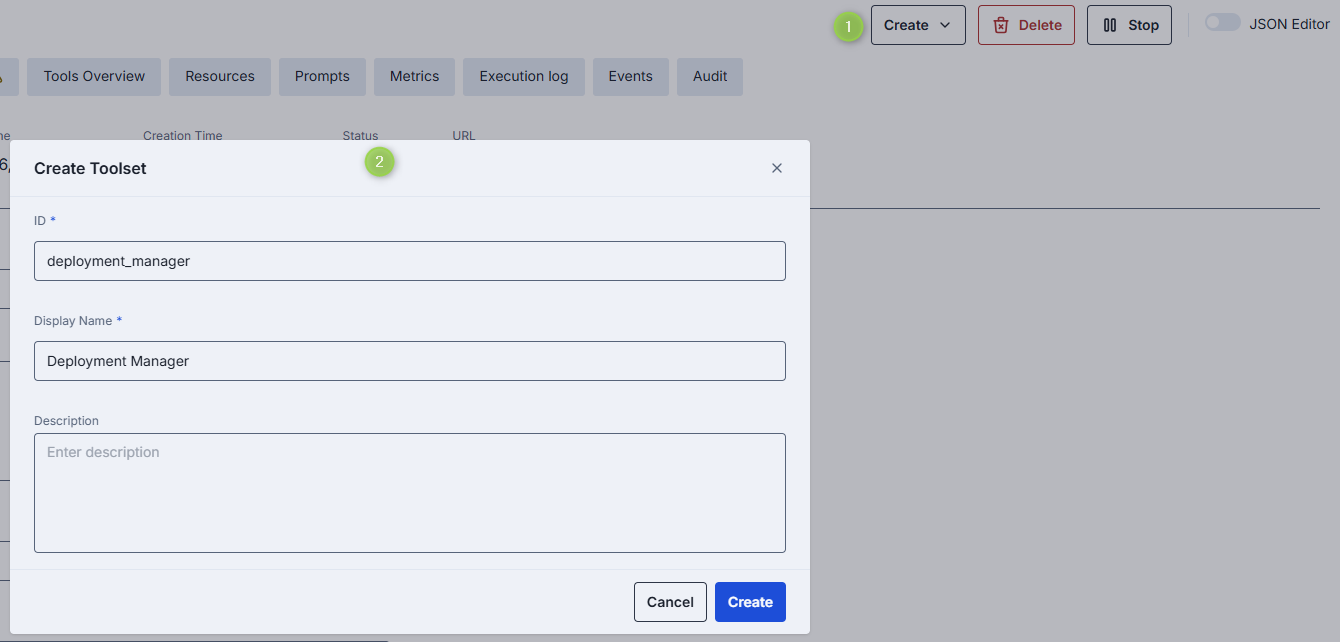
Create an asset toolset
Select Asset Toolset in the Create dropdown. The dialog opens with the container URL as the endpoint and the container transport pre-populated.
MCP-specific properties
The Properties tab shows the container's properties.
| Property | Required | Editable | Description |
|---|---|---|---|
| Source Type | — | No | Source type used to create the container: - Internal MCP Image - Docker image reference - MCP Registry |
| MCP Image | Conditional | Yes | Internal MCP image used to create the container. Available for containers created from internal images. |
| Docker Image Reference | Conditional | Yes | URI of the external Docker image. Available when an external image was used to create the container. |
| MCP server name | Conditional | Yes | Name of the MCP server from the MCP Registry. Start typing to search, or click Select from registry to browse. Available when the container was created from the MCP Registry. |
Note
Advanced users can switch to the JSON editor view for bulk updates, copying configuration between environments, or adjusting settings not exposed in the form UI.
Tools overview
Tools are specific functions supported by the MCP server that clients can invoke to perform actions such as processing, transforming, or analyzing data.
This tab shows the list of tools supported by the selected MCP server along with their details. Toolsets created from this container inherit these tools in the Tools Overview configuration tab.
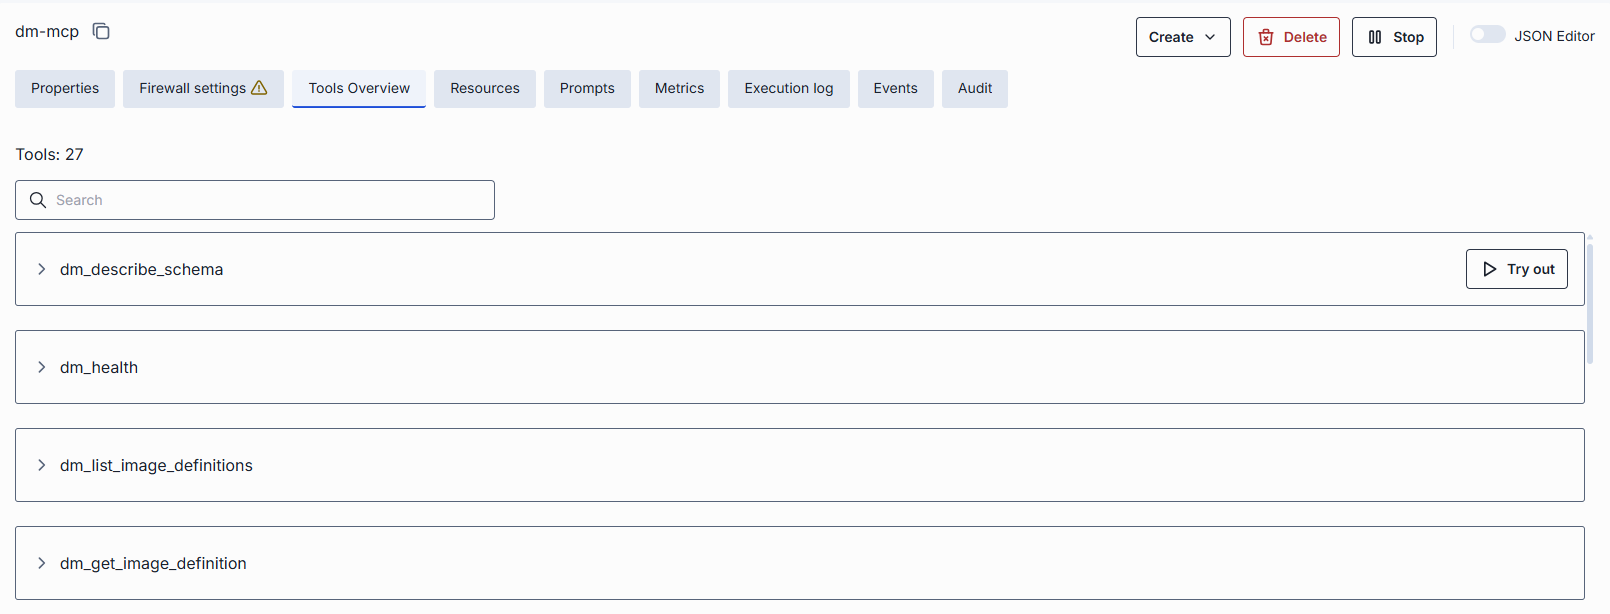
Try a tool
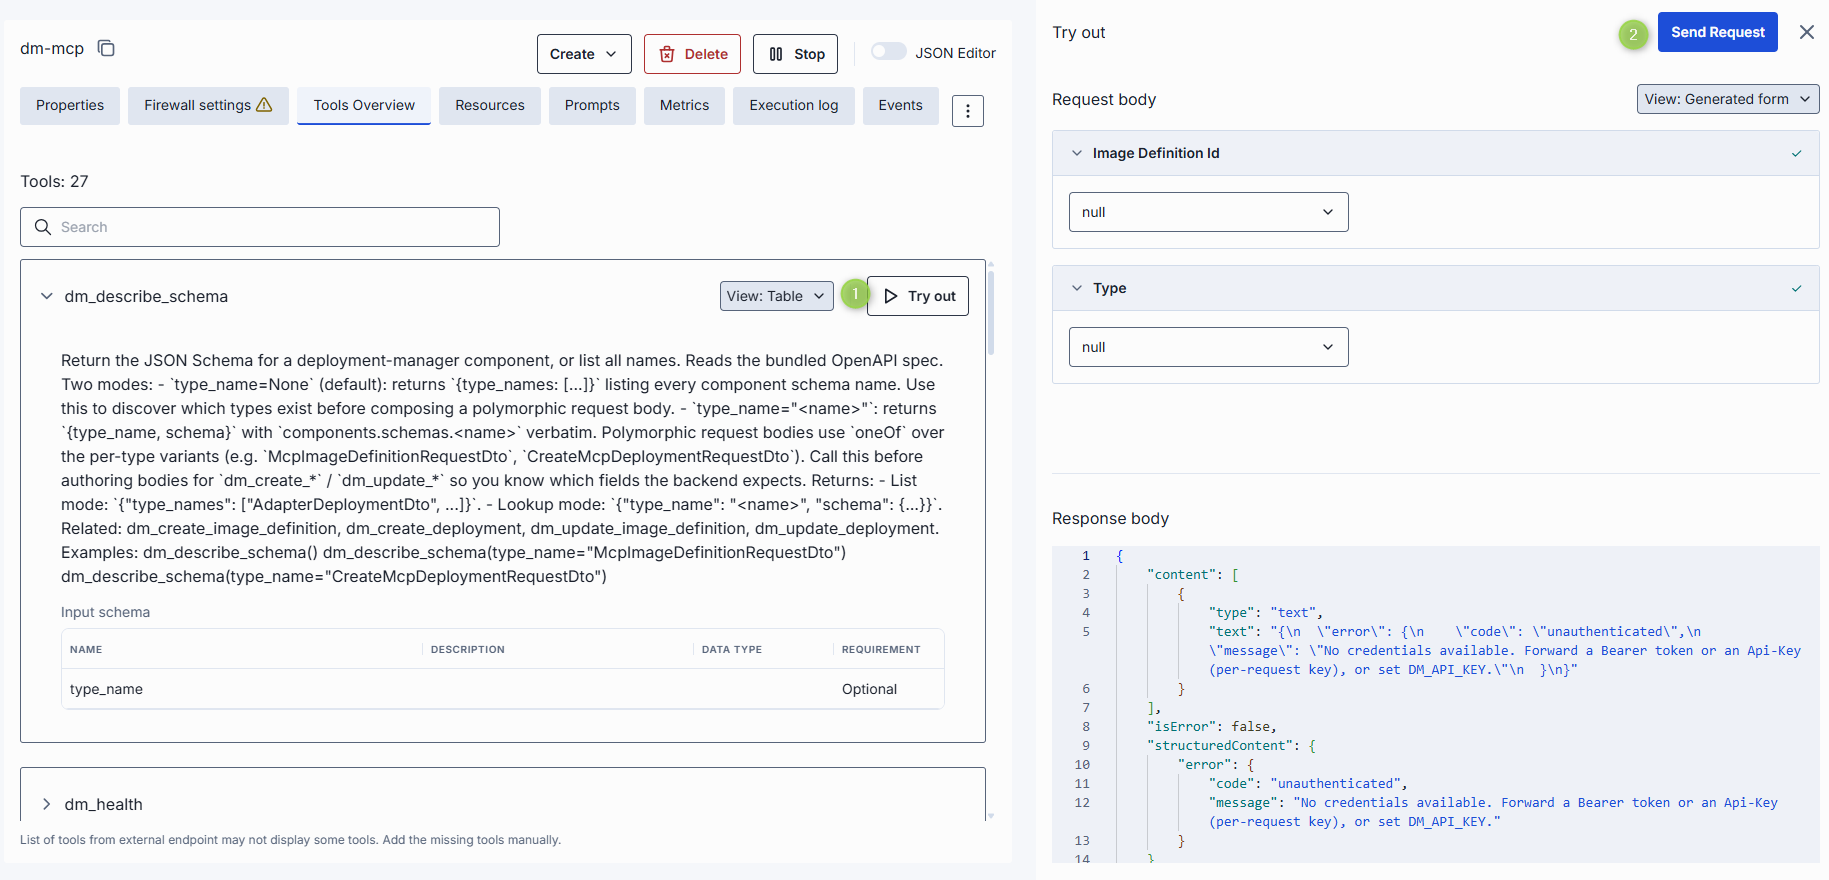
Click or hover over any enabled tool and click Try out to enter test mode.
In test mode you can send a request to the server using either the rendered form UI or a raw JSON mode.
To try a tool:
- Click a tool to view its description and input schema parameters. Toggle between table and JSON view modes.
- Click Try out to open the request sidebar.
- Populate the Request body using the table or JSON view.
- Click Send Request. The server's response appears in the Response body area.
Resources
The Resources tab shows contextual data attached to and managed by the MCP server. This data provides additional context to AI models.

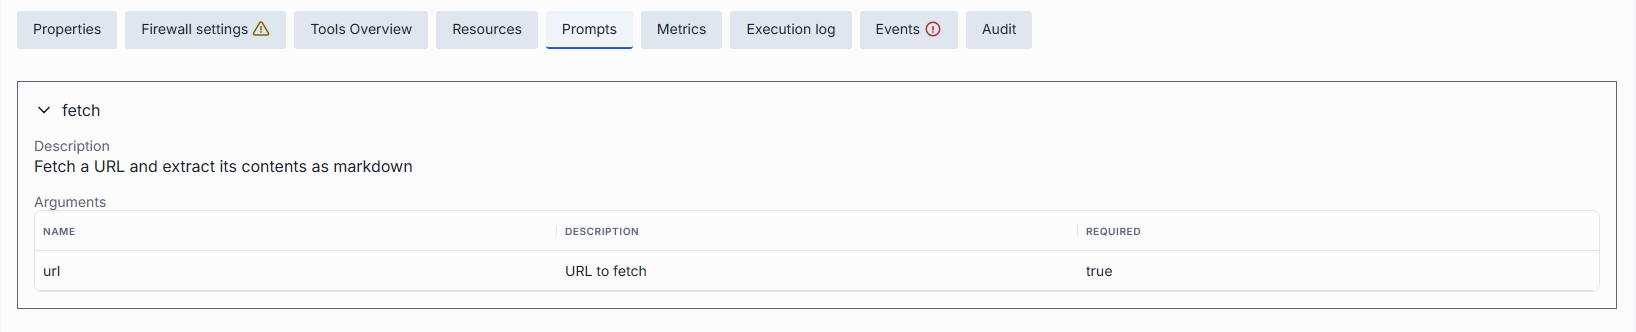
Prompts
The Prompts tab shows pre-defined templates or instructions that guide language model interactions. These are defined by the MCP server.
Further reading
- Manage deployment images — build and version the images that containers are based on
- Manage model servings — run Hugging Face models and create models from them
- DIAL Deployment Manager — how the backend and MCP proxy manage workloads
- DIAL Deployment Manager Backend configuration — cluster access, image builds, and workload settings
- DIAL Admin: Toolsets — register and configure MCP Toolsets in DIAL Admin
- Manage interceptors — register interceptors and attach them in DIAL Admin