Integration with n8n
This guide shows you how to build a custom n8n node that calls DIAL and how to use that node inside your workflows. n8n is an open-source workflow automation tool that connects applications, services, and APIs into automated pipelines. The custom node lets any workflow reach DIAL's chat completion and text embedding endpoints through the Unified API. This guide is for developers who already run DIAL and have a working n8n instance.
Tip
Watch a demo video to see an AI-powered HR assistant built with a custom DIAL node and n8n automation before you start.
Prerequisites
- Node.js 22.22.0+ installed locally, and npm, for building and testing the node.
- A DIAL API key for authentication.
- A running DIAL Core instance reachable from your n8n environment.
- n8n installed and set up, locally or in the cloud. See n8n's install options.
Build the DIAL custom node
n8n organizes workflows using nodes — building blocks that perform a specific action, such as calling an API, transforming data, or running a script. Built-in nodes do not cover DIAL, so you build a custom node that calls the Unified API.
Step 1: Plan the node
Design the DIAL custom node as follows:
- Type — action node.
- Building approach — programmatic style.
- UI components — credentials, operations, and fields.
- File structure — follow n8n's node file structure guidance.
Step 2: Build the node
Set up a development environment first, then build and test the node.
n8n's official @n8n/node-cli tool scaffolds, lints, builds, and locally test-runs community nodes.
-
Scaffold a new node project:
npm create @n8n/node@latestWhen prompted, name the project
n8n-nodes-dialand choose the programmatic template with basic type. This generates a working project with the following layout:n8n-nodes-dial/
├── nodes/
│ └── Example/
│ ├── Example.node.ts
│ ├── Example.node.json
│ ├── example.svg
│ └── example.dark.svg
├── package.json
└── tsconfig.json -
Rename the example node to
Dial:cd n8n-nodes-dial
mv nodes/Example nodes/Dial
mv nodes/Dial/Example.node.ts nodes/Dial/Dial.node.ts
mv nodes/Dial/Example.node.json nodes/Dial/Dial.node.json
mv nodes/Dial/example.svg nodes/Dial/dial.svg
mv nodes/Dial/example.dark.svg nodes/Dial/dial.dark.svg -
Create the credentials folder and file. CLI doesn't scaffold credentials for the programmatic template, so add it yourself:
mkdir credentialsCreate
credentials/DialApi.credentials.tswith the following code:import {
IAuthenticateGeneric,
ICredentialType,
INodeProperties,
} from 'n8n-workflow';
export class DialApi implements ICredentialType {
name = 'dialApi';
displayName = 'DIAL API';
documentationUrl = 'https://docs.dialx.ai/';
properties: INodeProperties[] = [
{
displayName: 'Base URL',
name: 'baseUrl',
type: 'string',
default: '',
required: true,
placeholder: 'https://your-dial-deployment.example.com',
description: 'The base URL of your DIAL Core deployment.',
},
{
displayName: 'API Key',
name: 'apiKey',
type: 'string',
default: '',
required: true,
typeOptions: {
password: true, // Mask the value for security
},
description: 'The API key for DIAL.',
},
];
authenticate: IAuthenticateGeneric = {
type: 'generic',
properties: {
headers: {
'Api-Key': '={{$credentials.apiKey}}',
},
},
};
} -
Replace the metadata file named
Dial.node.jsonin the/nodesdirectory with the following code:{
"node": "n8n-nodes-dial",
"nodeVersion": "1.0",
"codexVersion": "1.0",
"categories": ["Miscellaneous"],
"resources": {
"credentialDocumentation": [
{
"url": ""
}
],
"primaryDocumentation": [
{
"url": ""
}
]
}
} -
Replace the node file named
Dial.node.tsin the/nodesdirectory with the following code. Adjust the logic to fit your needs.import type {
IDataObject,
IExecuteFunctions,
IHttpRequestOptions,
INodeExecutionData,
INodeType,
INodeTypeDescription,
} from 'n8n-workflow';
import { NodeConnectionTypes, NodeOperationError } from 'n8n-workflow';
export class Dial implements INodeType {
description: INodeTypeDescription = {
displayName: 'DIAL API',
name: 'dialApi',
group: ['transform'],
version: 1,
description: 'Call DIAL for chat completions and text embeddings',
defaults: {
name: 'DIAL API',
},
icon: { light: 'file:dial.svg', dark: 'file:dial.dark.svg' },
inputs: [NodeConnectionTypes.Main],
outputs: [NodeConnectionTypes.Main],
usableAsTool: true,
credentials: [
{
name: 'dialApi',
required: true,
},
],
properties: [
{
displayName: 'Operation',
name: 'operation',
type: 'options',
options: [
{
name: 'Chat Completion',
value: 'chatCompletion',
description: 'Call the chat completion endpoint',
},
{
name: 'Text Embeddings',
value: 'textEmbedding',
description: 'Call the text embedding endpoint',
},
],
default: 'chatCompletion',
description: 'Choose the DIAL operation to perform',
},
{
displayName: 'Deployment Name',
name: 'deploymentName',
type: 'string',
default: 'gpt-4',
required: true,
description: 'The name of the DIAL model deployment to call, for example gpt-4 or text-embedding-ada-002',
},
{
displayName: 'API Version',
name: 'apiVersion',
type: 'string',
default: '2024-02-01',
required: true,
description: 'The DIAL/OpenAI API version to use',
},
{
displayName: 'User Input',
name: 'userInput',
type: 'string',
default: '',
required: true,
description: 'The text to send to the selected operation: the chat message for Chat Completion, or the text to embed for Text Embeddings',
},
],
};
async execute(this: IExecuteFunctions): Promise<INodeExecutionData[][]> {
const items = this.getInputData();
const returnData: INodeExecutionData[] = [];
for (let i = 0; i < items.length; i++) {
try {
const operation = this.getNodeParameter('operation', i) as string;
const deploymentName = this.getNodeParameter('deploymentName', i) as string;
const apiVersion = this.getNodeParameter('apiVersion', i) as string;
const userInput = this.getNodeParameter('userInput', i) as string;
const credentials = await this.getCredentials('dialApi');
const baseUrl = credentials.baseUrl as string;
let options: IHttpRequestOptions;
if (operation === 'chatCompletion') {
options = {
method: 'POST',
url: `${baseUrl}/openai/deployments/${deploymentName}/chat/completions`,
qs: { 'api-version': apiVersion },
body: {
messages: [{ role: 'user', content: userInput }],
},
json: true,
};
} else if (operation === 'textEmbedding') {
options = {
method: 'POST',
url: `${baseUrl}/openai/deployments/${deploymentName}/embeddings`,
qs: { 'api-version': apiVersion },
body: {
input: userInput,
},
json: true,
};
} else {
throw new NodeOperationError(this.getNode(), `Unsupported operation: ${operation}`, {
itemIndex: i,
});
}
// httpRequestWithAuthentication applies the credential's `authenticate` block above, so the Api-Key header is injected automatically.
const responseData = (await this.helpers.httpRequestWithAuthentication.call(
this,
'dialApi',
options,
)) as IDataObject;
const executionData = this.helpers.constructExecutionMetaData(
this.helpers.returnJsonArray(responseData),
{ itemData: { item: i } },
);
returnData.push(...executionData);
} catch (error) {
if (this.continueOnFail()) {
const executionData = this.helpers.constructExecutionMetaData(
this.helpers.returnJsonArray({ error: (error as Error).message }),
{ itemData: { item: i } },
);
returnData.push(...executionData);
continue;
}
throw error;
}
}
return [returnData];
}
} -
Update
package.json. Rename thenodesentry to match the renamed folder, add thecredentialsentry (the scaffold leaves this array empty), and fill indescription,author,repository, andhomepage:{
"name": "n8n-nodes-dial",
"version": "0.1.0",
"description": "DIAL integration",
"keywords": ["n8n-community-node-package"],
"license": "MIT",
"homepage": "https://dialx.ai/",
"author": {
"name": "<John Doe>",
"email": "<John_Doe@yourcompany.com>"
},
"repository": {
"type": "git",
"url": "https://github.com/<yourcompany>/n8n-nodes-dial.git"
},
"n8n": {
"n8nNodesApiVersion": 1,
"strict": true,
"credentials": ["dist/credentials/DialApi.credentials.js"],
"nodes": ["dist/nodes/Dial/Dial.node.js"]
}
}Leave
scriptsanddevDependenciesas generated by the CLI. -
(Optional) Replace
nodes/Dial/dial.svganddial.dark.svgwith your own icon. See n8n's icon reference. SVG is recommended. -
Test locally before deploying:
npm run devThis starts a disposable n8n instance at
http://localhost:5678with the node already linked, and rebuilds on file changes. Search for it by itsnameproperty (DIAL API), not the package name. -
Lint before you build or publish:
npm run lint
Step 3: Deploy the node
To install the node in your production n8n instance, follow n8n's install private nodes guide: run npm run build, then copy the compiled nodes and credentials folders from dist into that instance's ~/.n8n/custom/ directory (or bake them into your Docker image if you run n8n in a container).
Use the DIAL custom node in a workflow
With the node installed, add it to any workflow and chain it with other n8n nodes.
Step 1: Add the node to the canvas
- Log in to your n8n instance.
- Open the New Workflow page, or an existing workflow where you want to use the node.
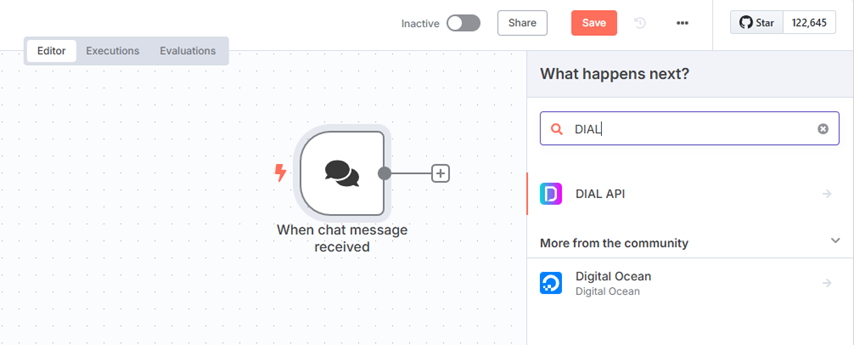
- Drag the DIAL custom node from the Nodes panel onto the canvas. Search for it by typing
DIAL APIin the search bar.
Step 2: Authenticate the node
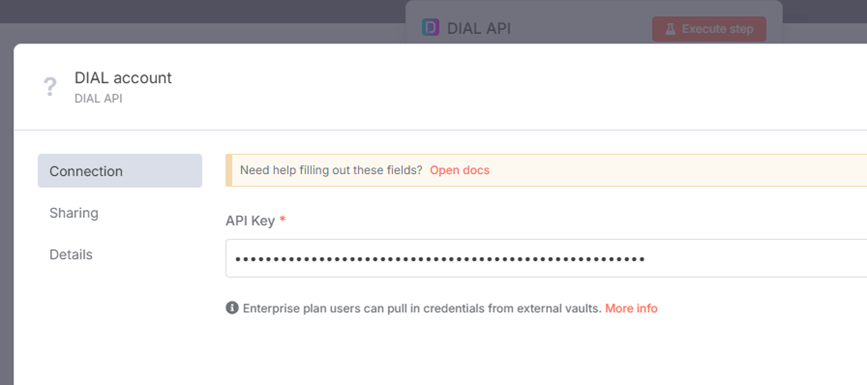
- Open the Credentials tab in the node configuration.
- Enter your DIAL deployment's base URL and API key in the credentials fields. If you saved these as a credential when you built the node, select it from the dropdown instead.
- Run the workflow to confirm authentication succeeds.
Step 3: Chain the node with others
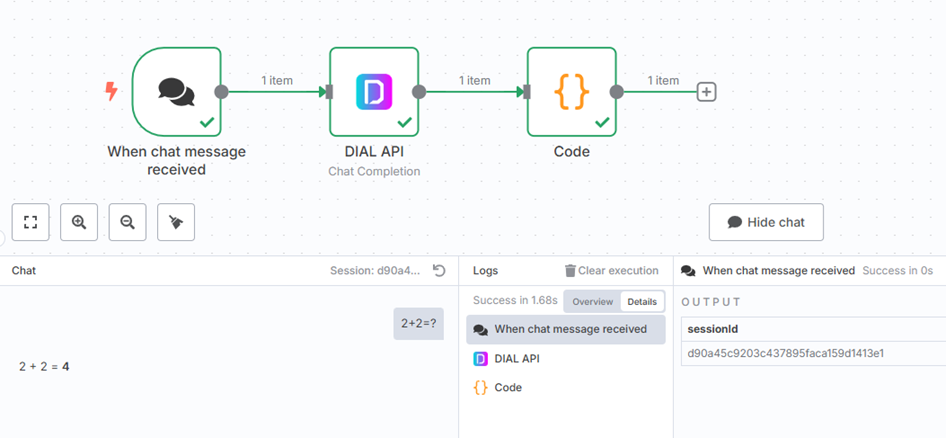
The DIAL custom node accepts input from and passes output to other n8n nodes, so you can compose it into larger automated processes. The example below shows a complete chat flow.
Example: a chat completion workflow
This example passes a user's message to DIAL and returns the model's response to the n8n chat.
-
Add an On chat message trigger node to capture user input.
-
Connect the trigger to the DIAL custom node and map the chat data to its input:
Operation: Chat Completion
Deployment Name: gpt-4
User Input: {{ $json.chatInput }}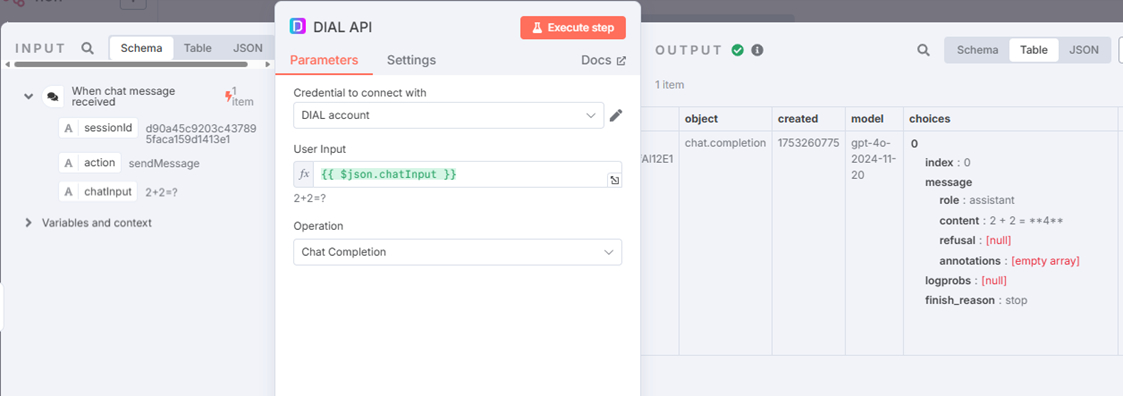
-
The n8n chat expects a specific JSON shape, so transform the DIAL response before returning it:
{ "output": "<response text>" }Add a Code node (Python) after the DIAL custom node to reshape the output:
return { 'output': _input.first().json['choices'][0]['message']['content'] }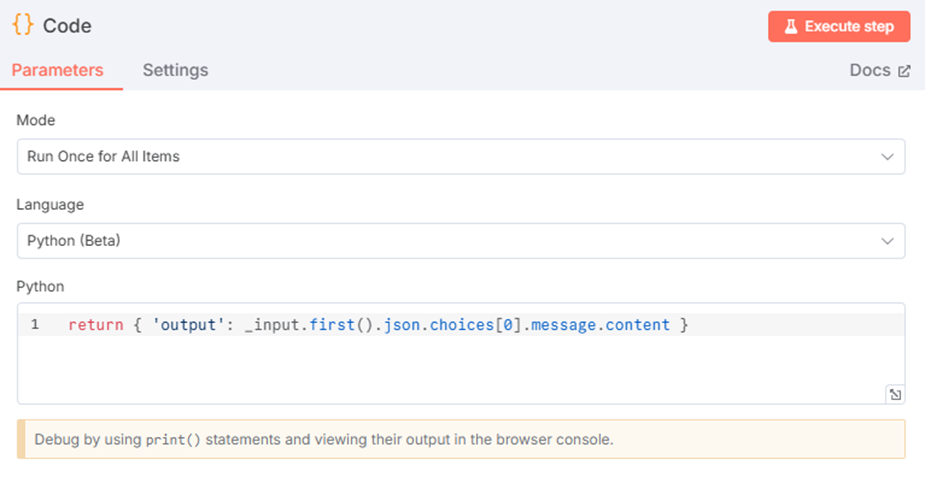
Further reading
- Integration with MS Excel — call DIAL from spreadsheet formulas
- Integration with MS Teams — bring DIAL into your messaging platform
- Integration demos — demos of DIAL in editors, productivity apps, and automation
- Embed AI in existing tools — reaching users inside Teams, Excel, and automation tools
- Unified API reference — the endpoints the custom node calls