Toolsets
Introduction
Toolsets in DIAL enable connectivity with MCP servers and can be used as tools by any internal or external application to perform specific actions. Refer to Video Demo to watch how tools are used in DIAL Quick Apps 2.0.
In DIAL, toolsets created by users (either using DIAL Core API or UI) are stored in a private folder of a dedicated user in the DIAL file storage and are not accessible to anyone but the toolset author (owner). To enable access for other users, toolsets owners can publish them or DIAL administrators can manually add them to the Public folder, where all published resources are stored.
Refer to Entities/Toolsets to learn more.
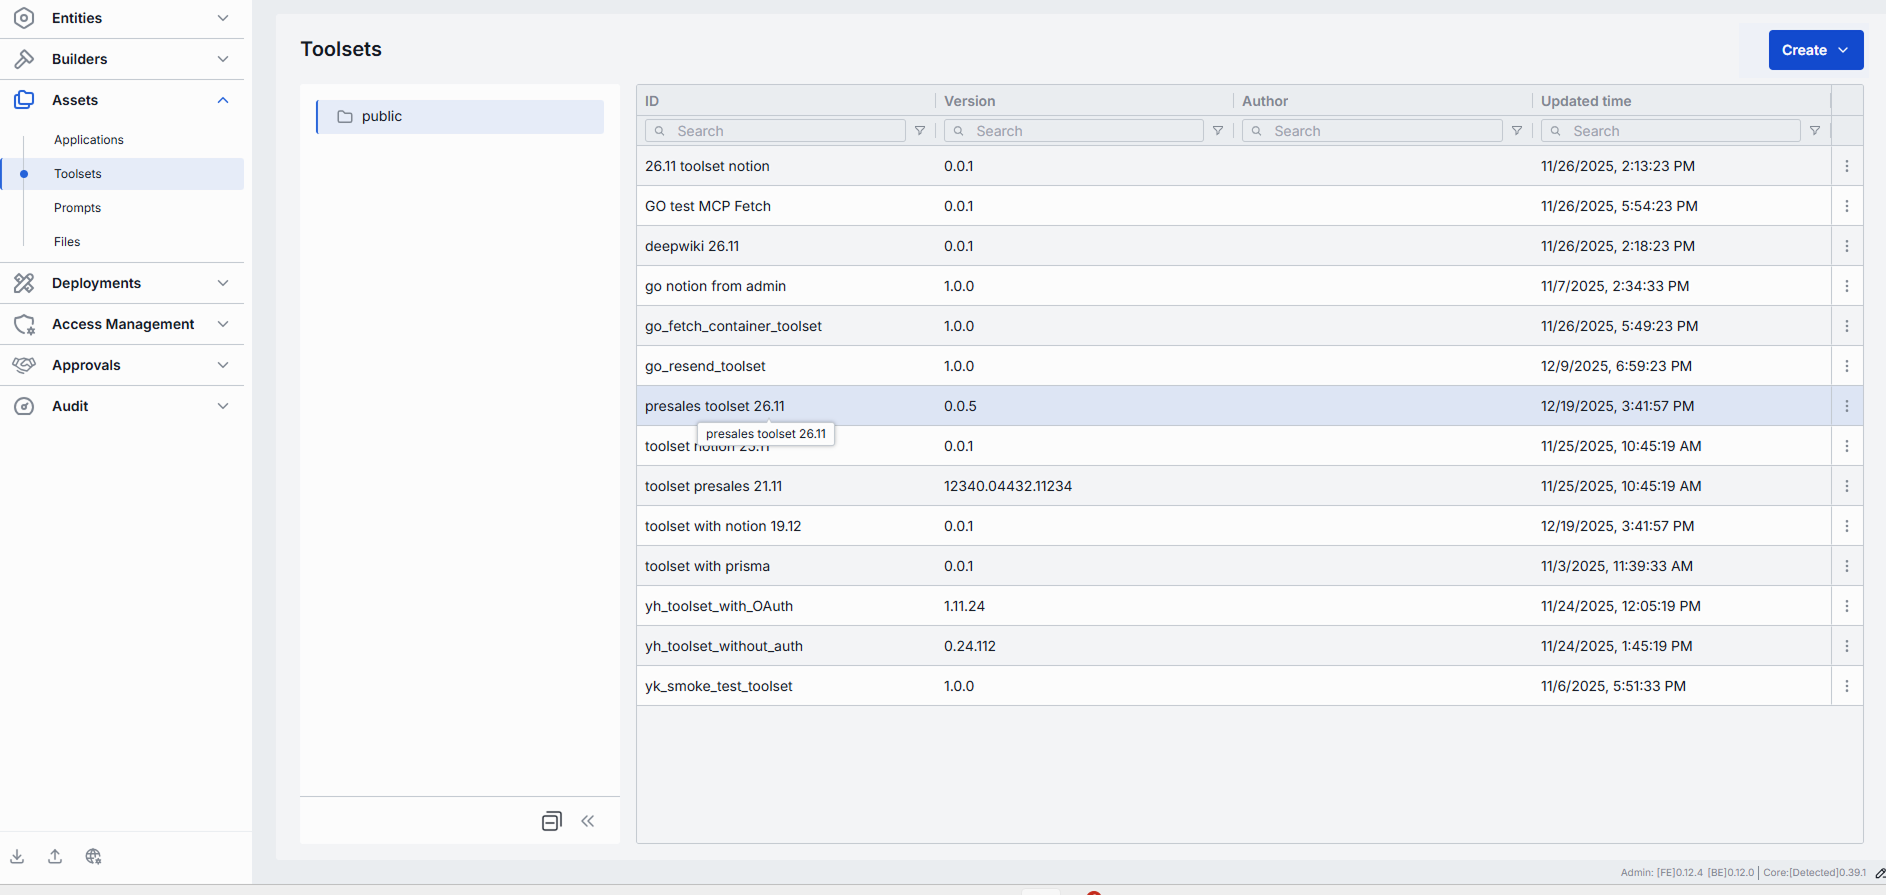
Main Screen
The main screen screen displays all toolsets located in the Public folder in DIAL file storage. Toolsets get to the Public folder when published by users or added by administrators.
Note: This screen, does not give access to private toolsets of users.
- Refer to Access Control to learn more about Private and Public logical spaces for objects storage in DIAL.
- Refer to Chat User Guide to learn how end users can publish toolsets and to DIAL Core API Publications to learn how to create and manage publication requests via API.
Folders
Objects in the Public folder are arranged hierarchically, similar to a file system.
- Root folder: Public is a root folder with sub-folders. It is visible to all authorized users. If a sub-folder is not specified for the new object being published, it is placed in the root folder by default.
- Sub-folders: Objects can be placed in sub-folders for logical organization purposes - one object per sub-folder is recommended.
Note, that access rules can be applied to sub-folders (manually or in publication request). You can view and manage access rules in Folders Storage. The effective authorization rule for an object in a sub-folder includes restrictions applied to all parent sub-folders up to the root folder. Refer to Tutorials to learn about affective rules for folders.
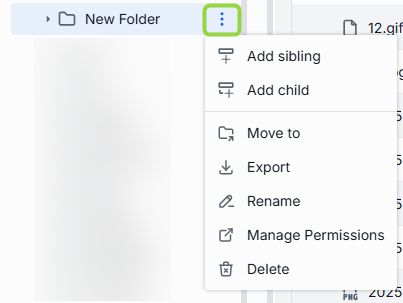
Actions
Hover over any folder in the right or left panel to display the actions menu.
| Available Actions | Description |
|---|---|
| Add sibling | Use to add new sibling sub-folders that share the same parent folder as the selected folder. |
| Add child | Use to add new child sub-folders located within the selected folder. |
| Move to | Use to select a target location in the hierarchy to move the selected folder. |
| Export | Use to download the content of the selected folder with objects inside it as a ZIP archive or raw JSON file. |
| Rename | Use to rename the selected folder. |
| Manage permissions | Redirects to Folder Storage to manage access to the folder. |
| Delete | Use to delete the folder with objects inside it. |
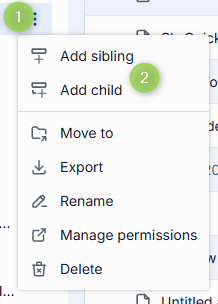
Add Folders
Toolsets can be placed in sub-folders.
In the actions menu of each existing folder, select Add sibling or Add child to create new sub-folders.
Note: The name of the folder must not exceed 160 characters.
You can also navigate to a specific folder and use the Create dropdown in the toolbar to add sub-folders.

Toolsets
Click any folder to display its content in the toolsets grid.
| Column | Description |
|---|---|
| ID | Toolset's unique identified. |
| Version | Version of the toolset. |
| Author | Username or system ID associated with the user who created or last updated this toolset. |
| Updated Time | Timestamp of the last update. |
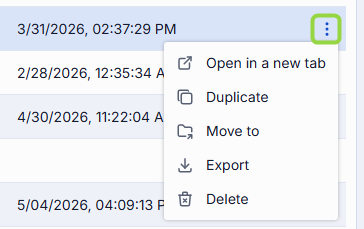
| Actions | Actions you can perform on the selected toolsets: Open in a new tab: Opens the toolset's properties, features, and parameters in a new tab. Duplicate: Creates a copy of the toolset. Refer to Duplicate to learn more. Move to: Select a target folder in the hierarchy to move the toolset. Export: Use to download the selected toolset. Refer to Export to learn more. Delete: Remove the toolset. Refer to Delete to learn more. |
Export
You can export individual toolsets or folders with toolsets (including nested folders). Assets can be exported as ZIP archive or raw JSON files.
- To export a folder, click Export in the actions menu of a specific folder to export its content.
- To export a specific toolset, select it and click Export in its actions menu.
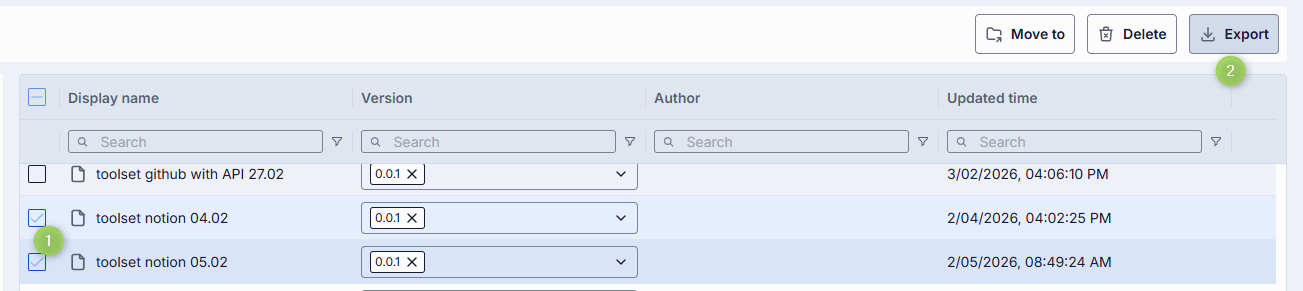
- To export several toolsets (or their specific versions), select them and click Export in the top toolbar.
Import
You can upload ZIP archives or raw JSON files of toolsets. This is essential for migrating, restoring, or sharing toolsets assets between DIAL users.
To import toolsets:
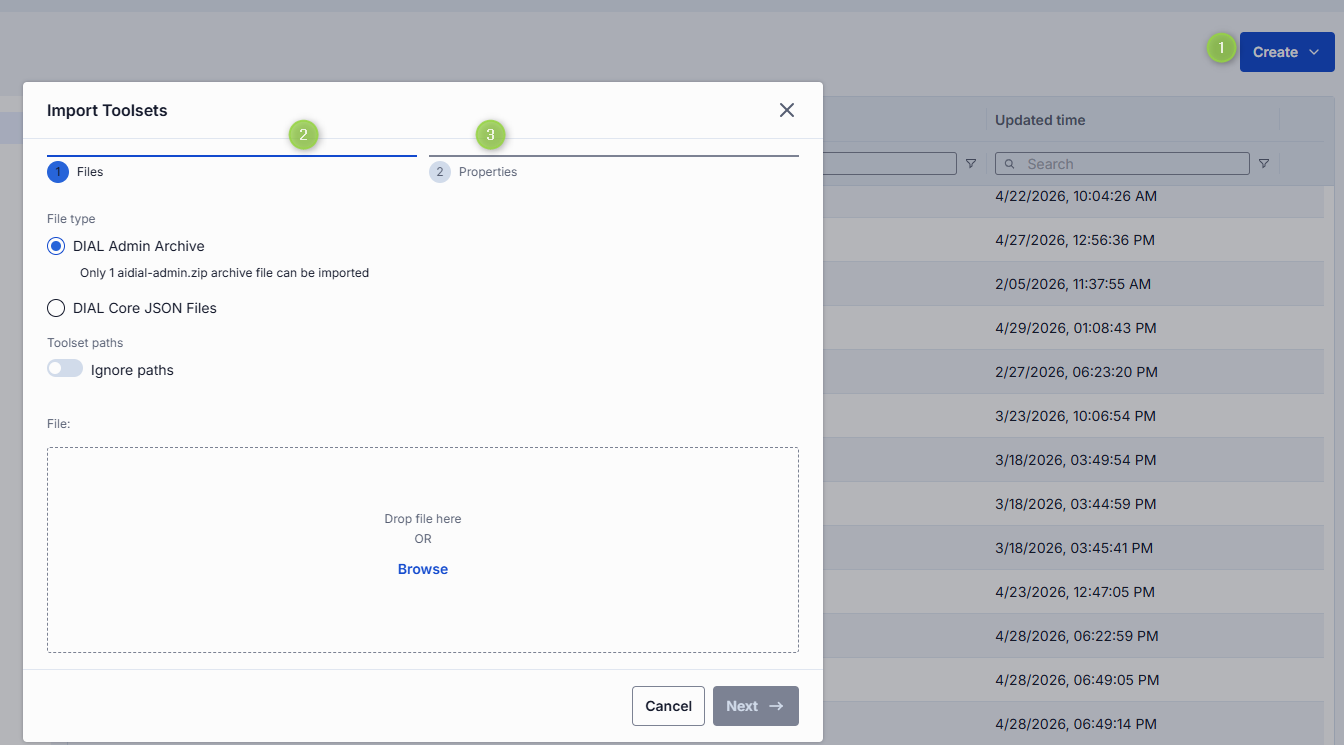
- Click Create in the toolbar and select Import.
- Select the type of files you want to import. Drag & Drop your ZIP archive or JSON files into the files area or click Browse to open a file picker.
- Archive: Select if you want to import a single ZIP or tarball containing multiple JSON files. Note: Only 1 archive can be imported at a time.
- JSON: Select if you want to import JSON files. Note: Up to 30 files can be imported at once.
- Select a Conflict resolution Strategy. It allows you to decide how to handle existing toolsets with the same name and version in your workspace:
- Skip: Leave existing toolsets untouched, only new ones will be added.
- Override: Replace toolsets with the same name and version with the imported ones.
- Edit manually: Resolve conflicts manually one by one.
- Use Ignore paths toggle to skip folder structure from the imported files. When enabled, all apps will be imported directly into the root folder without recreating the original folder hierarchy.
- Click Finish to start.
Create
On the main screen you can add new toolsets to the public folder.
Tip: You can quickly add new toolsets by duplicating existing ones. Use the Duplicate action in the toolset's context menu.
Follow these steps to add a new toolset:
-
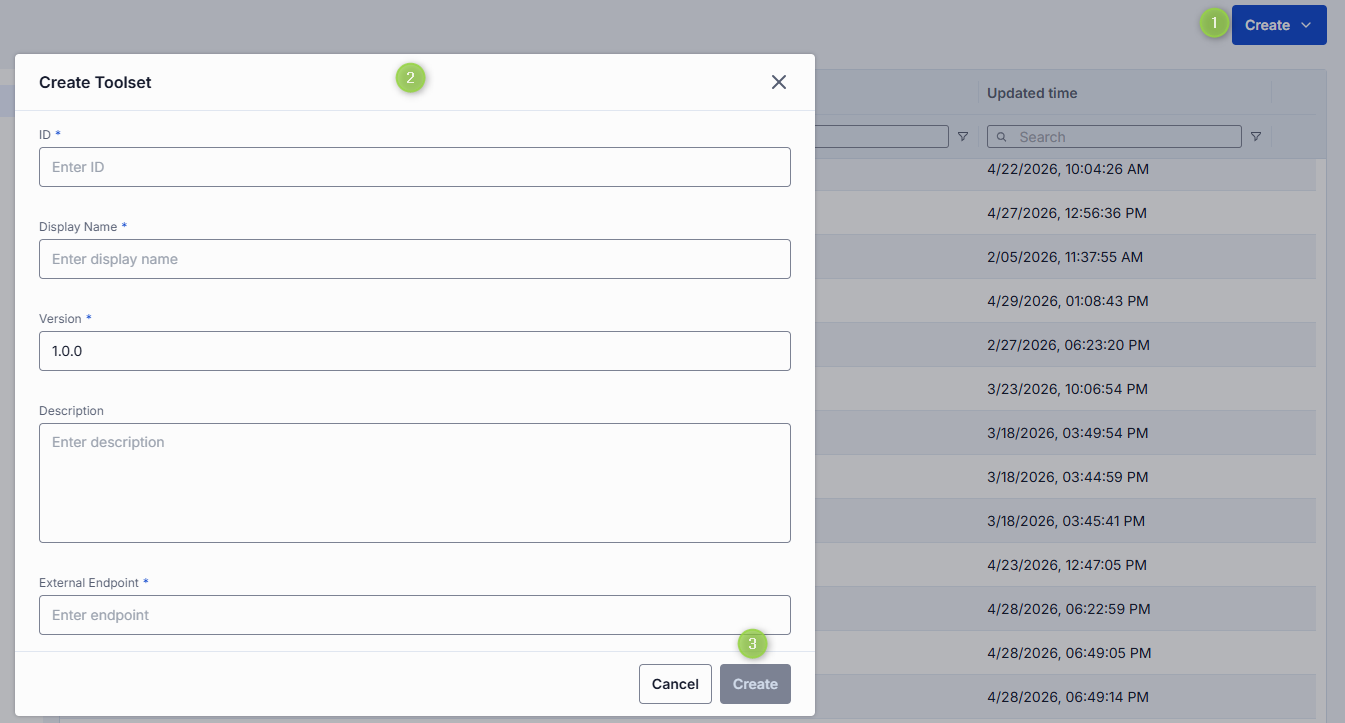
Select a folder where you want to add a new toolset, click Create in the header's toolbar and select Toolset to invoke the Create Toolset modal.
Field Required Description ID Yes Unique identifier of the toolset. Display Name Yes Name of the toolset displayed on UI. Version Yes Semantic identifier (e.g., 1.2.0) of a toolset's version. Description No Description of a toolset. External Endpoint Yes Endpoint DIAL Core will use to communicate with the related MCP server. -
Once all required fields are filled click Create. The dialog closes and the new toolset configuration screen is opened. This entry will appear immediately in the listing under the selected folder once created.
Duplicate
You can duplicate an existing toolset to create a copy of it.
Note: When duplicating a toolset that requires authentication, you will be prompted to enter authentication credentials that will apply to a duplicate for security purposes.
To create a duplicate of a toolset:
- Click Duplicate in the actions menu of a toolset on the main screen.
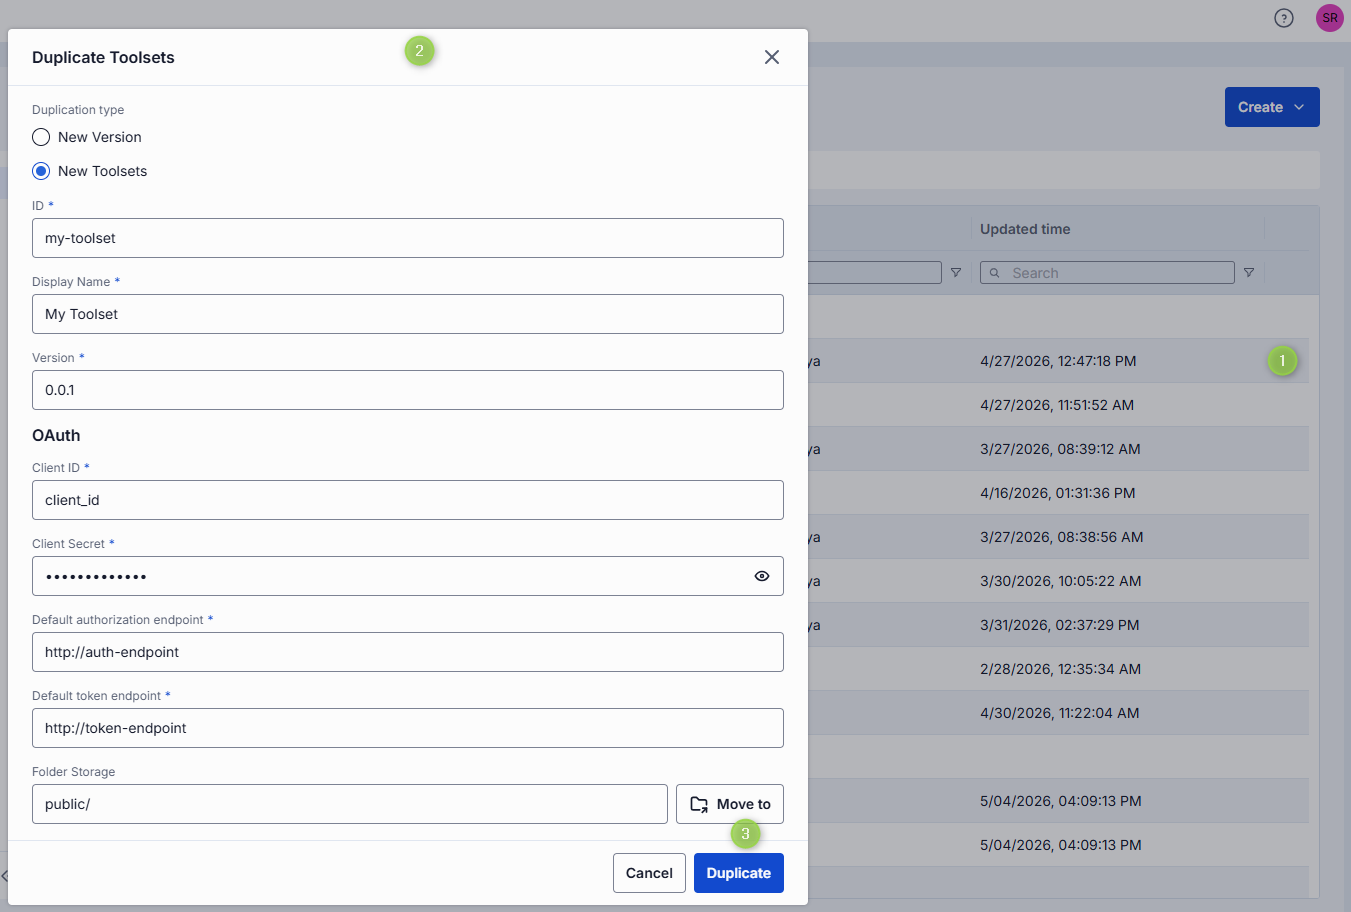
- In the Duplicate Toolsets window:
- Select Duplicate type: New version: Creates another version of the selected toolset. You can also quickly add a new version on the Configuration screen by clicking Create in the Version dropdown. New toolsets: Clones the selected toolset as a new entity.
- Enter Display Name, Version and ID (disabled for New Version duplication type) for the new toolset.
- Enter OAuth credentials that will apply for the duplicate.
- Select Folder Storage where the new toolset will be stored (disabled for New Version duplication type).
- Click Duplicate to complete the procedure.
Delete
There are several ways to delete a toolset or a specific version of it:
- Click Delete in the toolbar on the Configuration screen to permanently remove the selected toolset from your DIAL instance.
- Use the Delete option in the toolset context menu.
- Delete the related folder where the toolset is located.
- Use Bulk Actions on the main screen to delete more than one toolset.

Configuration
Click any toolset on the main screen to open a screen with information about the selected toolset and its configuration details.
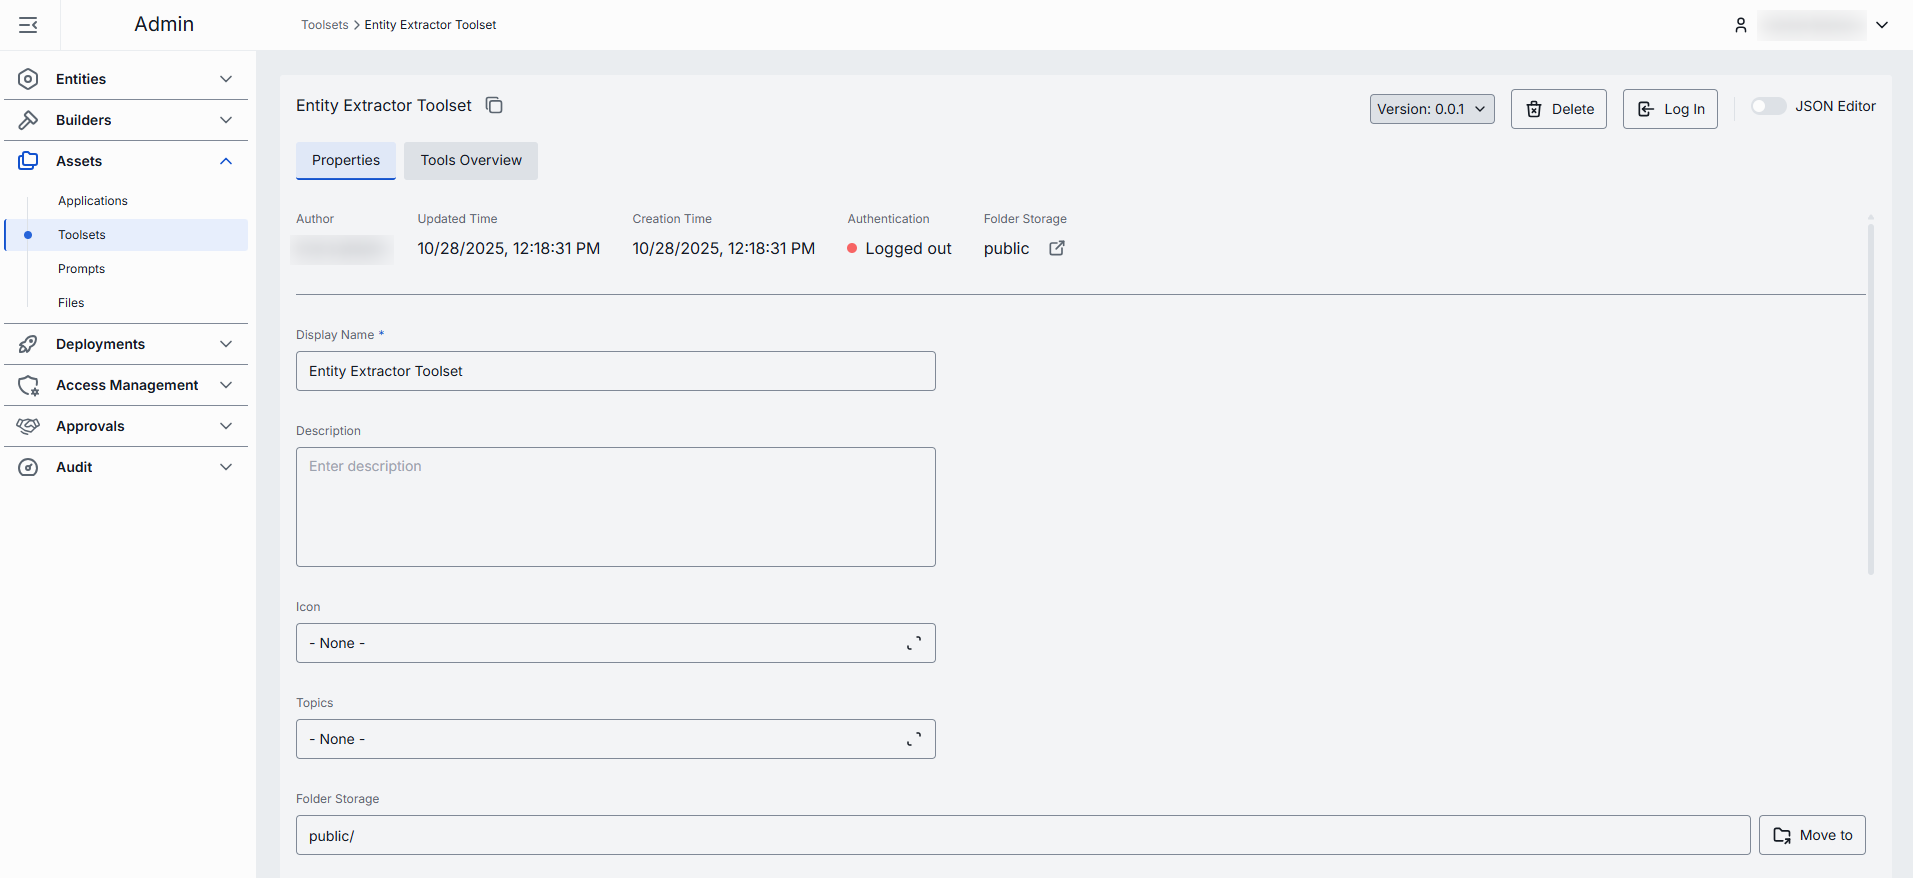
Properties
In the Properties tab, you can preview and modify selected toolset's basic properties.
Available actions
You can find the following action buttons in the configuration screen header:
| Action | Description |
|---|---|
| Version | Version of the toolset. Can be selected from the dropdown to display properties for different versions of toolset. In the dropdown, click Create to add a new version of the toolset. |
| Delete | Use to delete the selected toolset. |
Fields description
| Field | Required | Editable | Description |
|---|---|---|---|
| ID | - | No | Unique identifier of the toolset. It is read-only but includes a copy-to-clipboard button for easy reference. |
| Author | - | No | User who created toolset. |
| Updated Time | - | No | Timestamp of the last update. |
| Creation Time | - | No | Creation timestamp. |
| Authentication | - | No | Current authentication status of the selected toolset: - Logged out: The toolset is not authenticated with the related MCP server. - Logged in (Personal): The toolset is authenticated with your personal credentials only. - Logged in (Organization): The toolset is authenticated with organization credentials only. - Logged in: The toolset is authenticated at both personal and organization levels. |
| Folder Storage | - | No | Path to the toolset's location in the hierarchy within the public folder. Click to navigate to Folders Storage. |
| Display Name | Yes | Yes | The name of the toolset displayed on UI. |
| Description | No | Yes | Toolset description. |
| Icon | No | Yes | Logo of the toolset displayed on UI. Maximum size: 512 MB. Supported types: .jpeg, .jpg, .jpe, .png, .gif, .apng, .webp, .avif, .svg, .svgz, .bmp, .ico. |
| Topics | No | Yes | Topics are semantic labels that you can assign to toolsets (e.g. "finance", "support") for better navigation on UI. Click to display a list of available topics. You can add your own custom topics to the list following these rules: - The topic name must not exceed 255 characters. - The topic name must not contain leading or trailing spaces. |
| Storage folder | Yes | Yes | Path to the toolset's location in the hierarchy of the Public folders. Use Move to to change the application's location. |
| External Endpoint | Yes | Yes | Endpoint DIAL Core will use to communicate with the related MCP server. |
| Transport | Yes | Yes | Transport supported by MCP server. - HTTP (default) - SSE (deprecated) |
| Authentication | Yes | Yes | Authentication settings for the toolset. |
| Forward per request key | Yes | Yes | Set this flag to true if you want a per-request key to be forwarded to the toolset endpoint allowing a toolset to access files in the DIAL storage. Note: it is not allowed to create toolsets with authType.API_KEY and forwardPerRequestKey=true. |
| Max retry attempts | Yes | Yes | Number of times DIAL Core will retry a failed call (due to timeouts or 5xx errors). |
Authentication
If the toolset you have chosen requires authentication at the related MCP server, you will have to sign in before you can use it. For example, if you are using an application that relies on the MCP toolset and authentication is required, you will not be able to access it unless you are logged in. Therefore, make sure you are authenticated with MCP server you are about to use.
Note: A toolset can be published with organization credentials by other users. In this case, it can already have the state Logged in (Organization). You can additionally authenticate with your personal credentials and use both levels at the same time. When both levels are active, authentication status is displayed as Logged in.
Refer to DIAL Core to learn more about toolset authentication
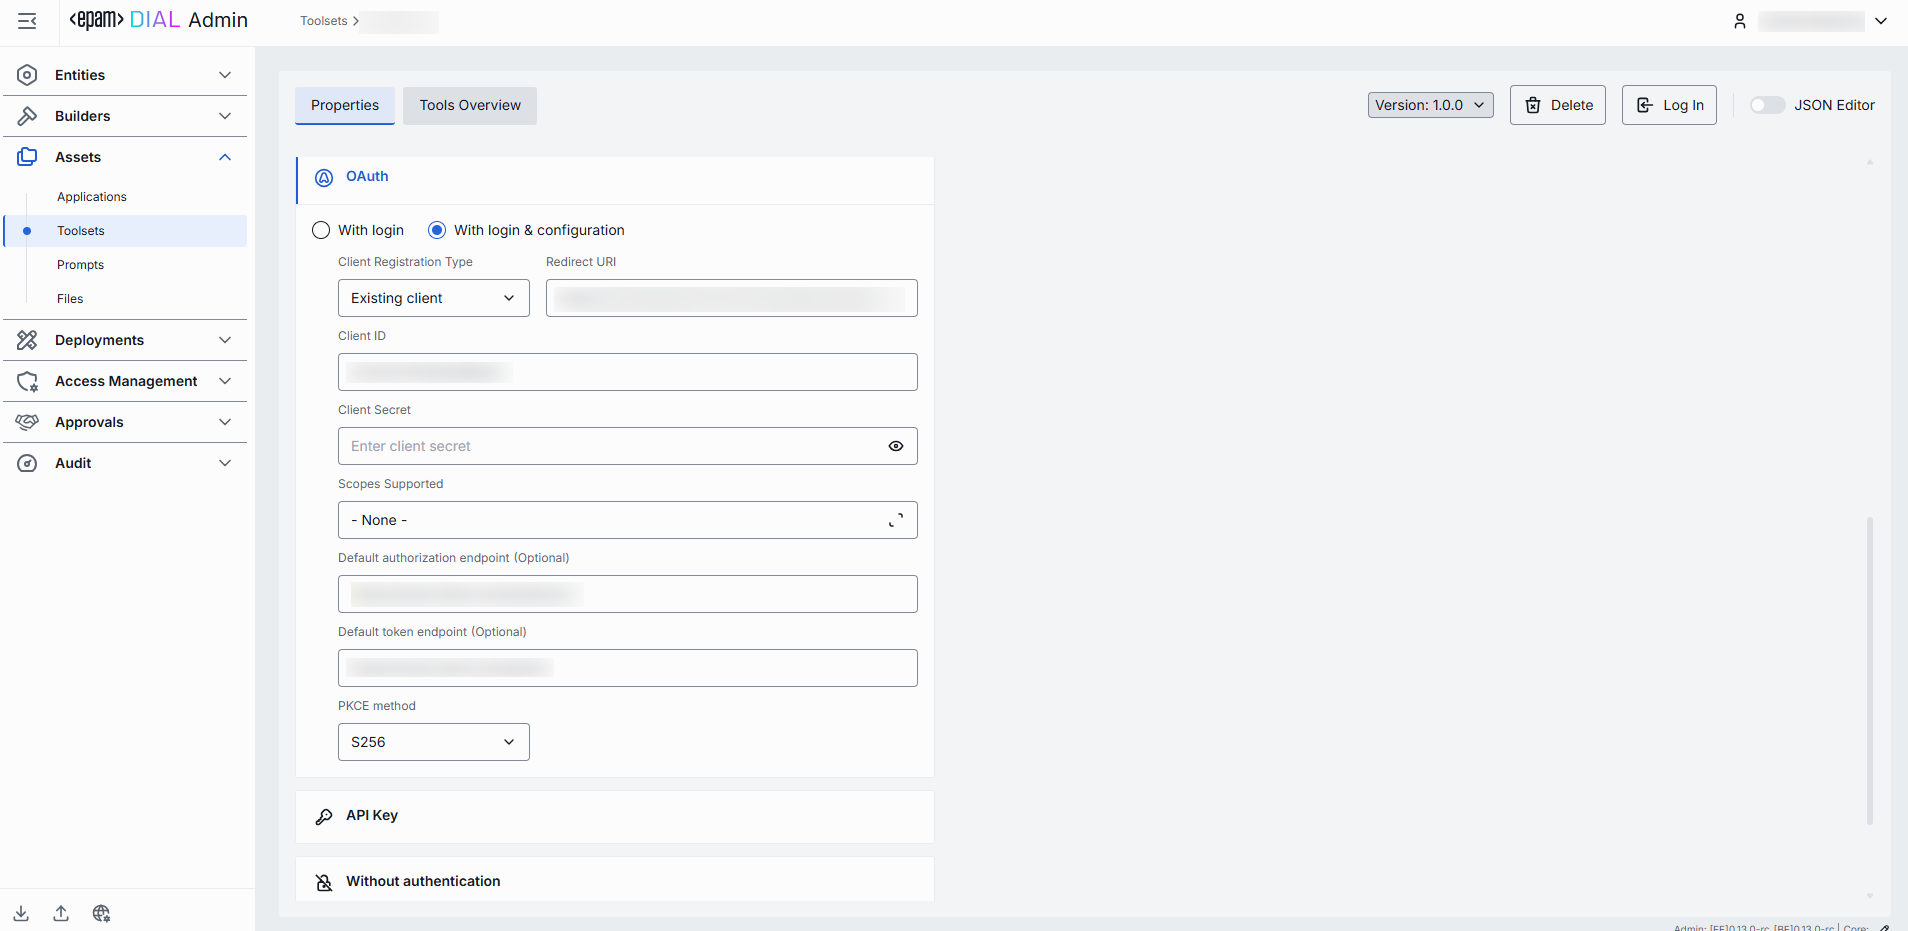
Step 1: Select and configure the authentication method
DIAL supports several authentication methods for toolsets:
- OAuth: Authenticate via OAuth 2.0 with an external identity provider. If this option is selected, you have to choose With login for a dynamic registration of clients or With login & configuration for a static registration of clients - depending on what method your MCP server supports. For a dynamic option, it is enough to provide an External Endpoint in the toolset properties. For a static, populate the authentication form with correct values provided by the identity provider:
- Redirect URI: Redirect URI used during sign in flows. After authentication, the MCP Server redirects the User to the provided URI.
- Client ID: Unique identifier of the client/application requesting access to the resource.
- Client Secret: Confidential key used by a client to authenticate itself with the authentication server.
- Scopes Supported: List of supported scopes that define access levels. May be discovered via .well-known endpoints.
- Default authorization endpoint: URL for performing authorization. Can be discovered via .well-known metadata if provided by the Authorization Server.
- Default token endpoint: URL where a client exchanges authorization code for an access token. Can be discovered via .well-known metadata if provided by the Authorization Server.
- PKCE method: Proof Key method for Code Exchange (PKCE), usually
plainorS256.
- API Key: Authenticate using API key. If this option is selected, provide API key and header name in the configuration.
- Without authentication: No authentication is required.
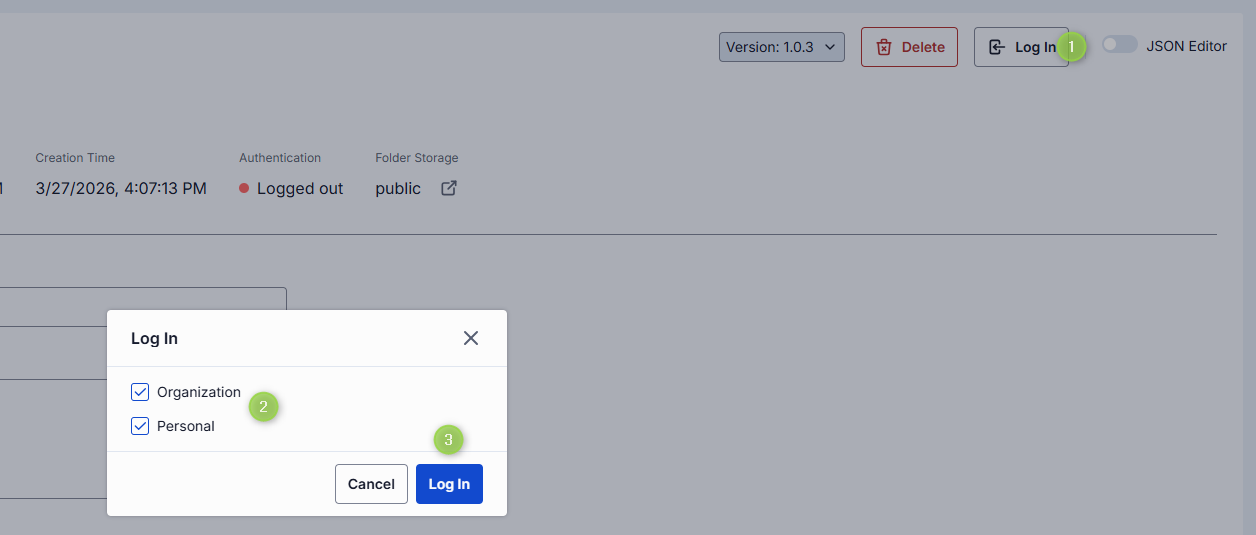
Step 2: Choose authentication level(s)
Having selected and configured any authentication method, click Save and Log In to authenticate a toolset with the related MCP server. At this step, choose the level you want to authenticate:
- Personal: the toolset is authenticated for your user only with the state Logged in (Personal).
- Organization: the toolset is authenticated for all users in your organization with the state Logged in (Organization).
- Both: You can keep both personal and organization authentication active for the same toolset. In this case, authentication status is displayed as Logged in. When you use Log out, you can also choose the level to sign out from (Personal, Organization, or both).
Tip: At this step, for authentication with API keys, you will be prompted to provide a valid API key value.
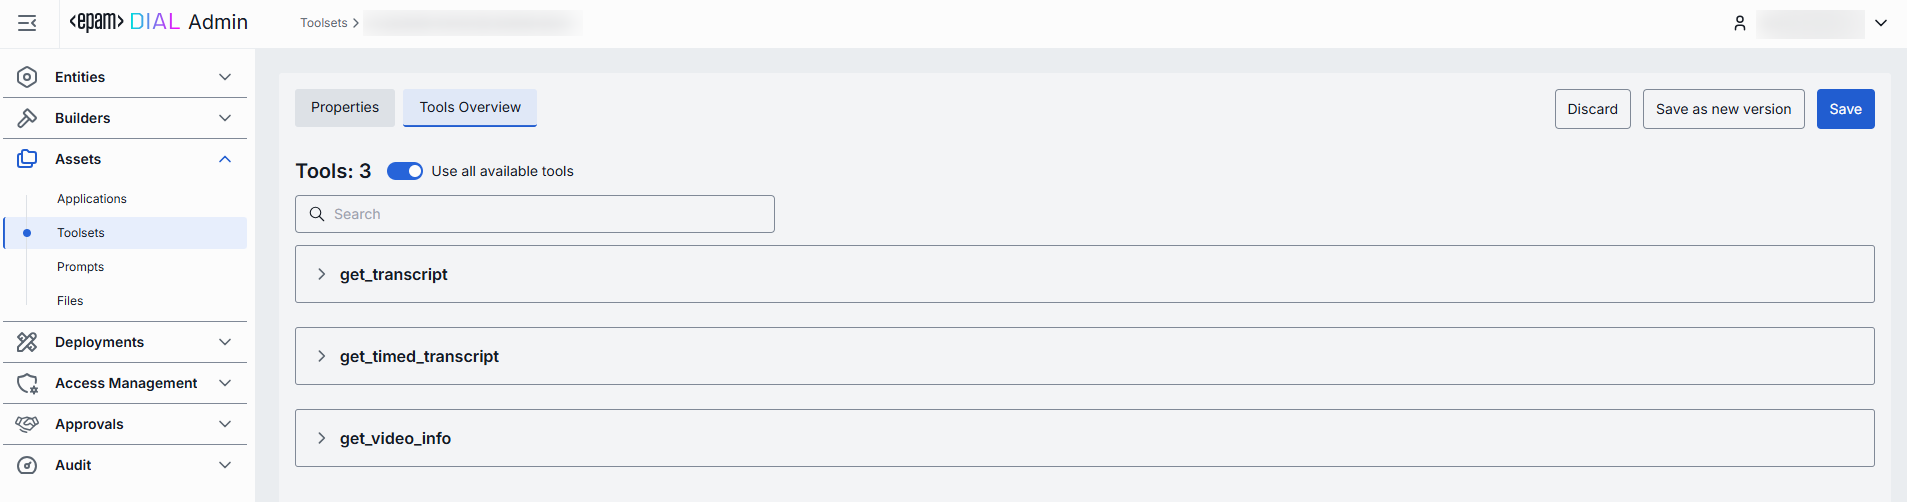
Tools Overview
Tools are functions supported by an MCP server that can be used by clients to perform specific actions. On this screen, you can find and manage all tools supported by the related MCP server.
In case your toolset was created based on the MCP container deployed in DIAL, the content of this screen is inherited from the related MCP container and displays all the enabled tools. Click Manage tools to access, try and enable all the available tools.
Use all tools
Enable Use all available tools toggle to automatically include all tools supported by the related MCP server. When enabled, you cannot add or remove tools manually.
Click on any tool to preview its details or try it out.
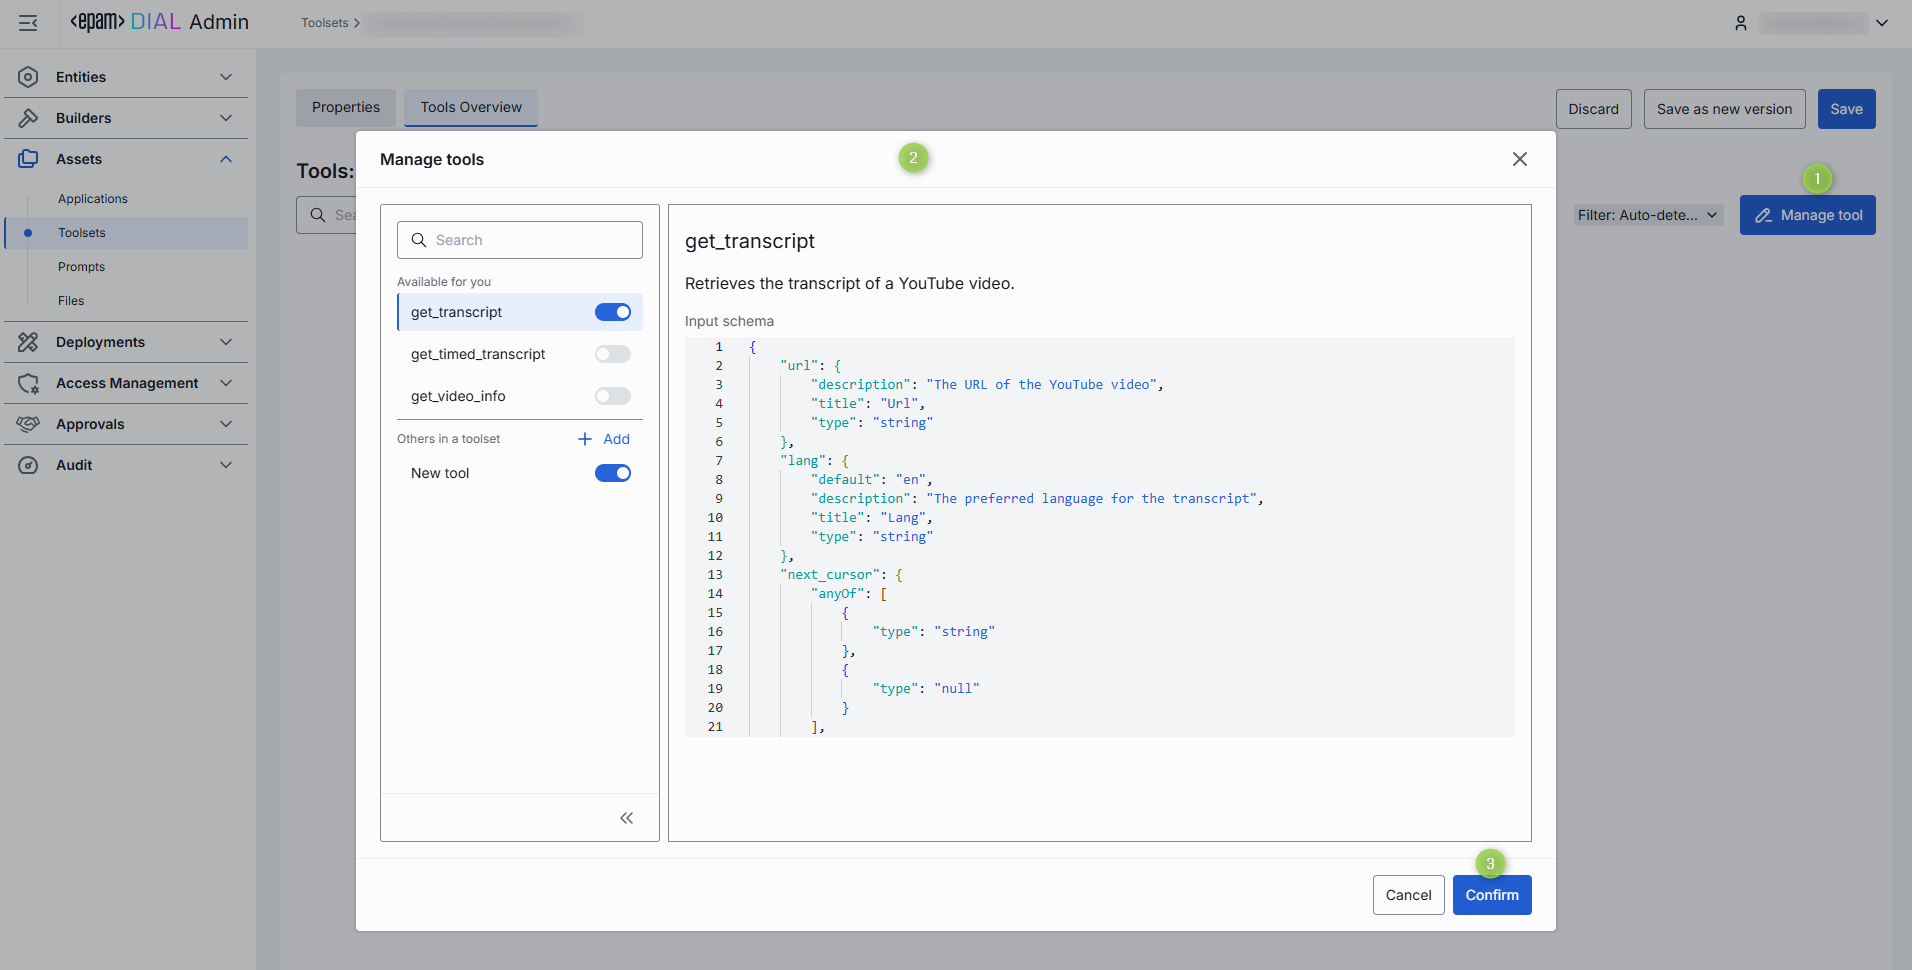
Manage tools
Disable Use all available tools toggle to enable a manual tools management mode.

- Disable Use all available tools toggle and click Manage tool button to open the Manage tools modal.
- The modal displays all tools available to your user. You can preview and enable/disable each tool individually.
- MCP sever can support other tools that are not available to your user and therefore are not rendered in the list of available tools. If you know their names, you can manually add them. Manually-added tools are labeled accordingly on the Tools Overview screen.
- Click Confirm to apply changes.
- On the Tools overview screen, use the filter to see all tools, just auto-detected tools or manually added tools.
- Hover over any tool to see its details or try it out.
Try tools
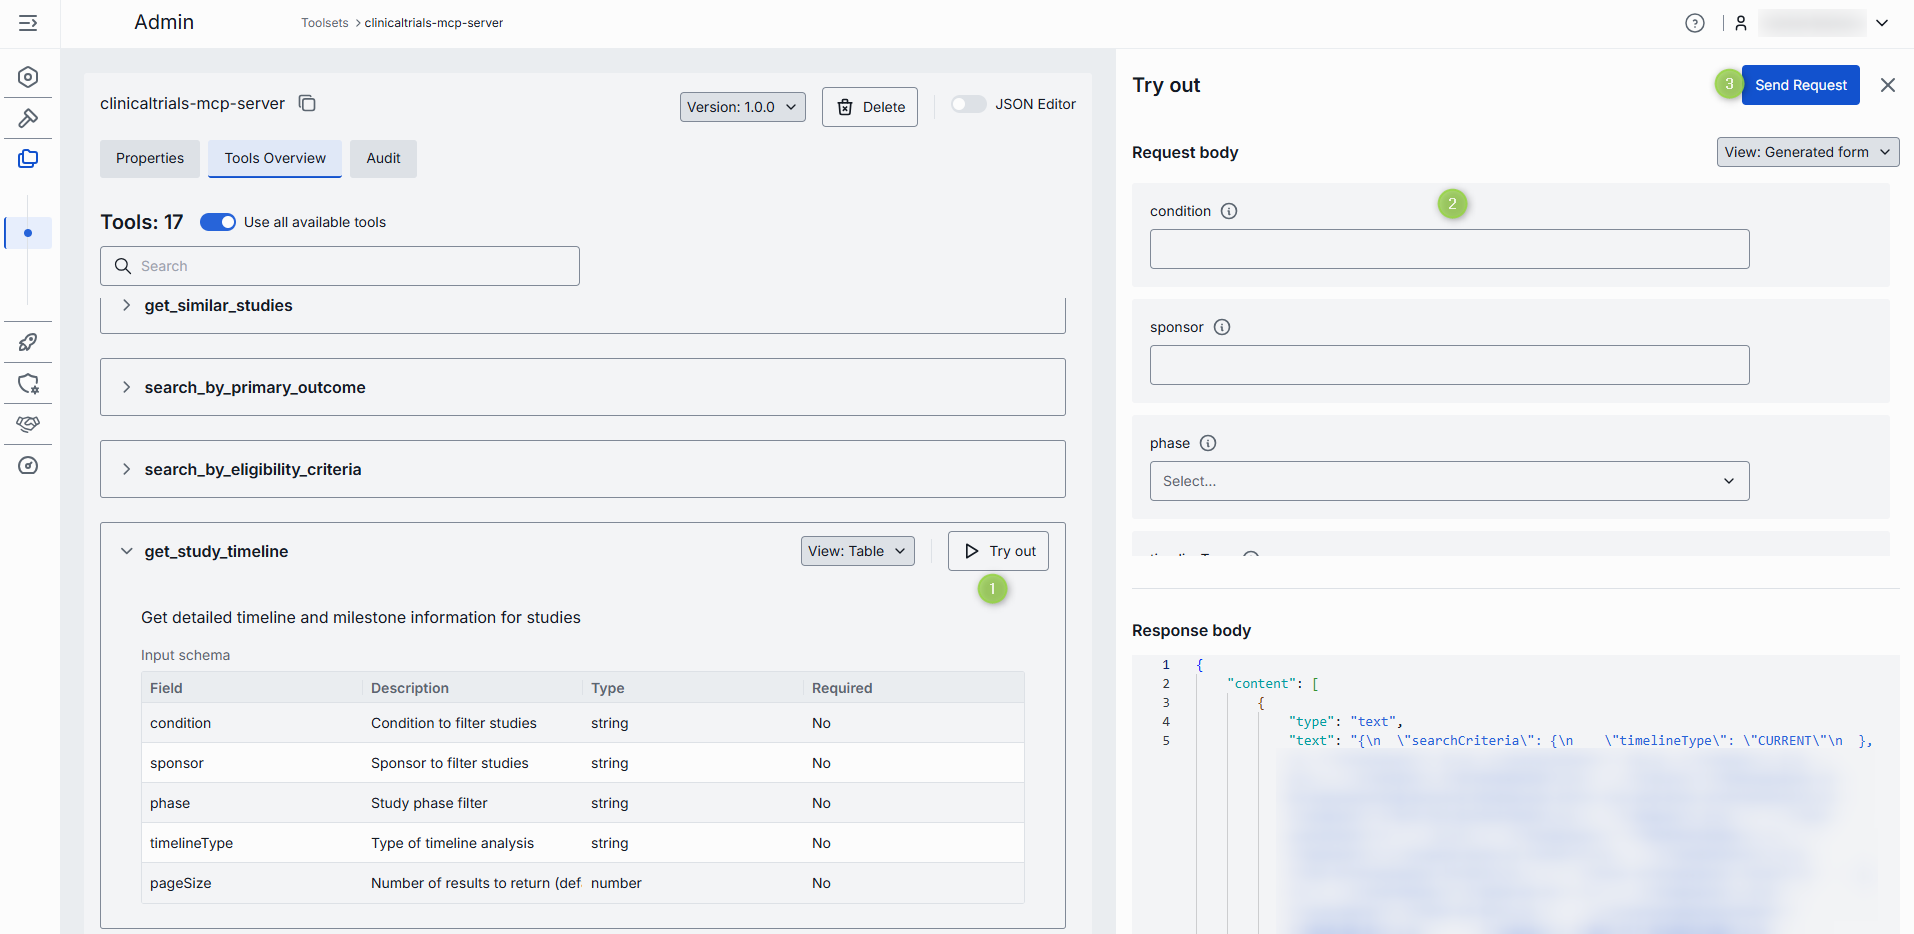
Click or hover over any enabled tool and click Try out to enter the Try out mode.
In the Try out mode, you can test each enabled tool by sending a request to the server. When sending a request, you can use the rendered UI form or a raw JSON mode to populate the request input fields.
To try tool
- Click any available tool to access its description and input schema parameters. You can display input schema in both table and JSON view modes.
- Click Try out to open a side bar for sending requests.
- Populate the Request body. You can display request body in both table and JSON view modes.
- Click Send Request to send the request. The response from the server will be displayed in the Response body area.
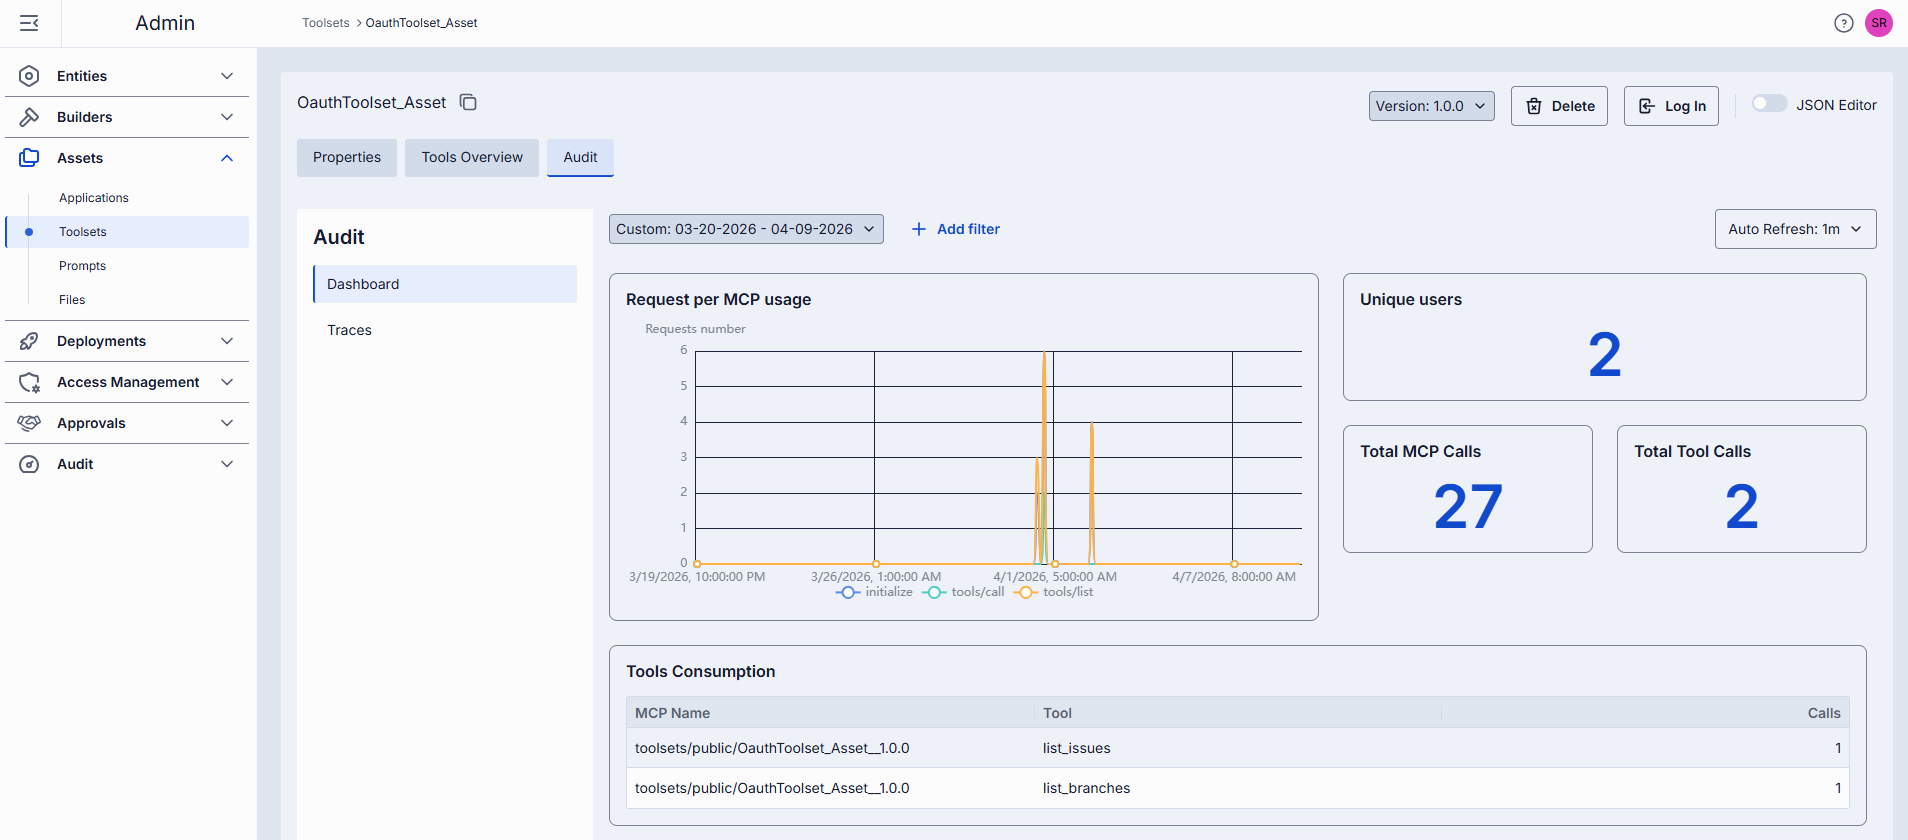
Audit
The Audit section enables administrators to monitor usage and consumption metrics for the selected toolset.
TIP: This section mimics the functionality available in the global Dashboard section, but is scoped specifically to the selected toolset.
JSON Editor
Advanced users with technical expertise can work with the toolset properties in a JSON editor view mode.
Use the JSON Editor toggle to switch between the form-based UI and raw JSON view of the toolset’s configuration. It is useful for advanced scenarios of bulk updates, copy/paste between environments, or tweaking settings not exposed on UI.
TIP: You can switch between UI and JSON only if there are no unsaved changes.
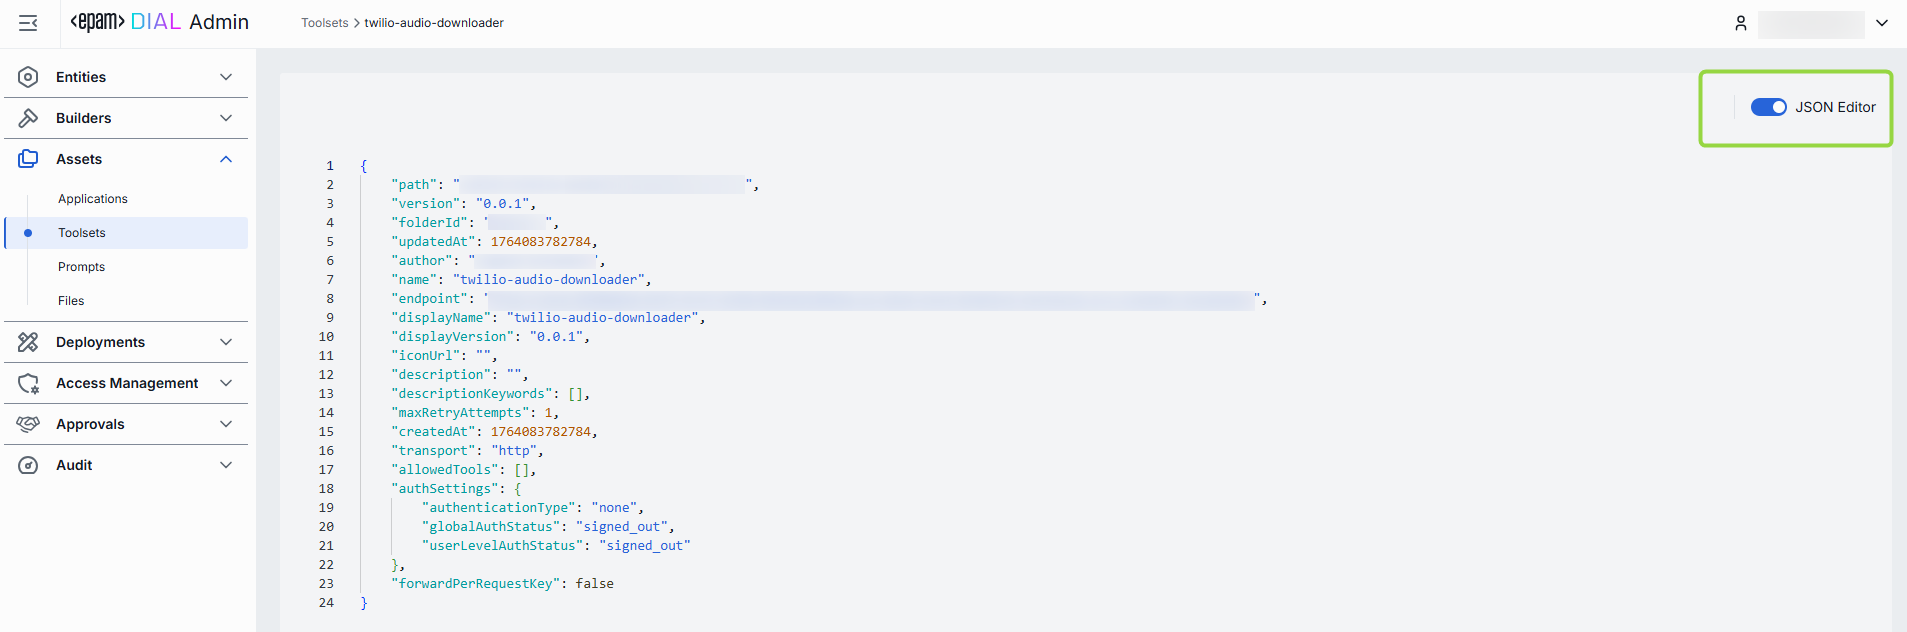
Switching to the JSON Editor
- Navigate to Assets → Toolsets, then select the toolset you want to edit.
- Click the JSON Editor toggle (top-right). The UI reveals the raw JSON.